Thank you for purchasing the Minolta 3D 1500. Please take the time to read through this instruction manual so you can enjoy all its features. For information on installing and operating the included application software, please read the software instruction manual saved in the CD-ROM as a pdf file. This manual contains information regarding products introduced before Sep., 1999.
FOR PROPER AND SAFE USE Read and understand all warnings and cautions before using this product. WARNING Batteries may become hot or explode due to improper use. • Use only the batteries specified in this instruction manual. • Do not install the batteries with the polarity (+/-) reversed. • Do not subject batteries to fire or high temperatures. • Do not attempt to recharge, short, or disassemble. • Do not mix batteries of different types, brands, or ages.
TABLE OF CONTENTS TABLE OF CONTENTS FOR PROPER AND SAFE USE ......................................................................2 BEFORE YOU BEGIN......................................................................................3 TABLE OF CONTENTS ...................................................................................4 NAMES OF PARTS ..........................................................................................6 MATERIALS COVERED IN THIS MANUAL ...............................
NAMES OF PARTS NAMES OF PARTS Refer to the Dimâge EX Camera Instruction Manual for more details.
MATERIALS COVERED IN THIS MANUAL This manual covers only the procedures for using the Minolta 3D 1500 to take pictures which will be served as the source for generating 3D images. For the basic functions and operating procedures of the Minolta 3D 1500 camera, refer to the Camera Instruction Manual for Dimâge EX. You can use your Minolta 3D 1500 as an ordinary Dimâge EX (Version 2) camera (non-3D camera) by attaching an optional Zoom 1500 or Wide 1500 lens unit in place of the MetaFlash unit.
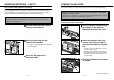
INSERTING BATTERIES [Camera Body] The Minolta 3D 1500 uses a total of 8 AA-sized alkaline batteries, 4 batteries for the camera body and 4 batteries for the MetaFlash unit. • You may also use AA-sized Ni-Cd or Ni-MH batteries. • When using Ni-Cd or Ni-MH batteries, fully recharge them with a vendor-endorsed battery charger. (When replacing the batteries), press the main switch to turn the camera off and remove the camera bracket (see Page 21).
INSERTING BATTERIES [MetaFlash] The Minolta 3D 1500 uses a total of 8 AA-sized alkaline batteries, 4 batteries for the camera body and 4 batteries for the MetaFlash unit. • You may also use AA-sized Ni-Cd or Ni-MH batteries. • When using Ni-Cd or Ni-MH batteries, fully recharge them with a vendor-endorsed battery charger. (When replacing the batteries), press the main switch to turn the camera off, turn the MetaFlash off, and remove the camera bracket (see Page 21).
INSERTING BATTERIES - CONT’D Low Battery Indicator [Camera Body] INSERTING BATTERIES - CONT’D Auto Power Off [Camera Body] A warning message will appear in the top overlay bar of the LCD monitor when the battery power gets low. The LCD monitor will shut off if the camera has not been used for 3 minutes. • The power lamp will remain on. • Press the Display button to turn the LCD monitor back on.
INSERTING BATTERIES - CONT’D COMPACT FLASH CARD Using the AC Adapter [Camera Body Only] Your camera requires a compact flash card to be inserted before capturing images. Use the AC Adapter allows the camera to receive power from an electrical outlet. Use of the AC Adapter is recommended to conserve batteries during periods of heavy use. It is also recommended when interfacing the camera with the computer.
COMPACT FLASH CARD - CONT’D Close the battery-chamber cover and slide it shut until it clicks. COMPACT FLASH CARD - CONT’D Close the battery-chamber cover and slide it shut until it clicks. Removing the Compact Flash Card Make sure the camera is off. Open the battery-chamber cover by sliding it in the direction indicated, then open the cover. Lift the card-release lever until it is straight out. Press the card-release lever to eject the card. Pull the compact flash card straight out.
ATTACHING AND REMOVING THE METAFLASH UNIT ATTACHING THE CAMERA BRACKET Attaching the MetaFlash Unit to the Camera The CB-3D1 camera bracket stabilizes the positions of the camera body, MetaFlash unit, and lens unit. Using this bracket is very important when capturing 3D images. Align the projection on the MetaFlash Unit with the hole on the camera. Fit the MetaFlash Unit in the direction of the arrow as shown until a click is heard.
PROCESSES FOR GENERATING A 3D IMAGE [Image with no stripes projected] [Image with stripes projected] BEFORE TAKING PICTURES Calibration Data The Minolta 3D 1500 take two pictures as shown above during a single shot: one without a projected stripe and the other with projected stripes. The two images of data are transferred to the personal computer where a 3D image is generated from the images by an application called MetaFlash Studio.
IMPORTANT PREPARATIONS FOR TAKING PICTURES The Minolta 3D 1500, unlike ordinary digital cameras, requires you to be aware of shooting-time restrictions and conditions.
IMPORTANT PREPARATIONS FOR TAKING PICTURES IMPORTANT PREPARATIONS FOR TAKING PICTURES - CONT’D Brightness of the Subject and Its Surrounding To Get Better 3D Images The 3D 1500 records pattern-projected images by emitting flashes into masked subjects. Consequently, it is necessary to keep the subject of shooting and its surroundings “evenly dark” when taking a picture. • Position the camera so that the subject is centered in and completely fills the view area on your 3D 1500’s LCD monitor.
BASIC RECORDING PROCEDURE Mount the 3D 1500 securely on a tripod. • The 3D 1500 causes the MetaFlash unit to emits two flashes during a single shot. Any slight sway of the camera would hamper it from taking accurate pictures. Be sure to secure the 3D 1500 on the tripod. TAKING PICTURES Turn the MetaFlash on. Press the main switch to turn the camera body on. • An icon will appear on the soft key label (right side) indicating that the camera is now in the 3D mode.
BASIC RECORDING PROCEDURE - CONT’D Steps through shown below are not necessary when using this camera for the first time. Proceed with step . Set “Quality” to “S.FINE (Super Fine)” in steps to when you used the 3D 1500 as an ordinary Dimâge EX (non-3D camera) by replacing the MetaFlash unit with a zoom 1500 or wide 1500 lens (optional) and you changed the “Quality” setting in the Burst mode. In Record mode, press the MENU button. • The Record mode menus will appear.
BASIC RECORDING PROCEDURE - CONT’D Make sure that the Flash-ready lamp on the MetaFlash unit turns on. • You can click the shutter even when the MetaFlash unit is not fully charged. Be sure to check that the MetaFlash unit has been fully charged (the Flash-ready lamp is lit) before taking a picture. Press the shutter-release button part way down. When the green focus lamp glows, press the shutter-release button the rest of the way down to take a picture.
EXPOSURE COMPENSATION In general the camera sets the exposure setting automatically. But, if necessary, the exposure can be adjusted to make the final image brighter or darker. When the image turns out to be too dark or too bright, you can easily compensate for that by pressing the Up or Down button on the camera. While in Record mode, press the Up or Down button to select the exposure compensation value. EXPOSURE COMPENSATION • Exposure can only be adjusted in Record mode.
TRANSFERRING IMAGE DATA When you finish taking necessary pictures, transfer the recorded image data from the CF card to a personal computer (PC) and generate 3D images using the MetaFlash Studio application program. There are two ways to transfer image data from a CF card to a PC. (1) Transferring the image data with a CF card reader Connect a card reader that has the capability to read CF card data directly and transfer image data to the PC through it.
WHEN TO REPLACE THE XENON LAMP TROUBLESHOOTING The luminescent tube (xenon lamp) of the MetaFlash unit has a limited life. The Minolta 3D 1500 informs you when to replace the xenon lamp by turning on the selftimer lamp on the front of the camera body when the camera is turned on after 2000 shots (4000 flashes) are taken with the camera. Refer to these pages to determine the cause of a problem you are experiencing with the camera.
TROUBLESHOOTING - CONT’D Problem The camera will not take a picture. Cause TROUBLESHOOTING - CONT’D Solution The camera is off. Press the main switch to turn the camera on and check that the power lamp goes on. The camera is not in Record mode. Slide the Mode Switch to REC. The camera is processing, Please Wait appears in the overlay bar. The compact flash card is full, No space on card appears in the overlay bar. Problem 3D images will not be generated properly.
ACCESSORIES ACCESSORIES The Minolta 3D 1500 is provided with optional accessories which are briefly described below. For more information, contact your camera dealer or Minolta Service Facility listed on the back cover of this manual. RM-8C/RM-16C/RM-32C compact flash Cards The RM-8C, RM-16C, and RM-32C are compact flash cards with storage capacities of 8MB, 16MB, and 32MB, respectively. CA-1C PC Card Adapter ZOOM 1500 (Lens Unit) ZOOM 1500 is a 1.
CARE AND STORAGE CARE AND STORAGE Operating Temperatures and Conditions Safety and Handling for Compact Flash Cards • This camera has been designed for use from 10°C to 30°C (50°F to 86°F). • Never leave the camera where it may be subjected to extreme temperatures, such as the glove compartment of a car. • Do not subject the camera to extreme humidity. • To prevent condensation from forming, place the camera in a sealed, plastic bag when bringing it from the cold exterior to a warm building.
CARE AND STORAGE - CONT’D TECHNICAL DETAILS Cleaning Camera Type • If the camera or lens is dirty, gently wipe it with a soft, clean, dry cloth. If the camera or lens comes in contact with sand, gently blow away loose particles, wiping may scratch the surface. • To clean the lens surface, first brush away any dust or blow away sand, then, if necessary, moisten a lens tissue with lens cleaning fluid and gently wipe the lens. • Never use organic solvents to clean the camera.
TECHNICAL DETAILS - CONT’D TECHNICAL DETAILS - CONT’D White Balance Power source (camera body) Fixed at the color temperatures of the MetaFlash unit Power: AA-sized alkaline battery x 4 (AA-sized Ni-Cd or AA-sized Ni-MH batteries are also available). External power: AC adapter (a DC terminal is provided on the camera body.) MetaFlash Flash mode: Fill-flash, fixed Light control: External light control suing the light-controlling element in the lens unit. Charging time: Approx.
MEMO MEMO - 50 - - 51 -
MEMO MEMO - 52 - - 53 -
MEMO MEMO - 54 - - 55 -
MEMO - 56 -
Minolta Co., Ltd. 3-13, 2-Chome, Azuchi-Machi, Chuo-Ku, Osaka 541-8556, Japan Minolta Corporation Head Office Los Angeles Branch Minolta Canada Inc. Head Office Minolta GmbH Minolta France S.A. Minolta (UK) Limited Minolta Austria Ges. m.b.H. Minolta Camera Benelux B.V. Belgium Branch Minolta (Schweiz) AG Minolta Svenska AB Finland Branch Minolta Portugal Limitada Minolta Hong Kong Limited Minolta Singapore (Pte) Ltd. 101 Williams Drive, Ramsey, New Jersey 07446, U.S.A.