
Service Manual


SCANNER SECTION
3-16
III DIS./ASSEMBLY
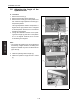
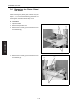
6. Remove the 2 screws [1] of the slit glass
pressure plate and remove the slit glass [2].
7. Loosen the screw [3] and slide the glass pressure
plate [4] to the paper feed side.
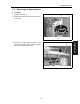
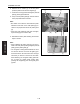
8. Lift up once the platen glass [5]. And then slide it
to the paper feed side to remove it.
Note:
• Be careful not to stain the white reference plate
attached to the back of the scale plate [6] pro-
vided on the paper feed side of the platen glass
[5].
• When the white reference plate gets smudged,
wipe it thoroughly with a clean cloth.
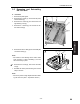
9. Reinstall the above parts following the removal
steps in reverse.
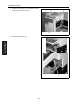
Note:
• When installing the platen glass [5], be sure to
fasten it securely while pressing the glass pressure
plate [4] to the platen glass [5].
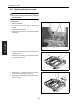
• The slit glass is distinguished between the front
and the rear. Be sure to set the slit glass [2] so
that a black dot on its side comes in the rear right
side when you see the 7145 from the front side.
When attaching the slit glass holding plate with
the 2 screws [1], tighten these screws while
pressing the slit glass [2] onto the original glass
[5] side.
[5]
[1]
[3]
[4]
[2] [6]