
Service Manual


DRUM UNIT
3-28
III DIS./ASSEMBLY
2
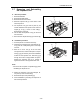
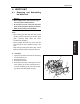
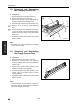
5.2 Removing and Reinstalling
the Charging Corona Unit
A. Procedure
1. Remove the drum unit from the main body.
2. Set the unit so the drum is to the top.
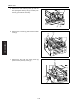
3. Remove the cleaning rod's [1] shaft stopper fit-
ting [2], and pull out the cleaning rod [1].
4. Disconnect the connector [3] from the drum unit.
5. Remove the 2 screws [4] (7235/7228/7222
only).
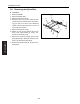
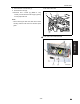
6. Remove the back side (rear side) of the charg-
ing corona unit [5] in the arrow-marked direction
[6] and remove it by sliding in the arrow-marked
direction [7].
7. Reinstall the above parts following the removal
steps in reverse.
Note:
• Be careful not to bend excessively the charging
corona pressure spring.
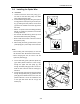
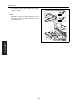
5.3 Removing and Reinstalling
the Charge Control Plate
A. Procedure
1. Remove the drum unit from the main body.
2. Remove the charging corona unit. Move the
charging cleaning block to its home position (at
the rear side).
3. Remove the 2 charge control springs [1], and
remove the charge control plate [2].
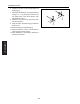
4. To clean: tap lightly with a cloth soaked in drum
cleaner, then use a blower brush to remove
remaining debris.
5. Reinstall the above parts following the removal
steps in reverse.
Note:
• When reinstalling, be sure to set the charge con-
trol plate so that the spring held end is toward the
front of the charging corona unit.
7322ma3006
2
[1]
[2]
[7]
[6]
[4]
[5]
[3]
[4]
[1]
[2]