
Service Manual

FIXING UNIT
3-52
III DIS./ASSEMBLY
2
9. FIXING UNIT
9.1 Removing and Reinstalling
the Fixing Unit
Caution:
• The fixing unit remains extremely hot imme-
diately after power is switched OFF. To avoid
injury from burns, do not begin work until the
fixing unit has cooled down sufficiently.
• When installing the fixing unit, be sure to
firmly tighten the unit's 2 set screws.
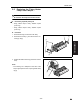
A. Procedure
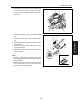
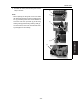
1. Open the ADU door [1] and the conveyance unit
[2], and loosen the 2 screws [4] holding the fix-
ing unit [3] in place.
2. Pull the fixing unit out toward you and remove it.
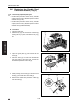
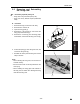
Note:
• Do not touch the areas shown in the diagram right
when attaching or removing the fixing unit.
• Observe care, as force applied to the fixing claw
and paper exit guide may result in the rollers
being scratched.
3. Reinstall the above parts following the removal
steps in reverse.
[1]
[2]
[3]
[4]