
Service Manual


FIXING UNIT
3-66
III DIS./ASSEMBLY
2
9.7 Removing and Reinstalling
the Fuse Mounting Plate
Assembly
Caution:
• This is an important safety part. (P/N:SP00-
0110) Be sure to observe the following cau-
tions and steps when removing or reinstall-
ing.
Caution:
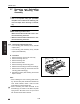
• After installing the thermostat:
Make sure that the wire bundle is not in con-
tact with the fixing heat roller.
• Make sure that the thermostat itself is in con-
tact with the fixing heat roller.
A. Periodically replaced parts/cycle
• Fuse mounting plate assembly: Every 480,000
copies (7145)
• Fuse mounting plate assembly: Every 400,000
copies (7235/7228/7222)
B. Procedure
1. Remove the fixing unit from the main body.
2. Remove the fixing claw unit.
3. Remove the fixing web.
4. Remove the heat roller.
5. Remove the fixing web mounting piece.
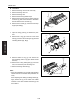
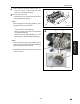
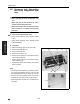
6. Detach the thermostat [1] 2 Faston terminals [2].
7. Remove the 2 screws [3], and remove the Fuse
mounting plate assembly [4].
8. Reinstall the above parts following the removal
steps in reverse.
Note:
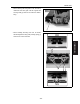
• When installing the fuse mounting plate assem-
bly, with the base plate sandwiched between the
unit’s sheet materials, fasten it with the screw
while attaching it to the bottom side.
• When connecting the Faston terminals of the
thermostat [1], be careful not to deform the plate
spring section. Be careful not to mix up the front
with the back of the Faston terminal.
[1]
[2]
[3]
[4]