
Service Manual


I ADJUSTMENT
36 MODE
1-57
1
(2) ADU centering adjustment
Note:
• Be sure to perform the centering adjustment for
each tray before starting this adjustment.
a. Procedure
1. Enter the 36 mode.
2. “36 mode menu screen”
Press the [2. Timing adj.] key.
3. “Timing adjustment menu screen”
Press the [5. Centring adj.] key.
4. “Centering adjustment screen”
Press the arrow key until “ADU” appears in the
message display area.
5. Press the [COPY] key.
6. “Basic screen”
Select copy mode to single side → double side
mode, then press the START button to print the
test pattern.
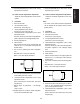
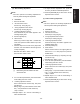
7. Fold the output at the center in the paper feed
direction, and check that the left and right lines
overlap completely.
• Standard value: Back : Within ± 3mm
Front and back : Within ± 3mm
8. If it is not within specification, press the # button
while holding down the
∗ button.
9. “Centering adjustment screen”
Enter a value from the numeric keys, then press
the [SET] key.
• Setting range: -53 (inward direction of the center
line) ~ +53 (rear direction of the center line)
1 step = 0.09mm
10. Repeat steps 5 to 9 until the miscentering is
within standard value.
11. To adjust another adjustment item, press the
arrow key to select the desired adjustment.
12. Press the [RETURN] key to return to the “Timing
adjustment menu screen”.
(3) Platen centering adjustment
Note:
• Be sure to perform the centering adjustment for
each tray before starting this adjustment.
a. Procedure
1. Enter the 36 mode.
2. “36 mode menu screen”
Press the [2. Timing adj.] key.
3. “Timing adjustment menu screen”
Press the [5. Centring adj.] key.
4. “Centering adjustment screen”
Press the arrow key until “Platen” appears in the
message display area.
5. Press the [COPY] key.
6. “Basic screen”
Set the new test chart on the original glass and
select A3 or 11 x 17 size paper, then press the
START button.
7. Check the miscentering by comparing the origi-
nal with the copy.
• Standard value: Within ± 2mm
8. If it is not within specification, press the # button
while holding down the
∗ button.
9. “Centering adjustment screen”
Enter a value from the numeric keys, then press
the [SET] key.
• Setting range: -74 (inward direction of the center
line) ~ +74 (rear direction of the center line)
1 step = 0.04mm
10. Repeat steps 5 to 9 until the miscentering is
within standard value.
11. Press the [RETURN] key to return to the “Timing
adjustment menu screen”.
[1] Lengthwise direction
[2] Miscentering amount between first side
and second side
[1]
[2]