DM9E 12/15/98 11:37 AM Page 1 E INSTRUCTION MANUAL
DM9E 12/15/98 11:37 AM Page 2 FOR PROPER AND SAFE USE Designed exclusively for the Maxxum/Dynax 9, the Data Memory Back DM-9 makes it possible to record 18 separate data items for each exposure to a SmartMedia™ card. The data from as many as 400 36-exposure rolls of film can be saved to a single 2MB card. Read and understand all warnings and cautions before using this product.
DM9E 12/15/98 11:37 AM Page 2 SMART MEDIA NOTES Names of Parts Proper Handling Electrical contact area Write-protect area Index label area Proper Data Storage Important files should be copied to other media (floppy disk, MO disk, hard drive, etc.) Minolta is not responsible for lost, erased, or corrupted data. The following may cause data loss or damage: • Improper use of card. • Static discharge near the card or electric noise.
DM9E 12/15/98 11:37 AM Page 4 TABLE OF CONTENTS Names of Parts . . . . . . . . . . . . . . . . . . . . . . . . . .6 Battery . . . . . . . . . . . . . . . . . . . . . . . . . . . . . . . . .8 Attaching the Data Memory Back . . . . . . . . . . .10 Inserting the SmartMedia Card . . . . . . . . . . . . .11 Setting the Date and Time . . . . . . . . . . . . . . . . .13 Data Memory Recording Data . . . . . . . . . . . . . . . . . . . . . . . . . .16 Film Area . . . . . . . . . . . . . . . . . . . . . . . . . . .
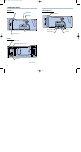
DM9E 12/15/98 11:37 AM Page 6 NAMES OF PARTS Doors Opened Outside Card window Data panel Film window AF button Control panel door Mode button + button Select button – button Card-slot door Inside Release pin Battery-chamber cover Contacts* * Do not touch.
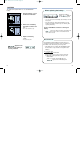
DM9E 12/15/98 11:37 AM Page 8 BATTERY The Data Memory Back DM-9 uses one CR2025 lithium battery. When replacing the battery… 1. Slide the battery cover in the direction indicated. Replace the battery when blinks in the DM-9’s data panel. • 1~2 rolls can be taken after bAttEry starts blinking in the DM9 data panel. 2. Remove the old battery and replace it with a new one. • The + side should face up.
DM9E 12/15/98 11:37 AM Page 10 ATTACHING THE DATA MEMORY BACK • The camera supplies power to the DM-9 when it is mounted on the camera. The DM-9’s lithium battery supplies power to the data memory back when the back is open or when the DM-9 is not mounted on the camera. • Data will be stored in the camera’s data memory function and imprinting will not be possible if the lithium battery is not installed in the DM-9. Turn the main switch to LOCK, then open the back of the camera… 1.
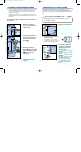
DM9E 12/15/98 11:37 AM Page 12 INSERTING THE SmartMedia CARD SETTING THE DATE AND TIME The Data Back DM-9 has an automatic calendar through the year 2029. SmartMedia NOTES The DM-9 can use 2 , 4, 8 or 16MB, 3.3 or 5V SmartMedia cards. The storage capacity of these cards is listed in the table below. Card Size Card Capacity 2MB 4MB 8MB 16MB 400 400 900 900 • Data for a maximum of 36 exposures can be stored in each film area.
DM9E 12/15/98 11:37 AM Page 14 SETTING THE DATE AND TIME 3. Press the + or – button to change the value of the selected item. • Press and hold the + or – button to change the value rapidly. DATA MEMORY 4. Repeat steps 2 and 3 until all the data is correct. 5. When the data is correct, press the mode or select button until the blinking stops.
DM9E 12/15/98 11:37 AM Page 16 RECORDING DATA The Data Memory Back DM-9 records 18 separate data items for each exposure to a SmartMedia card. The data from up to 400 36-exposure rolls of film can be saved to a single 2MB card. • The camera’s data memory function will be activated if a card is not installed in the DM-9 when the data memory function is turned on. will blink in the DM-9’s data panel every time the data or shutterrelease buttons are pressed. 1.
DM9E 12/15/98 11:37 AM Page 18 FILM AREA 2 and 4MB SmartMedia cards formatted by the DM-9 store data in 400 separate film areas. Area 1 stores the data from the first roll, area 2 the second, etc. 1st Roll 2nd Roll Press the data button to display the currently selected film area. 3rd Roll When the DM-9 is mounted and the data memory function is selected… SmartMedia card loaded… When all the data areas are full, new data is written to area 1, erasing the data stored there.
DM9E 12/15/98 11:37 AM Page 20 OVERWRITING THE FILM AREA 2 and 4MB SmartMedia cards can store exposure data for 400 rolls of film. Exposure data for additional rolls can be written over the old data. appears in the camera’s data panel and appears in the DM-9’s data panel before the data for the first exposure in Film Area 1 is overwritten. . • and disappear after the first exposure. • Overwriting takes longer than normal data recording.
DM9E 12/15/98 11:37 AM Page 22 RECALLING DATA 4. Turn the front control dial to select the desired frame number. 1. Open the control panel door, then press the data-memory button. – The shutter speed and aperture for the selected frame are displayed in the data panel. 2. Turn either control dial until and the desired film area appears in the camera’s data panel. - Turn the front control dial to change the film area increment by one. - Turn the rear control dial to change the film area increment by ten.
DM9E 12/15/98 11:37 AM Page 24 RECALLING DATA 6. Press the AE-lock button at step 4 or 5 to display the metering mode, flash compensation/ flash bracketing increment and exposure mode. 7. Press the mode button to cycle through the items that can be displayed on the DM-9’s data panel. • The flash compensation and bracketing increment are combined into a single value.
DM9E 12/15/98 11:37 AM Page 26 RECALLING DATA REMOVING THE SmartMedia CARD 8. Open the camera’s control panel door and press the adjust button. Do not remove the card if or is blinking in the DM-9’s data panel. 1. Turn the camera’s main switch to LOCK. • appears in the camera’s data panel. • ▲ appears below READ in the DM-9’s data panel. 9. Turn either control dial to select data memory On or Off, then press the shutter-release button partway down to enter the selection. 2.
DM9E 12/15/98 11:37 AM Page 28 FORMATTING THE SmartMedia CARD SmartMedia cards must be formatted before they are used in the DM-9. Formatting erases all previously stored data. 3. Press the data-memory button again. • Formatting resets the film area to area 1. • The data number sequentially numbers every roll exposed while the DM-9 is mounted and does not reset to 1.
DM9E 12/15/98 11:37 AM Page 30 IMPRINTING BETWEEN THE FRAMES User selected data items are imprinted to the left of the exposed frame. IMPRINTING DATA The DM-9’s data imprinting function imprints the data number at the beginning of each roll to ease the task of roll identification. Additional data can be imprinted in between the exposed frames as well. 1st Frame Data The table below details the data items which can be imprinted in between the frames. Data Item Display Shutter Speed/Aperture (ex.
DM9E 12/15/98 11:37 AM Page 32 IMPRINTING BETWEEN THE FRAMES Selection Press the MODE button to select the desired data item. ▲ appears under PRINT when the data item will be imprinted. ▲ blinks under PRINT for 4 seconds after the data has been imprinted The data items cycle as follows… Shutter Speed/Aperture • The Maxxum/Dynax 9’s maximum drive speed drops to 4.5 fps when the DM-9’s imprinting function is activated.
DM9E 12/15/98 11:37 AM Page 34 IMPRINTING BETWEEN THE FRAMES Updating the Data Items The values of the data items need to be reset after replacing the battery in the DM-9 Data Memory Back. • When the Fixed or Count-up number data items are selected, pressing the + and – buttons for 2 seconds resets the fixed or count-up numbers to 00001. • After updating the time, press the mode button to sync the seconds counter to 00 (not shown). 4. Repeat steps 2 and 3 until all the data is correct. 5.
DM9E 12/15/98 11:37 AM Page 36 DATA NUMBER Cancelling Data Number Imprinting Imprinting Cancel data number imprinting when the film will be loaded multiple times (Mid Reload). Data Number • The data number is recorded even if it is not imprinted. Cancel data number imprinting before loading the film. • The data number is imprinted when the film is loaded. When the DM-9 is mounted, the Data Number is automatically imprinted when film is loaded into the camera.
DM9E 12/15/98 11:37 AM Page 38 IMPRINTING INTENSITY Imprinting intensity is set automatically when DX coded film is loaded. The imprinting intensity can also be set manually when necessary. There are eight manual imprinting intensity levels. 3. Press the MODE button or press the shutterrelease button partway down to return to standard operation. • Higher numbers indicate a stronger imprinting intensity. • Manual imprinting intensities are set in 1EV increments.
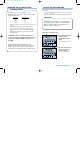
DM9E 12/15/98 11:37 AM Page 40 SYSTEM REQUIREMENTS The following are required to read and display the data stored on the SmartMedia card on a PC monitor. DATA RETRIEVAL Retrieve, display, and print the data stored on the SmartMedia card using your personal computer. Personal Computer with software capable of reading a plain text document. • The Windows 95 and 98 operating systems have been fully tested for compatibility with the data formatted by the Data Memory Back DM-9.
DM9E 12/15/98 11:37 AM Page 42 OPENING THE DATA FILE The formatting used by the DM-9 stores the data collected from each roll in a file identified by the same data number the DM-9 imprints on the film leader. • The DM-9 saves all the data, except the Nextdno file, to the SmartMedia in DOS type text format. • Data blocks are separated (delimited) by tabs. • SmartMedia is not designed for long term data storage.
DM9E 12/15/98 11:37 AM Page 44 OPENING THE DATA FILE 5. Select the delimited data type Radio button and a DOS file origin, then click Next. The Text Import Wizard page 2 appears. 7. Select the Text column format radio button, then click Finish. • The text data format treats all the data as text. Other data formats will treat the “/” character as a mathematical function. Data Display - Plain Text 6. Select the Tab checkbox, then click Next. The Text Import Wizard page 3 appears. 1.
DM9E 12/15/98 11:37 AM Page 46 READING THE DATA dno-0529 Frame Shutter FNo. Lens 1 250 4 50/1.4 2 300 4 50/1.4 3 12000 1.4 50/1.4 4 12000 1.4 50/1.4 5 Bulb 6.7 35/3.5 6 125 3.5 35/3.5 7 30” 16 85/4.5 8 30 4 35/3.5 +/- PASM Meter AF Area AFP/RP 0.0 P Multi A [] AFP +0.5 A Multi S -oAFP 0.0 S Multi C --o RP 0.0 S Multi C --o RP 0.0 M Ave M --0.0 A Multi M --0.0 M Multi S o-RP 0.0 P Multi A [] AFP Drive Flash FL+/- FLMeter ISO DR-S OFF OFF OFF 400 Self ON 0.
DM9E 12/15/98 11:37 AM Page 48 READING THE DATA NOTES • The Focus Mode, Focus Frame, and Focus Priority data fields display the focus mode selected on the camera even when a lens which must be focused manually is mounted. Manual focus is only recorded if the AF-mode switch is set to M . APPENDIX Handling Cautions Battery Performance • The Maxxum/Dynax 9’s battery performance decreases when the Data Memory Back DM-9 is attached. When mounted, the DM-9 is powered by the batteries in the camera.
DM9E 12/15/98 11:37 AM Page 50 TROUBLESHOOTING indicates that the enclosed items are blinking. • When inserting a new SmartMedia card after a CArdErr, press the DATA button in the camera’s data panel to make SmartMedia card is full. Data will be overwritten. sure the data memory function is on (p. 19). • Data is not recorded by the DM-9 or the camera when [CArdErr] blinks in the DM-9 data panel. Card not inserted. Appears when the shutter release or data button are pressed (p.16).
DM9E 12/15/98 11:37 AM Page 52 CARE AND STORAGE Cleaning • If the data memory back is dirty, wipe it gently with a soft, clean, dry cloth. If it comes in contact with sand, gently blow away loose particles - wiping may scratch the surface. • Never use organic solvents to clean the data memory back. SPECIFICATIONS Type Storage Media Format Type File Type Data Memory Items Storage • Attach the DM-9 to the camera body when storing (lithium batteries should be installed in the camera during storage).
DM9E 12/15/98 11:37 AM Page 54 Minolta Co., Ltd. 3-13, 2-Chome, Azuchi-Machi, Chuo-Ku, Osaka 541-8556, Japan Kurt-Fischer-Strasse 50, D-22923 Ahrensburg, Germany Minolta France S.A. 365 Route de Saint-Germain, F-78420 Carrieres-SurSeine, France Minolta (UK) Limited 7 Tanners Drive, Blakelands, Milton Keynes, MK14 5BU, England Minolta Austria Ges. m.b.H. Amalienstrasse 59-61, A-1131 Wien, Austria Minolta Camera Benelux B.V. Zonnebaan 39, P.O.