HD Digital Recorder User’s Manual HDR-FOX T2 The default password is 0000.
Notice English Thank you for purchasing a Humax HDR-FOX T2 Freeview+ HD product. Freeview+ HD explained: • Accurate recording The start and end times of scheduled recordings will track the signal meaning the recording will start and stop at the times sent by the broadcasters. If a programme starts early or runs late the record time will automatically be adjusted to record the whole programme. • Series Link If a programme you wish to record is in a series, you can now record the whole series.
Notice Thank you for purchasing a HUMAX product. Please read this user’s manual carefully to be able to safely install, use and maintain the product at maximum performance. Keep this user’s manual next to your product for future reference. The information in this user’s manual is subject to change without notice.
Notice English ‘WEEE’ Instructions This product should not be disposed with other household wastes at the end of its working life. Please separate this from other types of wastes and recycle it responsibly to promote the sustainable reuse of material resources. This will prevent possible harm to the environment or human health from uncontrolled waste disposal.
Contents Notice Thank you for purchasing a Humax HDR-FOX T2 Freeview+ HD product. Quick Start Guide 1. Checking Accessories 2. Product Overview 3. Connections 4. Powering On 5. Installation Wizard 6.
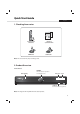
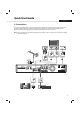
Quick Start Guide English 1. Checking Accessories Quick Start Guide User’s Manual Manual & Quick Start Guide Remote Control & Batteries SCART Cable HDMI Cable Note: The accessories may vary according to area. 2. Product Overview Front Panel Status Display STANDBY Switches between operation and standby modes. VOL-/VOL+ P-/P+ USB port Connect a USB storage device. Note: The image shown may differ from the actual product.
Quick Start Guide Rear Panel Common Interface Insert a CI-module. ANTENNA IN Connect your main aerial. ANTENNA OUT Connect to the TV or VCR using an RF cable. SPDIF Connect to the audio system using an S/PDIF cable. (digital audio). ETHERNET Connect a LAN cable. USB Port Connect a USB storage device. HDMI Connect to the TV using an HDMI cable. TV SCART Connect to the TV using a TV SCART cable. ON/OFF Powers on/off. VIDEO Connect to the TV or VCR using an RCA cable.
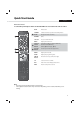
Quick Start Guide English Remote Control To control the product please make sure that the PVR mode is selected on the remote control. MUTE Mutes audio STANDBY Switches between operation and standby modes. MODE Changes the mode of remote. NUMERIC (0-9) TV Portal Access to Humax TV Portal. MENU Displays the main menu. ݣ Playback Control Buttons Play, II Pause, Stop, Record Rewind, ݤ COLOUR Buttons Colour keys for interactive applications. MEDIA Displays the media list.
Quick Start Guide VOLUME Adjusts the audio volume. P /P Changes the channel or page. LIST Displays the channel list. i (Information) Displays the channel and programme information. OPT+ Displays the channels attributes. AUDIO Displays the audio list. SUB Displays the subtitle language list. TV/RADIO Switches between TV and radio modes. TEXT Enters the digital text service. SOURCE Controls the output of TV SCART. SLEEP Sets the sleep timer. V-FORMAT Sets the resolution of video.
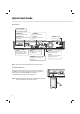
Quick Start Guide English 3. Connections This section describes how to connect your product to match your particular devices setup and to gain optimum signal quality. The product provides various interfaces to connect to the TV, VCR or other devices. Select the most appropriate procedure depending on the device you have. Note: If you encounter any problems setting up your product, please contact your local retailer or Humax Customer Helpline.
Quick Start Guide Connecting the Antenna Connect the aerial to the ANTENNA IN. Connecting the TV You can select one of the following connections depending on the device you have. ݎTV with the HDMI connector; For the best picture quality, connect the product and TV using a HDMI cable. When using a HDMI cable it is not necessary to also use a scart cable. ݏTV with the DVI connector; For very good picture quality, connect the product and TV using a HDMI cable and a HDMI-to-DVI converter for video.
Quick Start Guide English 4. Powering On 1. Connect the power cord of the product to a wall outlet. 2. Ensure the power switch at the rear of the product is switched to ON. 3. Power on by pressing the STANDBY button on the remote control or touching the STANDBY button at the front of the product. Note: To control the product please make sure that the PVR mode is selected on the remote control.
Quick Start Guide 5. Installation Wizard When powering on your product for the first time after purchase or performing the factory default in menu, the Installation Wizard will appear on your TV screen. If you do not see the Installation Wizard please check: 1. Your TV is switched on. 2. The cables between the product and your TV are connected correctly. 3. Your TV is on the correct input (AV channel) for the connection you are using.
Quick Start Guide English 3. Automatic Search Channel search will begin automatically. When the search has completed press the OK button to save the channels found during the search. 4. Result The results of the Installation Wizard are displayed on screen. Select Finish and press the OK button to complete the Installation Wizard.
Quick Start Guide 6.
Basic Operation English Changing Channels You can change the channels in several ways. Press the P /P button. Enter the channel number directly. (0-9) Go to the channel list or TV guide and select a channel. Note: Press the TV/RADIO button to switch between TV and radio channels. Volume / Mute / Audio To adjust the audio volume, press the +/ - button. To mute the audio temporarily, press the MUTE button.
Basic Operation Display Format / Resolution Setting Display Format Press the WIDE button to set the display format according to the screen ratio. Each time you press this button, the value changes. Screen ratio 4:3: Auto - Letterbox 16:9 - Letterbox 14:9 - Centre Screen ratio 16:9: Auto – Pillar Box – Zoom Note: Refer to Display Format for details. Display Setting Resolution Press the V-FORMAT button to set the resolution of the screen. Each time you press this button, the value changes.
Basic Operation English Programme Information (i-plate) The i-plate is an information banner that is displayed for a certain period of time whenever you change channels. Press the i button while watching a progamme to display the i-plate. Press the EXIT button to hide.
Basic Operation Sleep Timer Press the SLEEP button to set the automatic turn off time. Each time you press this button, the value changes. Sleep Off - 10 - 20 - 30 - 60 - 90 - 120 minutes Display Subtitle You can select the subtitle language when subtitle information is provided. Press the SUB button. Each time you press this button, the subtitle language changes. Note: • You can choose to always display the subtitle when available. • The icon appears when the DVB subtitle is supported.
Basic Operation English Text and Interactive Services If your chosen channel has digital text features, you can access them. Digital text services often load automatically shortly after the digital text window is displayed. In which case, simply follow the on screen instructions. (Press colour buttons) 1. Press the TEXT button to access digital text. 2. Press the TEXT button again to return to normal viewing. 3. Press the P /P button to exit this service.
Channel List The channel list will help you find the channel you want to watch quickly and easily. You can access the channel list in several ways. Press the LIST button. Press the MENU button and select Channel List. Changing Channels Select the channel you want to watch and press the OK button. The displayed channel will change. Note: • : Locked channel, : Pay TV / encrypted programmes (CAS icons) • Press the i button to view the detailed programme information.
Channel List English Editing Channels in Channel List You can lock or delete each channel in the channel list, as well as in menu. To edit the multiple channels, go to MENU >Settings > Edit Channels. Locking / Deleting Channels 1. Select a channel you want to edit and press the GREEN button. 2. Select an option. Lock: Select On or Off. Delete: Press the OK button. 3. Select OK to save and exit. Note: The default password is 0000.
Managing Channels Editing Channels The Edit Channel List menu will help you delete or lock multiple channels. MENU Settings Edit Channels Edit Channel List Group name Marked / Total channels Function buttons : Coloured button Select Mark/Confirm Page up/down Note: • : Locked channel, : Pay TV / encrypted programmes (CAS icons) • Press the MENU or EXIT button to exit. Press the BACK button to return to the previous screen. Deleting Channels 1. Select the channels using the / and OK button. 2.
Managing Channels English Advanced Options Changing Group To list the channels of other groups, press the GREEN button and select a group you want. Note: Press the TV/RADIO button to switch between TV and Radio groups. Changing Background You can change the channel displayed in the background while editing. 1. Select the channel you want to watch. 2. Press the YELLOW button. The displayed channel will change. Selecting / Releasing All Channels 1. Press the BLUE button. 2. Select Select All. 3.
Managing Channels Editing Favourite Channels The Edit Favourite List menu will help you add or remove channels from the favourite groups. MENU Settings Edit Channels Edit Favourite List Group name Marked / Total channels Favourite group name Function buttons : Coloured or OPT+ button Select Mark/Confirm Page up/down Note: Press the MENU or EXIT button to exit. Press the BACK button to return to the previous screen. Adding / Removing Favourite Channels 1.
Managing Channels English Advanced Options Changing Group To list the channels of other groups in the left column, press the GREEN button and select a group you want. Note: Press the TV/RADIO button to switch between TV and Radio groups. Changing Background To list the channels of other groups in the left column, press the BLUE button and select a group you want. Selecting / Releasing All Channels 1. Press the OPT+ button. 2. Select Select All. 3. To release all, select Release All.
TV Guide The TV guide is an on-screen guide of grid type which displays the programme information of channels in time and date order. You can access the TV guide in several ways. Press the GUIDE button. Press the MENU button and select TV Guide. Note: Press the GUIDE or EXIT button to exit. Press the BACK button to return to the previous screen.
TV Guide English Setting Reminders 1. Select a future programme and press the OK button. 2. Select Reminder and press the OK button. Press the OK button again to cancel the reservation. The reserved programmes will be added automatically in Schedule. Note: • If the programme is overlapped with another programme, adjust the reservation appropriately. • If the channel is locked, you will be prompted to enter your password before watching. The default password is 0000.
TV Guide Finding Programmes Find will help you find the programmes more specifically using the keyword or genre. By Keyword 1. 2. 3. 4. Press the GREEN button. Select Keyword and press the button. Select a keyword and press the OK button. Press the YELLOW button to confirm. Note: To enter a new keyword, select New Keyword. By Genre 1. 2. 3. 4. Press the GREEN button. Select Genre and press the button. Select a genre and press the OK button. Select the specific genre and press the OK button.
TV Guide English Scheduling Reminders and Recordings Schedule lists reminders and will help you manage them in more detail. 1. Press the YELLOW button. 2. You can add, edit or delete your reminders. To add, select New Reminder and press the OK button. To edit, select a reminder and press the OK button. To delete, select a reminder and press the BLUE button. 3. Reservation will pop up. You can change the options you want using the / / / , NUMERIC(0~9) and OK buttons. 4.
Recording and Playback You can record programmes in the built-in hard disk drive and playback the recorded programmes whenever you want. Recording You can watch another channel while recording a channel or record programmes from two different channels at the same time. Instant Recording You can record the currently watching programme instantly and change the recording duration. To instantly record the current programme you are watching, press the RECORD button.
Recording and Playback English Scheduled Recording You can easily set the recording reservations in TV Guide, Schedule or i-plate navigation mode. While in the TV Guide highlight a future programme and press the OK button. Select from: Record Whole Series Record the Whole Programme Press the OK button on a future programme in i-plate and select either Record Series or Record the Whole Programme. (Refer to Programme Information.
Recording and Playback Recording Conflict You can watch another channel while recording a channel or record programmes from two different channels at the same time. Recording Duration Conflict When an instant recording conflicts with one of the scheduled recordings (or reminders), you can either; Record for the automatically modified duration. Cancel either of the scheduled recordings (or reminders). Cancel the previous recording.
Recording and Playback English Setting Padding / Jump Time MENU Settings Preferences Recording Setting Padding Time You can set the recording padding time in case the recording starts earlier or ends later than scheduled. Start Padding Time : Additional recording time before the recording starts. End Padding Time : Additional recording time after the recording ends. Setting Jump Time You can set the jump time to replay or skip scenes during playback or time shifted recording.
Recording and Playback Playback You can playback the recorded programmes that are stored in the built-in hard disk drive. Playing Recordings (Video) You can access the recorded file list easily and play the recorded programmes. Press the MEDIA button. Press the MENU button and select Video. Select a file and press the OK button. Playback will start. You can perform fast rewind, fast forward, slow motion and pause while playing back a recorded file.
Recording and Playback English Playback Controls Play Pause the scene. Press the PAUSE button again to go back to play mode. Stop the playback of the current file and go to live TV. Fast Rewind Fast Forward Move to the previous chapter and replay the scenes. Move to the next chapter and skip scenes. / Jump to the previous or next scene. Add or delete a bookmark in your desired scene. The bookmarked scene is shown as a yellow pointer. Jump to bookmarked scenes directly.
Recording and Playback Pausing and Rewinding Live TV (TSR) Time Shifted Recording (TSR) allows you to pause a live broadcast and return to it later and continue where you left off. The TSR function automatically saves the programmes you watch to the built-in hard disk drive temporarily. TSR lasts for 120 minutes. To pause the programme you are watching, Press the PAUSE button. Press the PLAY button to return. Pause makes a time gap between the live broadcasting point and watching point.
Media List English You can retrieve video, music or photo files from the built-in hard disk drive, the USB storage devices, or the DLNA compliant devices. You can access Media List in several ways. Press the MEDIA button. Press the MENU button and select Video, Music or Photo. Connect a USB storage device for media and select your desired media type. Video Lists TV/Radio recordings or XviD files. Music Lists MP3 files. Photo Lists JPEG files. Note: • Press the MEDIA or EXIT button to exit.
Media List Note: • Please use only the USB storage device which was formatted with ext3, FAT or NTFS file system. • Compatible USB devices include portable flash memory (particularly keydrives) and digital audio players (MP3 players) of format FAT12/16/32. It is not possible to connect this unit to a personal computer for USB playback. • You can play back XviD/MP3/JPEG files (except files with copy-protection or restricted playback).
Media List English Using Video List You can play TV/Radio recordings or XviD files from the built-in hard disk drive, the USB storage devices, or the DLNA compliant devices. MENU Video Note: • Press the YELLOW button to switch the media type. • Press the BLUE button to switch the storage. • Press the i button to view the detailed programme information.
Media List Note: • To play multiple files successively, select the files using the RED button and press the OK button. When multiple files are selected, Resume Play and Rename are not available in Play Options. • You will be prompted to enter the password when playing the locked files or the files with guidance policy. • Some playback control buttons may not function depending on the contents. Editing Files Sorting Files 1. Press the OPT+ button. 2. Select Sort and press the OK button.
Media List English Renaming Files 1. Select the file you want to rename and press the OPT+ button. 2. Select Rename and press the OK button. 3. Enter the name of the file in the keyboard and press the YELLOW button. Creating Folder 1. Press the OPT+ button. 2. Select New Folder and press the OK button. 3. Enter the name of the folder in the keyboard and press the YELLOW button.
Media List Using Music List You can play MP3 audio files from the built-in hard disk drive, the USB storage devices, or the DLNA compliant devices. MENU Music Note: • Press the YELLOW button to switch the media type. • Press the BLUE button to switch the storage. Path Storage Title, Artist, Album Function buttons : Coloured or OPT+ button Playing Files Select a file and press the OK or PLAY button. All files in the folder will be played successively.
Media List English Music Player The music player is displayed while playing the music file(s). Plays or pauses Plays Pauses Plays the previous file RED Plays the next file Changes the play mode (once, repeat, repeat all, shuffle) Plays the first file Stops the music player and displays the list Plays the last file Exits the music player and goes to live TV Editing Files Deleting, moving, renaming the music files or creating new folders are the same as in the video list.
Media List Using Photo List You can play JPEG photo files from the built-in hard disk drive, the USB storage devices, or the DLNA compliant devices. MENU Photo Note: • Press the YELLOW button to switch the media type. • Press the BLUE button to switch the storage. Path Storage Thumbnail Function buttons : Coloured or OPT+ button Photo Slideshow Select a file and press the OK or PLAY button. All files in the folder will be shown successively.
Media List English Editing Files Deleting, moving, renaming the photo files or creating new folders are the same as in the video list. Refer to Using Video List > Editing Files. Slide Mode You can play music files during slideshow. 1. Press the OPT+ button. 2. Select Slide Mode and press the OK button. Display Time: The duration a photo is displayed Music Play: Select On to play music files during slideshow. Folder: Select the folder the music files in located in using the RED button. 3.
HUMAX TV Portal HUMAX TV Portal provides Catch-up TV services and various web applications. You can access HUMAX TV Portal in several ways. Press the TV Portal button. Press the MENU button and select HUMAX TV Portal. Note: • Press the TV Portal button to return to TV Portal home while using the portal service. • Press the EXIT button to exit. Press the BACK button to return to the previous screen. • Press the RED button to enter the simple mode.
Preferences English In this chapter you can set options for parental control, language, time, video, audio and screen display. Note: Press the MENU or EXIT button to exit. Press the BACK button to return to the previous screen. Parental Control MENU Settings Preferences Parental Control You will be prompted to enter the password to access this menu. Note: The default password is 0000. If you have forgotten your password, please contact Humax Customer Support.
Preferences Language Setting MENU Settings Preferences Language You can set the preferred language for audio and subtitle. 1. Select Preferred Language. 2. Select the language. Note: • You can change the audio or subtitle language by pressing the AUDIO or SUB button while watching a programme. • The Preferred Language will be the priority when you change channels or restart the product. Setting Power On/Off Timer MENU Settings Preferences Time 1.
Preferences English Video Setting MENU Settings Preferences Video Setting TV Screen Ratio You can select the screen ratio of your TV. 1. Select Screen Ratio. 2. Select an option. 16:9 - 4:3 Setting Display Format You can select the display format according to the screen ratio of your TV. 1. Select Display Format. 2. Select an option.
Preferences Audio Setting MENU Settings Preferences Audio Setting Audio Description You can set to narrate the on-screen visuals which is used for visually impaired viewers. 1. Select Audio Description. 2. Select an option. On - Off Note: Not all channels/programmes will provide Audio Description; for further information please contact the Broadcaster. Setting Digital Audio Output You can select the digital audio signal output of your product. 1. Select Digital Audio Output. 2. Select an option.
Preferences English Screen Display MENU Settings Preferences Screen Display Setting Info Display Time You can set the duration the information box is displayed every time the channel is switched. 1. Select Info Display Time. 2. Select an option. Off - 1~20 sec Setting Transparency You can set the transparency of the On-Screen Display. 1. Select Transparency. 2. Select an option. Off - 25% - 50% - 75% Setting Subtitle Display You can set to display the subtitle automatically or not. 1.
Installation Installation menu allows you to search the available TV and radio channels. Software update, antenna power and factory default setting are also available in this section. MENU Settings Installation Note: • You will be prompted to enter the password to access this menu. The default password is 0000. If you have forgotten your password, please contact Humax Customer Support. • Press the BACK button to save the changes and return to the previous screen. Press the MENU or EXIT button to exit.
Installation English Manual Search You can search channels manually by searching parameters. 1. Select Manual Search. 2. Configure the search options. Channel: Select the channel. Frequency: Enter the frequency. Transmission: Select DVB-T or DVB-T2. Bandwidth: Select the bandwidth. Network Search: Select On or Off. 3. Select Search and press the OK button. 4. Select Save and press the OK button to save the results. Note: • Select Stop and press the OK button to stop the channel search.
Installation Manual Update 1. Select Manual Update and press the OK button. 2. Enter the options manually Channel: Select the channel. Frequency : Enter the frequency. The corresponding frequency value will be automatically displayed. Transmission: Select DVB-T or DVB-T2. 3. Select Search and press the OK button to search for new software. 4. When new software is detected, select Yes to start the update process now. Please wait until the update is complete.
Installation English Antenna Power MENU Settings Installation Antenna Power Active antenna is a portable or indoor antenna which needs power supply from the product because it does not have power cord for itself. Connect an active antenna to the ANTENNA IN on the rear of the product. 1. Select 5V Antenna Power. 2. Select an option. On: 5V power is supplied from the active antenna cable.
System In System, system information, signal detection, power management , common interface, data storage and internet setting are available. Note: Press the MENU or EXIT button to exit. Press the BACK button to return to the previous screen. System Information MENU Settings System System Information The system information is displayed. Signal Detection MENU Settings System Signal Detection You can check the signal strength and quality of the searched channels.
System English Power Management MENU Settings System Power Management Setting Power Saving in Standby You can minimise the standby power consumption to below 1W. 1. Select Power Saving in Standby. 2. Select On to deactivate the certain features and minimise the power consumption. Note: When Power Saving in Standby is switched On the Time on the front display will not appear when in standby, nor will the Antenna Out loop-through the signal to a connected device.
System Data Storage MENU Settings System Data Storage You can check the size of the internal HDD or external USB storage device. 1. Select storage to display the details for the storage. 2. To format the selected storage, select Format Storage. If you select Yes, you will be prompted to enter the password. Note: • The default password is 0000. If you have forgotten your password, please contact Humax Customer Support. • Supported Features according to USB file system.
Appendix English Specification Tuner & Channel Input Connector IEC 169-2 Female Frequency Range 470 MHz to 862 MHz Signal Level -70 to -10 dBmV Demodulation OFDM Mode DVB-T : 2K, 8K DVB-T2 : 1K, 2K, 4K, 8K, 16K, 32K FEC Mode DVB-T: 1/2, 2/3, 3/4, 5/6, 7/8 DVB-T2: 1/2, 3/5, 2/3, 3/4, 4/5, 5/6 Guard Intervals DVB-T : 1/4, 1/8, 1/16, 1/32 DVB-T2 : 1/4, 1/8, 1/16, 1/32, 1/128, 19/128, 19/256 Audio/Video Decoding Audio Decoding Dolby Digital Plus Audio Mode Single channel/Dual channel/Joint st
Appendix Power Supply Input Voltage 90-250 V a.c., 50/60 Hz Type SMPS Power Consumption Max. 28 W (Standby: Under 1 W) Protection Separate internal fuse. The input should be protected against lightning. Physical Specification Size (w/h/d) 380 mm x 55 mm x 252 mm Weight 2.8 Kg Operating Temperature 0 °C to +45 °C Note: The specifications are subject to change without notice.
Appendix English Safety Warning This product has been manufactured to comply with international safety standards. Please read the following safety precautions carefully. Safety Instructions and Precautions 1. MAINS SUPPLY • • Operate this product only from the type of power supply indicated on the marking label. If you are not sure of the type of power supplied to your home, consult your local power company.
Appendix 11. CONNECTION TO THE TV • Disconnect the product from the mains before connecting or disconnecting the cable from the TV. Failure to do so can damage the TV. 12. LOCATION • • • • • Place the product indoors to avoid exposing it to lightning, rain or sun. Do not place it near a radiator or heat register. We recommend that the product has 10 cm clearance from any other appliances susceptible to electromagnetic influences, such as a TV or a VCR.
Appendix English Trouble Shooting Before contacting your local service centre, please read the tips below carefully. If the problem persists after completing the following procedure, please contact your local product distributor or service centre for further instructions. 1. No message displayed on the front display. (The product will not switch on.) • • • • Check the main power cable and make sure it is plugged into a suitable power outlet. Check that the mains supply is switched on.
Appendix 6. Cannot make reservations. • Check that no previous reservations are conflicting with the new reservation. 7. No password information is given. • The default password is always 0000. 8. Channel search does not work. • • • Satellite: Make sure that the antenna setting in the menu is correct. Terrestrial: Make sure that the antenna is connected correctly. Terrestrial: Use the appropriate antenna capable of receiving VHF or UHF channels for your area. 9. Cannot update new software.
Appendix English Error Message Error message No or bad signal [Satellite] No or bad signal [Cable] No or bad signal [Terrestrial] The channel is scrambled or not available. The audio is not available. Possible causes What to do The satellite dish is not pointing at the satellite. Adjust dish alignment. Signal is too weak. Increase the LNB voltage or connect a signal amplifier. Satellite dish is too small. Change to a larger dish. Problem with LNB. Change the LNB. Wrong antenna setting.
Appendix Glossary CVBS (Composite Video Baseband Signal) A technology for transmitting video signals via a cable. Mixes luminance (brightness) and the chrominance (colour) signals together. DiSEqC (Digital Satellite Equipment Control) A DiSEqC compatible receiver relies on a switching box which detects the 22kHz tone pulsing rapidly on and off. In this way, a specially designed receiver can control numerous LNBs through a DiSEqC switching box.
Appendix English Polarisation The direction of the electrical and magnetic fields of a signal. Satellites use both vertical and horizontal polarisation. Means that a frequency can be used twice. PVR (Personal Video Recorder) Video recorder that can record and playback programmes directly using the embedded hard disk drive(s). QPSK (Quaternary Phase Shift Keying) Digital modulation technique in which the carrier phase can have one of four possible values.
Appendix Remote Control Code List 1. Using the Universal Remote Control 1. Select the mode(PVR, TV, DVD, AUDIO) you want to set by pressing the corresponding button on the remote control. The button will blink once. 2. Keep pressing the button for 3 seconds until the button lights on. 3. Enter the 3-digit code. Every time a number is entered, the button will blink. When the third digit is entered, the button will blink twice. 4. If a valid 3-digit code is entered, the product will power off. 5.
Appendix English Button TV DVD AUDIO TEXT EXPAND PLAY PLAY II TEXT HOLD PAUSE PAUSE PIP INPUT STOP STOP PIP MOVE RECORD, OPEN CLOSE RECORD PIP OFF REWIND, SEARCH REVERSE; SCAN DVD SEARCH REW, CD SEARCH REW, REW PIP FAST FORWARD, SEARCH FORWARD; SCAN FAST FORWARD, DVD SEARCH REW, CD SEARCH REW, REW I TEXT MIX SKIP -, TRACK -, CHAPTER - DVD SKIP -, CD SKIP -, SKIP - I TEXT OFF, TV SKIP, TRACK +, CHAPTER + DVD SKIP+, CD SKIP +, SKIP + RED RED RED RED GR
Appendix Button TV DVD AUDIO TV/RADIO TV/DTV ATV/DTV; D/A; DTV/TV; DTV; DIGITIAL HDD, DVD/HDD BAND OPT+ RANDOM TEXT SUBPAGE TEXT TIME RANDOM TEXT INDEX TITLE TEXT POSITION TEXT CANCEL; TEXT UPDATE SLOW; STEP SOURCE, AV, 55INPUT; TV/AV SOURCE, TV/DVD, TV/DISK SOURCE, FUNCTION SLEEP SLEEP SLEEP SLEEP V-FORMAT TEXT SIZE; TEXT EXPAND; FTB WIDE WIDE, FORMAT, 16:9, ASPECT; ZOOM SOURCE ZOOM 2. TV Code List Brand Code A.R.
Appendix Amstrad English 006, 204, 043, 036, 074, 002, 023, 026, 062, 065, 071, 094, 128, 410, 436, 451 Anam 006, 002 Anam National 006, 129 Andersson 210, 211 Anglo 043, 002 Anitech 006, 043, 002, 045 Ansonic 006, 134, 064, 002, 017, 023, 042, 048 , 066, 070, 285 AOC 120, 266, 335 Apollo 083 Apro 420 Arc En Ciel Baird 011, 012, 020, 033, 035, 054, 218 Bang & Olufsen 014 Barco 023 Basic Line 102, 006, 134, 204, 036, 080, 002, 023, 035, 045, 053, 066, 211 Bastide 035 Bauer 17
Appendix Brionvega 006, 014, 062 CMS Hightec Britannia 034, 035 Concorde 002 Brother 043 Condor Bruns 014 006, 043, 064, 002, 034, 045, 049, 070, 072 BSR 023 Conia 179, 201, 298, 376 Conrac 172 Contec 006, 005, 002, 034 Continental Edison 087, 020, 046 Cosmel 006, 002 Crosley 014, 023 Crown 006, 144, 134, 204, 086, 145, 087, 111, 143, 064, 361, 135, 072, 071, 053, 033, 002 BTC 036 Bush 102, 006, 144, 134, 204, 138, 087, 061, 043, 036, 005, 108, 376, 373, 370, 361, 355, 352, 3
Appendix Denver English 006, 108, 214, 256, 352, 410, 453, 473, 489 Desmet 006, 002, 014, 049 DGM 436 Diamant 006 Diamond 181 DiBoss 293 Digatron 006 Digihome 210, 370 Digiline Elekta 043, 045 Element 376 Elfunk 204, 222 ELG 006 Elin 006, 098, 061, 002, 017, 056 Elite 006, 036, 049 Elta 043, 002 Emerson 006, 144, 134, 444, 086, 061, 064, 010, 014, 027, 045, 049, 065, 119 006, 134, 018 Emperor 045 Digimate 198 Envision 266 Digital Device 340 Epson 243, 184, 186 Di
Appendix Fisher 061, 064, 005, 008, 011, 014, 017, 033, 035, 056, 097 Flint 006, 113, 043, 036, 080, 011 Force 210 Forgestone 029 Formenti 006, 014, 023, 034, 049 Formenti-Phoenix 034, 049 Fortress 014, 015 Fraba 006, 064 Friac 006, 113, 064, 002, 091 Frontech 043, 002, 023, 035 Fujimaro 190 Gorenje 064 GPM 036 Gradiente 006, 025, 207 Graetz 144, 087, 061, 023, 053, 065, 211 Gran Prix 128 Granada 006, 098, 103, 005, 019, 038, 011, 023, 033, 035, 053, 054, 060, 081, 083, 094,
Appendix English Hikona 036, 452 Ingersol 002 Hinari 006, 043, 036, 005, 002, 033, 059, 077, 443 Inno Hit 036, 002, 011, 035, 045, 047, 094, 211 Hisawa 144, 113, 036, 080, 045 Innovation 095 Hisense 102, 092, 165, 254, 265, 366, 491 Innowert 190, 246 Hit 014 Interbuy 006, 043, 002 Hitachi 006, 098, 124, 204, 208, 005, 019, 037, 146, 152, 153, 163, 169, 193, 197, 007, 206, 210, 217, 227, 295, 296, 330, 377, 399, 424, 483, 020, 021, 023, 027, 035, 054, 056, 060, 076, 081, 083, 084, 085,
Appendix Kennex 204 Liesenk & Tter Keymat 258, 300, 398, 436, 437 Liesenkotter 006 Kingsley 034 Lifetec Kioto 142 006, 144, 134, 204, 208, 036, 002 066, 095, 137 Kiss 170 Kiton 006, 134 Kneissel 102, 006, 113, 064, 042, 048, 062 066, 070, 075, 091 Kobra 290 Kolster 006, 036, 056 Konig 006, 016 Konka 006, 144, 036, 065, 072, 126, 158, 201 006 Lloyd’s 002 Local India TV 002, 033, 109, 280 Lodos 204, 210 Loewe 006, 064, 014, 048, 093, 094, 123 131, 167, 414, 434 Logic 494
Appendix English Master’s 091 Morgan’s Masuda 036 Motorola 015 Matsui 102, 006, 144, 030, 204, 087, 005, 080, 074, 153, 195, 097, 094, 369, 445, 077, 447, 065, 059, 056, 052, 044, 035, 033, 028, 011, 008, 004, 003, 002 MTC 064, 009, 034, 056, 093 Matsushita 129 Maxent 394, 160 Maxim 213, 327, 451 Medialine 220, 449 Mediator 102, 006 Medion 006 MTEC 044 MTlogic 144, 473 Multibroadcast 029 Multitec 006, 134, 204, 086, 327 Multitech 006, 086, 043, 064, 002, 034, 035 Murphy 0
Appendix Nikko 027 Nobliko 010, 034 Nogamatic 020 Nokia 098, 113, 111, 061, 023, 033, 049, 053, 055, 056, 066, 083, 084, 089, 122 Norcent 266, 335 Nordic 035 Nordmende 006, 144, 103, 030, 020, 046, 054, 242, 280, 499 Normerel 006 Northern Star 220 Novatronic 006, 018, 066 Novita 273 Oceanic 098, 061, 023, 033, 083 Odeon 043 Okano Olidata 006, 043, 064, 002, 011 271 Omega 043 Onida 207, 226 Onimax 144 Onn 380, 465, 477, 495, 497, 500, 501 Onwa 036, 074, 065, 109 Onyx 38
Appendix English Powerpoint 006, 138, 087, 201 RBM 010 Prandoni-Prince 061, 094 RCA 120, 015, 442 Precision 035 RealiTV 237 Premier 199 Reality 237 Prima 043, 002, 071, 218, 238, 303 Recor 006 PrimeView 340 Rectiligne 006 Prinston 204, 145 Rediffusion 098, 061, 005, 055 Prinz 061, 011, 056, 097 Redstar 006 Profex 061, 002, 023 Reflex 006, 134, 204 Profi 002 Relisys Profilo 327 190, 192, 193, 194, 220, 221, 271, 310, 333, 338, 341, 355, 390 Profitronic 006 Remote
Appendix Sanyo 204, 064, 005, 019, 442, 370, 363, 358, 357, 356, 222, 200, 150, 140, 097, 053, 048, 035, 034, 033, 025, 023, 017, 011, 008, 003, 002, 240 SBR 102, 006, 029 Schaub Lorenz 098, 144, 086, 111, 061, 056, 066, 215, 256, 267 Schneider 102, 006, 144, 134, 204, 061, 208, 036, 451, 450, 293, 128, 097, 095, 065, 056, 054, 042, 035, 023, 010 Scotch 027 Scotland 023 Scott 214 Sears 022, 026, 027 Seaway 124 Seelver 204 SEG Sinudyne 006, 061, 014, 023, 032, 056, 094, 097 Skantic 06
Appendix English Sunstar 006, 043, 002, 065 Technotrend 316, 378 Sunstech 456 Techwood 204, 211 Sunwood 006 Teckton 271 Superla 034, 035, 094 Tecnimagen 102 SuperTech 102, 006, 036, 002, 034 Teco 205 Supra 002, 066 Tedelex 002, 035, 380 Susumu 036, 046, 052 Teiron 002 Sutron 002 Tek 168 SVA 108, 190 Teknika 009 Swedx 340 TELE System 192 Swissflex 481 Teleavia 046, 054 Swisstec 481, 480, 422, 421, 401, 400, 391, 344, 343, 342, 341, 340, 308, 307, 300, 271, 195,
Appendix Time 378, 454, 455 Univox 006, 014, 023 Tiny 238 V2max 190 TMK 027 V7 Videoseven 195, 224, 237, 271, 369, 394 Tobishi 310 Venturer 324, 386, 428 Tokai 006, 134, 204, 002, 011, 023, 035, 066 Vestel 006, 134, 204, 035, 211, 333, 370 Vexa 006, 002 Vibrant 044 Victor 005 Videocon 092 Videologic 036, 034 Videologique 036, 034, 035 VideoSystem 006 Videotechnic 034, 035, 049, 066 Videoton 023, 060 Vidikron 150, 277 Vidtech 027 Tokaido 204 Tokyo 004, 034 Tomash
Appendix English White Westinghouse 006, 034, 049, 119 Goodmans Wilson 102 Grandin 119 Windsor 134, 204 Grundig 102, 006, 030, 101, 445 Windstar 045 Hanimex 443 Windy Sam 102 Hinari 005, 443 World-of-Vision 190, 193, 195, 198, 224, 242, 246, 340, 389 Internal 444, 119 Irradio 147 X-View 215 LG 027 Xenius 124, 133 Magnin 442 XLogic 188 Matsui 445 Xomax 397 Xoro 218, 224, 229, 303, 404, 503 Xrypton 006 Yakumo 342 Yalos 398 Yamaha 169, 314, 330, 184 Yamishi 0
Appendix 3.
Appendix English Crown 073, 062, 100 ECC 066 Cybercom 082 Eclipse 065, 070 CyberHome 063 Elfunk 062, 087 Cytron 061, 119 Elin 073 D-Vision 100 Ellion 013, 087 Daenyx 091 Elta Daewoo 073, 018, 061, 063, 083, 091, 129, 130, 159 073, 057, 075, 087, 100, 104, 113, 161, 204 Eltax 113, 117, 149 Dalton 097 Emerson 043, 061 Dansai 073, 100, 162 Enterprise 043 Dantax 038, 077, 062, 065, 122 EuroLine 058, 075, 100, 113, 120, 131, 156 Daytek 091 F&U 203 Dayton 091,106 Fe
Appendix Hanseatic 067, 077 KXD 088, 117, 135, 181 Harman/Kardon 060, 111, 135 Lawson 072 Harwa 211 Leiker 091 HCM 075 Lenco 073, 062, 124 HDT 061 Lexia 072 HE 066, 181 LG 067, 043, 077, 090, 143, 179, 186 Henss 062 Lifetec 082, 119 Hikona 124 Limit 072 HiMAX 086 LiteOn 106, 126, 157, 165 Hitachi 042, 054, 062, 185 LM 156 Hiteker 057, 181 Lodos 062 Hoeher 082 ,062, 081, 094, 109, 140 Loewe 038, 067 Home Electronics 073, 066 Logic 222 Home Tech Industries
Appendix English Metz 041, 035, 062, 185 Oopla 106 MiCO 065, 070, 116 Opera 215 Micromaxx 059, 162 Optim 086 Micromedia 038, 033 Optimus 035 Micromega 038 Orbit 091, 156 Microsoft 163, 194 Orion 059, 062, 113, 127, 162 Microstar 082 Ormond 062 Minax 062 Pacific 082, 072, 077, 062, 071 Minoka 073, 100 Packard Bell 082, 117, 158 Mitsubishi 062 Palladium 059, 062, 179 MixSonic 101 Panasonic 032, 146, 155, 173, 178, 180 Mizuda 073 Panda 076, 135 Monyka 055 pee
Appendix Reoc 072, 092 SKY 013 Revoy 085 Skymaster 066, 072 Richmond 113 Skyworth 093 Roadstar 066, 057, 062, 093, 110, 172 Sliding 100 Ronin 091 SM Electronic 066, 072, 105 Rotel 045 Smart 061, 062 Rowa 064 Sogo 136, 203, 216 Rownsonic 076 Sontech 131 Saba 039, 204 Sony Saivod 082, 071 036, 089, 096, 098, 139, 142, 150, 171, 177, 184, 188, 190, 201, 202 Salora 067 Sound Color 113 Sampo 117 Soundmaster 072 Soundwave 062, 140 Samsung 032, 042, 017, 022, 069, 0
Appendix English TCM 067, 077 Walkvision 064 Teac 067, 072, 061, 064, 071, 110 Waltham 062, 140 Tec 093 Welkin 082 Technica 162 Wellington 062 Technics 032, 178 Weltstar 062 Technika 073, 082, 100, 140, 162, 206, 208, 218, 221 Wharfedale 077, 062, 070, 100, 124, 172 Wilson 082, 113 Technisson 100 Windsor 062 Technosonic 100 Windy Sam 042 Techwood 062, 140, 185 Telefunken 039 Teletech 072, 062 Tensai 073 Tevion 093, 097, 110, 123, 131, 164, 181, 215 Textorm 136
Appendix Philips 210 Technika Proline 193 UMC 208, 221 221 Prosonic 208 Venturer 193, 208 Sliding 100 Sogo 216 Ferguson 059 Swisstec 218 Matsui 059 TV/VCR/DVD Combo 4.
Appendix English Cybernex 020 GEC 010 Cyrus 010 General Technic 028 Daewoo 021, 050, 051, 029, 006 Genexxa 011 Dansai 021, 009 Go Video 030, 102 Dantax 029, 068 GoldHand 009 Daytron 021 GoldStar 003, 001, 031, 102 De Graaf 010, 011, 007, 004 Goodmans Decca 010, 001, 029, 008 010, 021, 050, 003, 028, 001, 051, 009, 029, 020, 068 Deitron 021 GPX 003 Gradiente 001 Graetz 011, 020 Granada 010, 003, 001, 011, 007, 004, 019, 020 Grandin 021, 003, 001, 009, 068 Grundig
Appendix JBL 021 Medion 028, 051, 029 JMB 028, 029, 068 Memorex 003, 028, 001, 011, 007, 020 Joyce 001 Memphis 009 JVC 008 Metronic 010 Kaisui 009 Metz 010, 144, 003, 019, 084 Karcher 010, 021, 051 MGA 005, 020 KEC 021, 003 MGN Technology 020 Kendo 021, 003, 028, 051, 009, 023, 012 Micormay 028 Kenwood 008 Migros 001 KLH 009 Minolta 004 Kneissel 021, 003, 028, 029 Mitsubishi 010, 051, 008, 007, 005, 031 Kodak 003 Motorola 007 Korpel 009 MTC 001, 020 Kyoto
Appendix English Osume 009 Royal 009 Otto Versand 010 Saba 021, 024, 025 Pace 029 Saisho 028 Pacific 028, 001, 051, 068 Salora 011, 005, 012 Palladium 003, 028, 009 Samsung 006, 030, 020, 068 Palsonic 001, 009 Sanky 007 Panasonic 144, 019, 084 Sansei 007 Pathe Cinema 005 Sansui 001, 009, 008, 012 Penney 003, 004, 020 Sanyo 011, 008, 007, 020 Pentax 004 Saville 021, 029, 020 Perdio 001 SBR 010 Philco 009 ScanSonic 020 Philips 010, 044 Schaub Lorenz 028, 00
Appendix Sonolor 007 Topline 028 Sontec 021, 003 Toshiba 010, 029, 006, 005, 030, 068 Sony 001, 002, 012, 095, 112 Totevision 003, 020 Soundwave 003, 028 Towada 009 Ssangyong 009 Tradex 010 Standard 021 Uher 020 Stern 021 Ultravox 021 Sunkai 021, 028 Unitech 020 Sunstar 011 United 028, 068 Suntronic 011 Universum Sunwood 009 010, 003, 028, 001, 011, 012, 020, 102 Supra 003 Vector 006 Sylvania 010, 001, 005 Victor 008 Symphonic 001, 044 Video Concepts 006
Appendix English Citizen 021 Portland 050 Colt 009 Radiola 010 Daewoo 021, 050 RCA 007, 020 Dantax 029, 068 Saba 024 Emerson 021, 050 Samsung 030, 020, 068 Ferguson 021, 001, 025, 068 Sansui 001 Fidelity 001 Sanyo 020 Firstline 021 Saville 029 Funai 001 Schneider 010, 001 GE 007, 020 Sears 003, 001 GoldStar 003, 031 SEG 050 Goodmans 021, 050, 029, 068 Sharp 007 Grandin 021, 068 Siemens 010 Grundig 010, 029, 068 Sinudyne 029 Hanimex 029 Sony 001, 0
Appendix 5.
Appendix English HCM 072 Onkyo 006, 063, 114 HE 071 Optimus 032, 010, 024 Hitachi 088 Orient Power 024 Hitech 024 Orion 018 Hiteker 071 Palladium 027, 045, 054, 072, 086 Home Tech Industries 071 Panasonic Hyundai 087 109, 085, 058, 059, 062, 110, 111, 113, 128 Inkel 020 Paramount Pictures 045 Intersound 024 JBL 056, 057 JVC 001, 019, 068 Kenwood 033, 061, 091, 010 Kioto 027 Kompernass 027 KXD 071 LG 054, 086, 125 Lifetec 027 LXI 024 Magnat 071 Magnavox
Appendix Sunfire 061 United 072, 098 T+A 050, 105 Universum TAG McLaren 043 013, 021, 024, 027, 045, 072, 076, 095 Tandberg 088 Venturer 027 ,072 Vestel 088 Victor 001 Waitec 065 Watson 027 Wellfund 024 Welltech 027 Wharfedale 072 Targa 054 TCM 027 Teac 018, 021 Technics Techwood 109, 085, 058, 059, 011, 110 088 Tedelex 098 Tevion 071 Thorens 043 Thorn 024 Tokai 072 Toshiba 092 Xenius 072 Yamaha 009, 002, 010, 017, 023, 041, 051, 064, 069, 112, 115, 120 Yu
Appendix English OPEN SOURCE SOFTWARE NOTICE HUMAX products use certain open source operating system software distributed pursuant to GNU GENERAL PUBLIC LICENSE Version 2 and GNU LESSER GENERAL LICENSE Version 2.1 each as defined and published by the Free Software Foundation, Inc.
Appendix The GNU General Public License (GPL) Version 2, June 1991 Copyright (C) 1989, 1991 Free Software Foundation, Inc. 51 Franklin Street, Fifth Floor, Boston, MA 02110-1301, USA Everyone is permitted to copy and distribute verbatim copies of this license document, but changing it is not allowed. Preamble The licenses for most software are designed to take away your freedom to share and change it.
Appendix 3. English licensees extend to the entire whole, and thus to each and every part regardless of who wrote it. Thus, it is not the intent of this section to claim rights or contest your rights to work written entirely by you; rather, the intent is to exercise the right to control the distribution of derivative or collective works based on the Program.
Appendix NO WARRANTY 11. BECAUSE THE PROGRAM IS LICENSED FREE OF CHARGE, THERE IS NO WARRANTY FOR THE PROGRAM, TO THE EXTENT PERMITTED BY APPLICABLE LAW. EXCEPT WHEN OTHERWISE STATED IN WRITING THE COPYRIGHT HOLDERS AND/OR OTHER PARTIES PROVIDE THE PROGRAM “AS IS” WITHOUT WARRANTY OF ANY KIND, EITHER EXPRESSED OR IMPLIED, INCLUDING, BUT NOT LIMITED TO, THE IMPLIED WARRANTIES OF MERCHANTABILITY AND FITNESS FOR A PARTICULAR PURPOSE. THE ENTIRE RISK AS TO THE QUALITY AND PERFORMANCE OF THE PROGRAM IS WITH YOU.
Appendix English To protect your rights, we need to make restrictions that forbid distributors to deny you these rights or to ask you to surrender these rights. These restrictions translate to certain responsibilities for you if you distribute copies of the library or if you modify it. For example, if you distribute copies of the library, whether gratis or for a fee, you must give the recipients all the rights that we gave you. You must make sure that they, too, receive or can get the source code.
Appendix 2. You may charge a fee for the physical act of transferring a copy, and you may at your option offer warranty protection in exchange for a fee. You may modify your copy or copies of the Library or any portion of it, thus forming a work based on the Library, and copy and distribute such modifications or work under the terms of Section 1 above, provided that you also meet all of these conditions: a) b) c) d) The modified work must itself be a software library.
Appendix c) d) e) 7. b) 9. 10. 11. 12. 13. 14. Accompany the work with a written offer, valid for at least three years, to give the same user the materials specified in Subsection 6a, above, for a charge no more than the cost of performing this distribution. If distribution of the work is made by offering access to copy from a designated place, offer equivalent access to copy the above specified materials from the same place.
Appendix PERFORMANCE OF THE LIBRARY IS WITH YOU. SHOULD THE LIBRARY PROVE DEFECTIVE, YOU ASSUME THE COST OF ALL NECESSARY SERVICING, REPAIR OR CORRECTION. 16.