
Instruction manual


- 52 -
COLOR CORRECTION
Histogram Correction – Auto Setting:
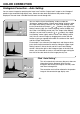
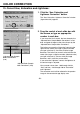
You can correct images by specifying the “Input Level” and the “Output Level” ranges in the “Histogram”
palette in the corrected image display area, where the color level distribution of the preview image is
displayed. The color level is divided into 256 levels from 0 through 255.
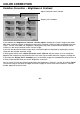
You can find the “Input Level Setting” slide bar under the
“Histogram” palette, and the “Output Level Setting” slide bar under
the “Input Level Setting” slide bar. The “Input Level Setting” slide
bar has three kinds of controls ( or buttons); the “Upper Limit
Setting” control (right), the “Gamma Setting” control (middle) and
the “Lower Limit Setting” control (left). The “Output Level Setting”
slide bar has two kinds of controls ( or buttons); the “Upper
Limit Setting” control (right) and the “Lower Limit Setting” control
(left). You can correct images by dragging each control with the
mouse or typing an appropriate number in each box of the “Input”
and the “Output” fields directly.
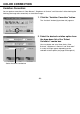
For example, if you take away the deep-black and the pure white
parts where no picture elements exist by sliding the “Upper Level
Setting” control a little to the left and the “Lower Level Setting”
control a little to the right as the histogram figure in the left-hand
shows, you will be able to create a rich-colored image making the
best use of the color levels that the image primarily has.
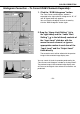
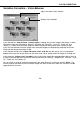
Click “Auto Setting”.
This will automatically take away the parts where no
information (picture elements) exist from the
histogram and correct the image to use every color
level from 0 through 255.
The correction result will be reflected in the preview
image in the corrected image display area.