
Instruction manual


- 56 -
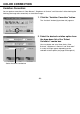
COLOR CORRECTION
To Correct Hue, Saturation and Lightness:
1. Click the “Hue, Saturation and
Lightness Correction” button.
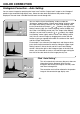
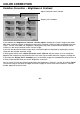
The “Hue, Saturation, Lightness Correction” window
(figure-lower left) appears.
2. Drag the control of each slide bar with
the mouse, or type an appropriate
number in each box.
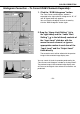
If you move the “Hue” control, the hue shown by the
“Adjusted Color Sample Before Corrections” in red,
blue and green changes to the status shown by the
“Adjusted Color Sample After Corrections”.
The farther you move the “Saturation” control to the
right from the center (the larger a positive number
you type in the box is), the more vivid the image
becomes. The farther you move it to the left from the
center (the larger a negative number (absolute value)
you type in the box is), the less vivid the image
becomes, and it raises the screen effect.
If you move the “Lightness” control, the lightness of
the entire image is adjusted.
You can enter values from –180 through 180 for
“Hue” and from –100 through 100 for “Saturation”
and “Lightness”.
The correction result will be reflected in the preview
image in the corrected image display area.
“Adjusted Color Sample
Before Corrections”
(hue)
“Adjusted Color Sample
After Corrections” (hue)