E 9222-2889-11 AV-A209 INSTRUCTION MANUAL
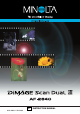
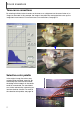
COLOR EXAMPLES Tone-curve corrections By selecting individual color channels on the tone curve, adjustments to the overall color of an image can be made. In this example, the image is too yellow. By moving the blue curve up, the image looks more neutral. For more on tone curve corrections, see page 71. Selective-color palette In the original image, the colors were muted making the whole scene flat. By subtracting cyan from the red channel, the bridge and faint details in the clouds could be accentuated.
BEFORE YOU BEGIN Thank you for purchasing this Minolta product. Please take the time to read through this instruction manual so you can enjoy all the features of your new scanner. This manual contains information regarding products introduced before October, 2002. To obtain information for products released after this date, contact a Minolta service facility listed on the back cover of this manual. This product is designed to work with accessories manufactured and distributed by Minolta.
TABLE OF CONTENTS Color examples . . . . . . . . . . . . . . . . . . . . . . . . . . . . . . . . . . . . . . . . . . . 2 Before you begin . . . . . . . . . . . . . . . . . . . . . . . . . . . . . . . . . . . . . . . . . . 3 For proper and safe use. . . . . . . . . . . . . . . . . . . . . . . . . . . . . . . . . . . . . 8 Getting started . . . . . . . . . . . . . . . . . . . . . . . . . . . . . . . . . . . . . . . . . . . 10 The package contents . . . . . . . . . . . . . . . . . . . . . . . . . . . . . . .
Easy Scan Utility . . . . . . . . . . . . . . . . . . . . . . . . . . . . . . . . . . . . . . . . . 24 Launching the Easy Scan Utility . . . . . . . . . . . . . . . . . . . . . . . . . 24 Using the Easy Scan Utility. . . . . . . . . . . . . . . . . . . . . . . . . . . . . 25 DiMAGE Scan Dual III Utility . . . . . . . . . . . . . . . . . . . . . . . . . . . . . . . . 30 DiMAGE Scan Dual III Utility – Basic scanning . . . . . . . . . . . . . . . . . . . 31 Launching the DiMAGE Scan Dual III Utility . . . . .
TABLE OF CONTENTS DiMAGE Scan Dual III Utility – Advanced scanning . . Setting scanner preferences . . . . . . . . . . . . . . . Exposure-control tab. . . . . . . . . . . . . . . . . . . . . Saving exposure settings. . . . . . . . . . . . . Loading exposure settings . . . . . . . . . . . . More index scan functions . . . . . . . . . . . . . . . . Reverse frame order . . . . . . . . . . . . . . . . Saving the index images . . . . . . . . . . . . . Saving an index file . . . . . . . . . . . . . . . . .
DiMAGE Scan Dual III Utility – Image processing . . . . . . . . . . . . . . . . . 64 Image processing tools . . . . . . . . . . . . . . . . . . . . . . . . . . . . . . . . 64 Main window and image-correction tab . . . . . . . . . . . . . . . 64 Guide to image-processing tool . . . . . . . . . . . . . . . . . . . . . 65 Undoing and redoing image corrections . . . . . . . . . . . . . . . 66 Tracking image corrections – Snapshot button . . . . . . . . . . 66 Comparing pre and post correction images . . . . . .
FOR PROPER AND SAFE USE Read and understand all warnings and cautions before using this product. WARNING • Use only within the voltage range specified on the unit. Inappropriate current may cause damage or injury through fire or electric shock. • Only use the AC adapter (model specified by Delta Electronics, Inc. ADP-20LB or Ya Hsin Industrial Co., Ltd. 019-240840) supplied with the product within the voltage range indicated on the adapter unit.
• • • • Insert the plug securely into the electrical outlet. Do not use if the cord is damaged. Do not cover the AC adapter. A fire may result. Do not obstruct access to the AC adapter; this can hinder the unplugging of the unit in emergencies. • Unplug the product when cleaning or when the unit is not in use for long periods. • Periodically check that the plug is clean. Dust and dirt that may collect between the prongs of the plugs may result in fire.
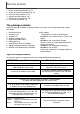
GETTING STARTED Follow the steps below to set up the scanner. 1 Check the package contents (p. 10) 2 Check the system requirements (p. 10) 3 Install the utility software (p. 12) 4 Connect the USB cable (p. 18) 5 Connect the AC adapter (p. 19) 6 Turn on the scanner (p. 19) The package contents Check the packing list before using this product. If any items are missing, immediately contact your dealer.
* * The CPU and RAM must satisfy the requirements of the operating system. Application software must be guaranteed by the manufacturer to work with the operating system. * The USB interface must be guaranteed by the manufacturer to work with the operating system. * The software may freeze or an error may occur if the operating system's stand-by (sleep) function activates. Turn the function off before using the utility software.
GETTING STARTED Installation Before installing the utility software RAM-stationed programs such as anti-virus or installation-monitoring software may cause the installer to fail. Remove or disable these programs before installing the scanner software. Reinstall or enable the software when the installation is complete.
To install the software in the default folder (C:\Program Files\DS_Dual3), click the next button. To install the software in another folder, click the browse button to display the folder selection window. Specify the directory in which to install the software, then click the next button. Select the components to be installed, then click the next button. Normally, TWAIN-data-source should be selected. The descriptions in this manual assume the utility was installed with the TWAIN-data-source.
GETTING STARTED Installing the utility software – Macintosh Turn on the computer to start the Mac OS. Users with Mac OS X should log in as administrator. Insert the DiMAGE Scan Dual III CD-ROM into the CD-ROM drive. The DiMAGE Scan Dual III CD-ROM icon will appear on the desktop. Double-click on the CD-ROM icon. Open the driver folder to view the language folders. Open the appropriate language folder. Double click on the DS Dual3 Installer icon; the installer’s start-up screen will be displayed.
Select the installation method from the pop-up menu at the top left of the installer screen. The easy-install option will install the required software. If only specific programs need to be installed, select the custom-install option; click the check box of the files to be installed. Click on the install button to begin installation. Any software that is running must be stopped before the scanner software can be installed.
GETTING STARTED Installing Adobe Photoshop Elements The scanner utility software contains a plug-in module that can be installed in the Photoshop Elements import/export folder located in the plug-in folder. This will allow the scanner utility software to be opened from Photoshop Elements. PC / AT compatible computers Macintosh computers Pentium processor PowerPC processor. Windows 98, 98 Second Edition, Me, 2000, NT 4.0, or XP. Mac OS 8.6, 9.0, 9.0.4, or 9.
Names of parts 35 mm film-holder mark (p. 22) Pull the front door down to this position when inserting a 35mm film holder FH-U1 or slide mount holder SH-U1. Front door (p. 22) When the scanner is not in use, close the door to prevent dust from entering the unit. Eject button (p. 23) This button ejects the film holder, and rewinds the film in the optional APS adapter. Indicator lamp APS adapter mark (p. 23) Power switch (p.
GETTING STARTED Before scanner setup Before connecting the DiMAGE Scan Dual III to a computer, the scanner utility software must first be installed; if the scanner is connected to the computer before the CD-ROM is installed, the computer may not recognize the scanner unit. Read page 12 for the installation procedure. The scanner should be placed on a level surface free from vibrations. It should be located away from direct sunlight and in a clean, dry, well-ventilated area.
Connecting the AC adapter Connect the output plug of the AC adapter to the scanner’s DC terminal (1). Plug the adapter unit into a standard household outlet (2). 2 1 Turning on the scanner Check the scanner is securely connected to the computer. With the front door closed, turn on the scanner with the power switch. Start up the computer. When launching the utility software, the front door must be closed during initialization; the indicator lamp will blink when the scanner is initializing.
LOADING THE FILM HOLDERS Film formats With the DiMAGE Scan Dual III, two film formats can be scanned: 35 mm and APS. Two supplied film holders and one optional holder are available. FH-U1 For 35mm film strips SH-U1 For mounted 35mm and APS slides AD-10 (sold separately) For APS film cassettes Loading the film Handling film To achieve the best possible reproduction from the scanner, the film and film holder should be free from dust and dirt.
Replace the cover. Slide the two protrusions on the left side of the cover into the two slots in the base (2). Carefully lower the cover taking care not to move the film. Snap the cover closed by pressing the two push marks on each side of the tab (3). 2 3 Loading mounted slides Up to four mounted 35mm or APS slides can be inserted into the slide mount holder. The slide mounts must be between 1 mm and 2 mm thick to fit the holder.
LOADING THE FILM HOLDERS Loading a film holder into the scanner Using the FH-U1 and SH-U1 film holders Before using the scanner, install the scanner utility software (p. 12). With the front door closed, turn on the scanner and then start the computer. Launch the software before inserting the film holder (p. 24, 31). Do not insert the film holder into the scanner while the utility software is launching or the scanner is initializing; the indicator lamp blinks slowly during this period.
4 Insert the cassette into the film chamber as shown (3). Close the chamber door (4); the film-chamber release will return to its original position (5). 3 5 When the indicator lamp glows steadily, open the front door until the top of the door is aligned with the APS adapter mark. With the scanner contacts face up, insert the adapter into the scanner until it stops. The scanner detects the holder and automatically loads the film.
EASY SCAN UTILITY Easy Scan Utility is a simple, automatic scanning application for trouble-free scans. The utility works as a stand-alone program, and cannot be launched through another application. Simply follow the steps below to create trouble-free scans: 1 Turn on the scanner (p. 19) 2 Launch the Easy Scan Utility (p. 24) 3 Load the film holders (p. 20) Follow the instructions in the Easy Scan window. The Easy Scan Utility wizard will take you through scanning procedure.
Using the Easy Scan Utility When the Easy Scan Utility is launched, the easy scan wizard appears. Simply follow the instructions on the scan wizard to scan images. A screen requesting to insert the film holder appears. Load the holder following the instructions from page 20 to 23. When the holder is loaded, the scanner automatically detects the holder type.
EASY SCAN UTILITY When scanning with 35mm film strips or mounted slides, the film type must be specified on this screen. Color negative, B&W negative, color positive, B&W positive film can be scanned. Film for slides is a positive film. Film for prints is a negative film. Click the appropriate film-type button. The border of the film-type button is highlighted to indicate the selection. Click the next button to set the film type and begin the index scan.
When the index scan is complete, thumbnails of all the images in the holder are displayed. The image to be scanned can be selected on this screen. Click the frame of the image to be scanned. The border is highlighted to indicate selection. Only one image can be selected. Make the desired settings for the selected image. Click the next button.
EASY SCAN UTILITY If the adjust-image option was selected by checking the box in the previous screen, the adjustimage screen will be displayed. After making adjustments to the image, click the next button. Pixel Polish button Auto Dust Brush button Brightness, contrast, and saturation sliders Pixel Polish button: Click this button to correct images automatically. Changes will be reflected in the displayed image. If the function was selected in the previous screen, the button is highlighted.
On the save-as screen, specify the file name, file format, and destination of the image data. Click Save to start scanning. Images can be saved in BMP, JPEG, TIFF, or PICT file formats. See the below for more about these formats. When saving JPEG files, the compression ratio can be specified. Click the save button to complete the final scan. When using a USB storage device on the same bus as the scanner, save the data on the computer’s hard disk first before transferring it to the storage device.
DIMAGE SCAN DUAL III UTILITY The DiMAGE Scan Dual III Utility provides a variety of tools to optimize the reproduction of a film image. This section covers basic scanning, advanced scanning, and image processing. Read the basic scanning section entirely before moving on to the other sections. Basic scanning (p. 31 – 43) Advanced scanning (p. 44 – 63) Launch the DiMAGE Scan Dual III Utility (p. 31) Select the film format and type(p. 31) Setting scanner preferences (p.
DIMAGE SCAN DUAL III UTILITY – BASIC SCANNING Launching the DiMAGE Scan Dual III Utility Turn on the scanner before launching the DiMAGE Scan Dual III Utility. When launching the utility, the scanner front door must be closed and the film holder removed. Do not launch the utility through image-processing software if it has already been opened as a stand-alone application. Windows Macintosh Open the DS Dual3 (DiMAGE Scan Dual III) folder, and double click the DS Dual3 Utility icon.
DIMAGE SCAN DUAL III UTILITY – BASIC SCANNING Index scan The index scan is a low-resolution scan used to show thumbnail images of all the frames in the film holder. Index scans are particularly useful when selecting images from negative films. Images can be prescanned or scanned without making an index scan. Main window and index scan tab Preference button (p. 44) Pixel Polish button (p. 40) Help Auto Dust Brush button (p. 39) Film type (p. 31) Film format (p. 31) Flip-vertically button (p.
Making an index scan With a loaded film holder in the scanner, click the index-scan button in the main window to start the scan. The frame number of the index scan corresponds to the frame number in the film holder. To cancel the index scan, click the cancel button in the small dialog box that appears during the scan, or press the escape key (Windows), or press the command key and period (.) at the same time (Macintosh).
DIMAGE SCAN DUAL III UTILITY – BASIC SCANNING Flip and rotate images The orientation of the index thumbnails and prescan images can be changed with the flip and rotate buttons on the tool bar. Rotate – the rotate-right button rotates the thumbnail 90° clockwise and the rotate-left button rotates the image 90° counterclockwise each time the buttons are clicked. Original image Flip – when an image is flipped, it will create a mirror image.
Fit-to-window button Normally, index thumbnails and prescan images are displayed based on their size and resolution. When the number of thumbnails or the size of the prescan is too large or small for the display area, clicking the fit-to-window button will automatically resize the images to fit the display area. Clicking the button again displays the images at their original size. The prescan grab and zoom tools cannot be used with the fit-towindow function.
DIMAGE SCAN DUAL III UTILITY – BASIC SCANNING Prescan Prescan tab allows image orientation, cropping, focus, and exposure to be optimized before the final scan. Images can be scanned without making a prescan. Main window and prescan tab Film format (p. 31) Index scan button (p. 33) Prescan button (p. 37) Scan button (p. 43) Eject button (p. 23) Film type (p. 31) Auto Dust Brush button (p. 39) Help Pixel Polish button (p. 40) Preference button (p.
Making a prescan When using an index scan, select the index frame(s) to be prescanned. Click the prescan button in the main window. Double clicking on the index frame will also activate the prescan even if no thumbnail is displayed in the frame. The prescan window will be displayed automatically. The procedure to cancel the prescan is the same as the index scan, see the canceling the index scan section on page (p.33).
DIMAGE SCAN DUAL III UTILITY – BASIC SCANNING CHP button (APS film) H Clicking the CHP button cycles the cropping frame through the “C,” “H,” and “P” APS framing formats. The cropping area can be moved by placing the mouse pointer within the marquee (dotted line) and then clicking and dragging. The cropping area can also be adjusted manually (p. 38). When using the image-correction tools, only the cropped area is displayed.
Auto Dust Brush – Removing the effect of dust The Auto Dust Brush reduces the visibility of fine dust particles on the film surface that cannot be removed with a brush or blower. Auto Dust Brush processing is applied to all the images in the holder. The scanning time increases with the use of the Auto Dust Brush. This function cannot be used with 16-bit linear color depth (p. 45). Before using the Auto Dust Brush, remove all visible dust from the film, see handling film on page 20.
DIMAGE SCAN DUAL III UTILITY – BASIC SCANNING Pixel Polish – Correcting images automatically Pixel Polish makes automatic image corrections or custom corrections using straightforward parameters displayed in the window. Once the Pixel Polish button is pressed, corrections are immediately applied to all the frames in the holder. Image corrections performed prior to the use of the Pixel Polish function are all reset for all images in the holder. Scanning time increases with the use of Pixel Polish.
Clicking the Pixel Polish button on the main window automatically corrects all the images in the film holder replacing any previous corrections. The correction are immediately applied to the prescan image. Once applied, Pixel Polish will remain active until canceled; to cancel Pixel Polish and return to the original image, click the Pixel Polish button again. To reapply any image corrections made before clicking the Pixel Polish button, open the image in the image-correction tab and press the undo button.
DIMAGE SCAN DUAL III UTILITY – BASIC SCANNING Making the final scan using Jobs The final scan saves the image data and any changes made to it with the scanner software in your computer. Before making the final scan, the input and output parameters must be specified. While it’s possible to input the scan settings yourself, DiMAGE Scan Dual III Utility gives you an easier choice – the Job function. This function automatically loads the scan settings based on the final use of the image.
Click a Job file name to select it. The Job names can be sorted chronologically or alphabetically by clicking the name or date radio buttons at the bottom of the dialog box. The scan settings of the selected Job file are displayed on the right side of the window. The Job settings vary between the 35mm and APS film formats, see the Job file list on page 82. Click the OK button to apply the Job settings. When the Job file is loaded, a cropping frame will appear on the image.
DIMAGE SCAN DUAL III UTILITY – ADVANCED SCANNING This section covers the advanced scanning tools in the DiMAGE Scan Dual III Utility. The basic scanning section on pages 31 through 43 should be read before continuing. Setting scanner preferences Click the preferences button in the main window to open the preferences dialog box. Select the preferences options to customize scanner operations. Click the OK button to apply the preference settings and close the window.
Color-depth list box: this option specifies the color depth of the scanned image. The default setting is 8 bit for each RGB channel. 16-bit and 16-bit linear can be made. Because 16 bit linear color depth does not make any gamma corrections, the scan of a negative will produce a negative image. 16-bit and 16-bit linear images can only be saved in the TIFF file format. Auto Dust Brush cannot be used with 16-bit linear color depth. Pixel Polish cannot be used with 16-bit and 16-bit linear color depth.
DIMAGE SCAN DUAL III UTILITY – ADVANCED SCANNING Exposure-control tab The exposure control is not an image-processing tool. No gamma or contrast changes can be made. The exposure-control tab allows the scanner’s exposure system to be customized to specific films, lighting, or a personal exposure index based on the film, processing, lens, and shutter combination. This can also be used to compensate for badly exposed film. Simply click the exposure-control tab to display the selected image.
Adjust the sliders or enter values between ±2 in 0.1 increments in the text boxes. Press the apply button to view the effect on the preview image. Repeat until the desired result is achieved. To cancel all settings, click the reset button and press the apply button to initialize the preview image. When using autoexposure, adjustments are made in reference to the exposure determined by the AE system.
DIMAGE SCAN DUAL III UTILITY – ADVANCED SCANNING More index scan functions Index scan button (p. 33) Reverse-frame-order button (p. 48) Save index-image button (p. 49) Save index-file button (p. 49) Load index-file button (p. 49) Load image-correction Job button (p. 68) Reverse frame order Some cameras reverse-wind the film so the last frame is exposed at the beginning of the roll.
Saving the index images The displayed thumbnail images can be saved in one image file. An index scan of all the frames in the film holder, including empty frames, must be made before the index thumbnails can be saved. Click the save index-image button. The standard save-as dialog box will appear. Enter the file name, and select the file destination and file format for the image data. Click the save button.
DIMAGE SCAN DUAL III UTILITY – ADVANCED SCANNING Autoexposure control – More prescan functions Autoexposure adjusts the scanner exposure to compensate for the density of the film. To use the autoexposure function with color slides, the auto-expose-for-slides option must be checked in the preferences box. To use it with color negatives, the exposure control for negatives must be set to auto in the preferences box (p. 44).
AE area selection Click the AE-area-selection button after prescanning the image. Pressing the shift key changes the dotted cropping frame to the solid AE area frame. While pressing the shift key, use the mouse to adjust and move the AE area. The methods used to manipulate the frame are the same as the cropping frame except that the shift key must be held, see manual cropping section on page 38. Place the AE area over the section of the image to be used to determine the exposure.
DIMAGE SCAN DUAL III UTILITY – ADVANCED SCANNING Focusing the scanner – More prescan functions Use the focusing functions if the film is warped or curled. Three options are available: autofocus, Point AF, and manual focus. Autofocus uses the center of image to determine the focus is activated with the autofocus-at-scan option in the preferences dialog box (p. 44). Point AF uses a point specified in the image to determine the focus. The scanner can also be focused manually using a selected point.
Manual focus The scanner can be focused manually using the focus meter. For best results, select an area within the image with contrast or detail. The manual focus functions cannot focus on a low-contrast image area such as a cloudless or overcast sky. Click the manual-focus button. The mouse pointer will change to the manual-focus icon. To cancel the function, click the manual-focus button again. Click on the area of image to be used for focus. The focus meter window will appear.
DIMAGE SCAN DUAL III UTILITY – ADVANCED SCANNING Inputting scan settings manually Settings for the final scan such as input or output resolution and size can be manually made for individual images in the index scan or prescan windows. Once made, they will remain in effect until changed.
Magnification text box: to set image magnification. This value equals the input resolution divided by the output resolution, or the output size divided by the input size. The magnification text box cannot be used if pixel is selected in the unit list box. When the input size and output size are unlocked, the input resolution and output size vary according to the entered magnification value. When the output size is locked, the input resolution and input size vary according to the entered magnification value.
DIMAGE SCAN DUAL III UTILITY – ADVANCED SCANNING Scan setting examples Example 1: setting the scanner output by pixels. This example creates an image with the pixel dimension of 1024 X 768. Select pixel from the unit list box. The output-resolution and input-size boxes are deselected. Enter the dpi resolution for the output size; 1024 for the width and 768 for the height. Click the output-size lock button to fix the values; the output-size boxes will be deselected.
Saving scan settings as a Job Frequently used scan settings can be saved. With the settings to be saved in the scan setting window, click the save Job button. The Job-registry dialog box will open. Select the category in which to save the settings from the drop-down menu. Enter the Job name. Click OK to save the settings. See page 42 to load a Job. Deleting a Job A Job file can be deleted. Once deleted, it can not be recovered. Click the load Job button.
DIMAGE SCAN DUAL III UTILITY – ADVANCED SCANNING Custom Wizard The Custom Wizard is an automated scanning routine. Insert a film holder into the scanner. Click the Custom Wizard button. On the Custom-Wizard-setting dialog box, select New from the Custom Wizard settings. Click the next button. If previous Custom Wizard settings have been saved, they will be displayed in this window. To use any settings, simply select it with the mouse. Set up the dialog box for the film and holder in use.
Make any adjustments to the scanner exposure. Previously saved settings can be loaded. See page 46 for more information. Click the next button to continue. The Auto Dust Brush (p. 39) and Pixel Polish (p. 40) functions can be used in the scan. Click the Auto Dust Brush button to activate the dust-removal function, then set the degree of processing with the slider. Click the Pixel Polish button to activate the automatic image-correction function, then specify automatic or custom corrections.
DIMAGE SCAN DUAL III UTILITY – ADVANCED SCANNING Color matching Each output device (monitor or printer) defines color and contrast differently. To ensure the output images are reproduced to the original scanned data as accurately as possible, the color space for both devices must be defined. The DiMAGE Scan Dual III color matching function matches the scanned color with specified color spaces. The color matching system can use the monitor’s ICC profile to display the image as accurately as possible.
The choice of output color space depends on how the image will be reproduced. For most home use where the image is displayed on a monitor or printed with a small printer, sRGB color space is adequate. Other color spaces have been included for professional and technical applications. For recommendations for color space use, see page 63. sRGB: the color space promoted by Hewlett Packard and Microsoft.
DIMAGE SCAN DUAL III UTILITY – ADVANCED SCANNING Setting the monitor ICC profile The ICC profile for a specific monitor can be used. Refer to the monitor instruction manual for the profile name. Click the use-ICC-profile check box. Click the load ICC-profile button. The operating systems file-open dialog box will open. Open the ICC profile for the monitor in use. Click OK in the preferences box to set the ICC profile.
Color matching recommendations The following are recommendations for output color space and monitor ICC-profile settings with image-processing applications. Some applications have a monitor correction display function which automatically corrects the monitor display to a specific color space. With an application with a monitor correction display function such as Adobe Photoshop ver.5 or later: Output Color Space: Select the same color space as set in the application. With Photoshop ver. 5.
DIMAGE SCAN DUAL III UTILITY – IMAGE PROCESSING Image processing tools This section contains details on the image-processing tools as well as functions to view and save image corrections. Main window and image-correction tab The prescan image or a selected index image can be displayed in the correction window by simply clicking the image-correction tab. If the image has not been prescanned, a prescan will be made automatically. RGB display Index scan button (p. 33) Prescan button (p.
Guide to image processing tool There are multiple tools that will result in the same effect. One may be easier or more flexible than another. The most suitable tool for a specific job will depend not only on the required results but also the experience of the operator; all changes made with any of the palettes can be reset or undone (p. 66). Tools and functions Effects Variation palette: a simple image processing tool.
DIMAGE SCAN DUAL III UTILITY – IMAGE PROCESSING Undoing and redoing image corrections The undo, redo, and reset-all buttons only affect tools used in the image-correction tab. Click the undo button to cancel the last image correction applied to the image. The number of image corrections that can be undone depends on the computer memory capacity. Click the redo button to reapply the last image correction canceled with the undo button.
Comparing pre and post correction images Clicking the comparison display button divides the image display area in two. The original image is on the left and the corrected image is on the right. To display the corrected image only, click the comparison display button again. Original image Corrected image Changes made with the scroll bars on one image will be applied to the other. Using the fit-to-window button automatically resizes both images to fit the display area.
DIMAGE SCAN DUAL III UTILITY – IMAGE PROCESSING Loading image-correction Jobs Display the image to be corrected in the image-correction window. Click the load image-correction Job button to load a saved image-correction setting. Click on an image-correction Job thumbnail to select it. Click OK to apply the Job to the displayed image. Jobs are loaded into the snapshot display area. Multiple Jobs can be loaded.
Variation palette The variation palette allows an image to be corrected by comparing it to other slightly corrected images surrounding it. This is an easy method to correct images for individuals who are inexperienced in image processing or photofinishing. Click the variation button to display the palette. Click the arrow next to the variation list box (1) to select the image quality to be corrected: color balance, brightness and contrast, or saturation.
DIMAGE SCAN DUAL III UTILITY – IMAGE PROCESSING Brightness, contrast, and color balance palette Click the brightness, contrast, color-balance button to display the palette. Drag the brightness, contrast, or color sliders, or enter specific values in the corresponding text box to make corrections. Dragging each slider to the right or inputting a positive number in the text box increases the brightness, contrast, and color.
Tone curve and histogram corrections The tone curve is a graphic representation of the brightness and color levels of the image. The bottom axis is the 256 levels of the original image (input data) from black to white. The vertical axis is the corrected image (output data) with the same scale from top to bottom. Output The bottom left portion of the graph represents the dark colors and shadow areas of the image. The middle section represents the mid-tones: skin, grass, blue sky.
DIMAGE SCAN DUAL III UTILITY – IMAGE PROCESSING Tone curve and histogram palette Click the tone-curve/histogram button to display the palette. Color-histogram button (p. 77) Channel list box (p. 72) Tone curve Freehand curve button (p. 73) Smooth curve button (p. 73) White, gray, and black-point buttons (p. 78) Apply button (p. 78) Histogram Input shadow, gamma, and highlight text boxes (p. 76) Output shadow and highlight text boxes (p. 76) Reset button Auto-setting button (p.
Place the mouse pointer over the tone curve. Click and drag the curve. Any corrections made on the tone curve are immediately applied to the displayed image. Each time the tone curve is clicked, a node is attached to the curve. The nodes can be moved by clicking and dragging. The horizontal axis (input level) represents the brightness levels of the original image, and the vertical axis (output level) the change applied to the image.
DIMAGE SCAN DUAL III UTILITY – IMAGE PROCESSING A short guide to tone curve corrections Image processing is a highly specialized and difficult field that takes years of practice to master. This basic guide to using tone curves covers a few simple procedures to improve your pictures. For more about digital-image processing, consult your local book dealer about self-help guides on this subject.
Increasing image contrast The contrast of an image can be changed. The light blue 45° line on the tone-curve graph represents the original contrast of the image. Making the angle of the tone curve greater than 45° will increase the contrast. Making the angle less than 45° will reduce the contrast. With the RGB channel selected, click on the tone curve near the top and bottom to add two nodes. Slightly move the top node up and the bottom node down.
DIMAGE SCAN DUAL III UTILITY – IMAGE PROCESSING Histogram corrections Input shadow slider Input highlight slider Input gamma slider Input shadow text box Input gamma text box Input highlight text box Output shadow slider Output highlight text box Output highlight slider Output shadow text box The color histograms can be displayed with the channel list box or with keyboard shortcuts.
The input shadow slider sets the black level. As the slider is moved to the right, an apparent increase in contrast can be seen in the displayed image. All pixels to the left of the slider are set to 0 and any image detail they may contain will be lost. The black and white output levels can be adjusted. By moving the output highlight and shadow sliders, the contrast of the image can be reduced. Click the color-histogram button to view the red, green, and blue histograms.
DIMAGE SCAN DUAL III UTILITY – IMAGE PROCESSING White, gray, and black point corrections On the tone curve / histogram palette, corrections can be made by specifying a white, black, and gray point within the image. Locating an appropriate neutral area within the image is critical to correctly calibrate the software. When the dropper tool is selected, the RGB display is active and can be used to evaluate the image area. All changes are immediately reflected in the display image.
Setting the white and black-point values The white and black-point values are set to 255 and 0 for each RGB level. Changing these values allow the calibration of an image with no true white or black. Double-click on either the white-point or black-point button to activate the point-value-setting dialog box. Enter the new white-point or black-point values. Click OK. With the point-value-setting dialog box open, the mouse pointer can be used to measure the color of any point on the displayed image.
DIMAGE SCAN DUAL III UTILITY – IMAGE PROCESSING Unsharp mask The unsharp mask sharpens edges in the image without affecting overall image contrast. This mask can be used with soft or slightly out-of-focus images. The effect of the unsharp mask is very subtle, but makes a significant improvement to the overall appearance of the image. Click the unsharp-mask button to open the unsharpmask dialog box. Drag the sliders or enter values in the text boxes to adjust the parameters of the mask.
Hue, saturation, and lightness palette This palette adjusts the image in reference to the HSB color model. These controls can be used to manipulate the color image rather than producing a realistic representation. The HSB color model defines color based upon human perception rather than photographic processes. Hue refers to each separate color in the model. Saturation is how S vivid each colors is. Lightness describes how bright or dark a color is in the color space.
JOB FILE LISTS Jobs can be used to make scan settings based on the final use of the image. See making-thefinal-scan using Job section in page 42.
APS film 83
INSTALLED FILES AND FOLDERS When installing the utility software, the following files and folders are installed: Windows C: Program Files DS_Dual3 folder DS_Dual3.exe DS_Dual3Easy.exe Readme.txt Exporter folder Help folder Job folder* Profile folder Prefs folder EasyScan folder Windows folder (98, 98SE, Me) or WINNT folder (2000 and XP) Twain.dll Twain_32.dll Twunk_16.exe Twunk_32.exe System folder (98, 98SE, Me) MFSLib2889.dll MFSBaseLib2889.dll MFSIFLib2889.dll MCMLDS.dll Pfudsrv.dll PQueen20.
Mac OS 8.6, 9.2.2 Mac OS X DS Dual3 folder DS Dual3 Utility DS Dual3 Easy DS Dual3 Plug-in Read Me /(root) Applications DS Dual3 folder DS Dual3 Utility DS Dual3 Easy DS Dual3 Plug-in Read Me Library CFMSupport folder MFSLib2889 MFSBaseLib2889 MFSIFLib2889 MCM Library DS MFSIOUsb2889.bundle Pfudsrv.Shlb Queen20Lib System folder Preferences folder DS Dual3 folder Prefs folder Help folder Job folder* Profile folder ColorSync Profile folder MLTF2840.icc MLTF2840p.
TROUBLESHOOTING AND TECHNICAL SUPPORT This section covers minor problems with scanner operation. For major problems or damage, or if a problem continues to reoccur frequently, contact your dealer or a Minolta service facility. SYMPTOM or MESSAGE SOLUTION When starting up the utility software, Error=4 – could-not-confirm-scanner-connection message appears. Confirm the cable is securely connected between the computer and scanner. Turn the scanner off and on. Click OK to continue.
Pixel Polish and Mac OS With Macintosh operating systems, to use Pixel Polish when the utility is launched through Photoshop or Photoshop Elements, the largest unused block of memory in the system must be more than 128 MB. With the Photoshop application open, check the amount of the largest unused block of memory before launching the utility. If the block of memory is less than 128 MB, use one of the following method to increase the volume: - Close all other application running.
TROUBLESHOOTING AND TECHNICAL SUPPORT How to delete the driver. 1 Click on the driver to select it for deletion. 2 Windows 98 and Me: click the remove button. A confirmation screen will appear. Clicking the yes button will remove the driver from the system. Windows 2000 and XP: click on the action button to display the drop-down menu. Select uninstall. A confirmation screen will appear. Clicking the yes button will remove the driver from the system. 3 Restart the computer.
TECHNICAL SPECIFICATIONS Scan type: Film type: Film formats: Maximum scan size: Maximum input pixels: Optical input resolution: Sensor type: Number of pixels: A/D conversion: Color depth: Dynamic range: Light source: Focusing: Other: PC interface: Power consumption: Power requirements: Dimensions : Weight: Operating environment: Storage environment: Scan times : Prescan Scan Moving film, fixed sensor, single-pass scan Color / B&W, Negative / positive Mounted and unmounted 35mm film, Mounted APS film.
AN INTRODUCTION TO COLOR Primary (RGB) and secondary (CMY) colors The RGB color model is an additive process that uses the primary colors of light: red, green, and blue. An additive color system mixes the three colors to recreate the entire spectrum of light. If all three colors are mixed, white light is produced. Television sets and computer monitors use RGB to create images. The CMY color model is a subtractive process that uses the secondary colors: cyan, magenta, and yellow.
COLOR EXAMPLES Complementary colors (p. 90) HSB color model (p. 81) Saturation GREEN YELLOW Lightness RED CYAN Hue BLUE MAGENTA Hue corrections Changes in hue rotate the original color values though a color space and reassigns a new hue based on the new position in that space. In this example, the original image was rotated 180°. For more on the hue, saturation, and brightness palette, see page 81.
© 2002 Minolta Co., Ltd. under the Berne Convention and the Universal Copyright Convention.