
Repair Manual
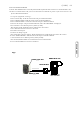
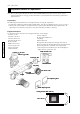
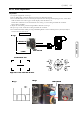
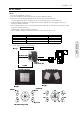

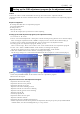
Table Of Contents
- REPAIR GUIDE
- ■Precautions
- 1. Disassembly of the exterior parts
- ■Wires arrangement
- 2. Disassembly of the TEBURE ASSY, SHUTTER ASSY
- 3. Disassembly of the MIRROR BOX ASSY, BATTERY HOLDER
- 4. Disassembly of the IMAGE BOARD ASSY, MAIN BOARD ASSY
- 5. Disassembly-1 of the MIRROR BOX ASSY
- 6. Disassembly-2 of the MIRROR BOX ASSY
- 7. Disassembly-3 of the MIRROR BOX ASSY
- 8. Disassembly of the TOP COVER ASSY
- 9. Disassembly of the BACK COVER ASSY
- 10. Disassembly of the CCD ASSY, DC JACK HOLDER
- 11. Disassembly of the CARD COVER HOLDER, SIDE COVER, FRONT COVER ASSY
- ■How to replace "SHUTTER ASSY"
- ■Required adjustment, setting and confirmation items after repairing (exchanging parts)
- ■Related adjustment and required setting items
- ■Using HIT System
- ■Adjustment/Check items available with 2181 ROM Pack
- ■Viewfinder Back Adjustment
- ■Manual Set SS & X-Sync. Time-lag Check
- ■Manual Set SS Adjustment
- ■SPC Position Adjustment
- ■Aperture Preset Check
- ■PI-PR Adjustment
- ■Preparation before AF adjustment
- ①AF Area Adjustment
- ②Pitch Yaw Adjustment
- ③EZ Check
- ④EZ Adjustment
- ■Assist MODE
- ■LCD Displays Check
- ■Preparing the 2181 adjustment program
- ■Starting up the 2181 adjustment program (in the adjustment mode).
- ■Back up Flash ROM data of Master Body
- ■Adjustment of CCD Vsub voltage
- ■Setting of Master body and chart for the adjustment of CCD position
- ■Adjustment of CCD position and perspective
- ■Adjustment of the frequency for camera shaking (ACT DRV FREQ)
- ■Adjustment of the servo for camera shaking (SERVO)
- ■Adjustment of the gyro for camera shaking (GYRO)
- ■Adjustment of the AE (AE)
- ■Sensitivity adjustment (GAIN)
- ■Adjustment of the defective pixel (DEFECT PIXEL)
- ■Adjustment of white balance (WB)
- ■Adjustment of the camera shaking compensation (SHAKE GAIN)
- ■Setting of Destination (DESTINATION)
- ■Light Source-A Maintenance
- ■Error code on adjustment program
- ■Measuring instrument
- ■Subsidiary Materials

(2181) 49
REPAIR GUIDE
Starting up the 2181 adjustment program (in the adjustment mode).
Outline
Connect the camera and PC with USB-2 and start up the camera in the "adjustment mode."
"Adjustment mode" means the condition of that the camera can contact with the 2181 adjustment program
in the PC.
Required equipment
PC with preinstalled the 2181 adjustment program
CF card for Adjustment
AC Adapter AC-11
USB-2 (USB cable)
* Use the AC adapter (AC-11) not batteries when adjusting.
Starting up the 2181 adjustment program (in the adjustment mode).
1. Set camera to M mode.
2. Insert CF card for Adjustment. Main power switch on with pressing shutter release button on (S2).
After starting the adjustment mode, BBBB is displayed at the counter of LCD monitor.(Fig.1)
3. Connect camera and the PC with USB cable, after starting camera by adjustment mode.
4. Starting up the 2181 adjustment program, "KMdsc_cs.exe."
There is the message Please select camera code. in the window of the 2181 adjustment program.
5. Select 2181 from CAMERA CODE in the window, according to the display.
The massage changes to Please connect #2181 and click START. in the window.
6. Click the START button in the window, according to the display.
The massage changes to Camera Boot mode READ-OUT has completed. in the window. (Fig.2)
Fig.1Fig.1
Fig.1Fig.1
Fig.1
Fig.2 Fig.2
Fig.2 Fig.2
Fig.2
Quitting the 2181 adjusting program and cancel adjustment mode of camera
1. Click "ADJUSTMENT END" in the window of the 2181 adjustment program.
2. Remove the AC adapter.
Adjustment items in the 2181 Adjustment Program
Adjustment of CCD Vsub voltage
Adjustment of CCD center position
Adjustment of CCD perspective
Adjustment of camera shaking actuater
Adjustment of the servo for camera shaking
Adjustment of the gyro for camera shaking
Adjustment of the AE
Sensitivity adjustment
Adjustment of the defective pixel
Adjustment of white balance
Adjustment of camera shaking compensation
*Peform adjustment of CCD center position and adjustment of CCD perspective (P. 52) without BACK
COVER ASSY, after disassembling from step 1 to step 4 in P.4.