English magicolor 2200 DeskLaser Installation Guide ® 1800621-001E i
Thank You Thank you for purchasing a magicolor 2200 DeskLaser. You have made an excellent choice. Your magicolor 2200 DeskLaser is specially designed for optimal performance in Windows and TCP/IP networking environments. English Trademarks The following are registered trademarks of MINOLTA-QMS, Inc.: QMS, the MINOLTA-QMS logo, and magicolor. Minolta is a trademark of Minolta Co., Ltd. Other product names mentioned in this guide may also be trademarks or registered trademarks of their respective owners.
English Contents Getting Acquainted with Your Printer .......................................................................................1 Features 1 Front/Right Side View 1 Front Internal View 1 Left Side/Rear Side View 2 Documentation Set ........................................................................................................................2 Setting up Your Printer ................................................................................................................
Regulatory Compliance ..............................................................................................................24 FCC Compliance Statement 25 Canadian Users Notice 25 Laser Safety 25 International Notices 26 English Warranty Considerations ...........................................................................................................26 Consumables and Your Warranty 26 Manufacturer’s Declaration of Conformity—Europe 220 Volt ..............................................
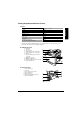
Getting Acquainted with Your Printer Print Speed 5/20* pages per minute SDRAM 32 MB Resolution 1200 x 600 dpi 500-sheet Letter/A4/Legal (Upper Media Tray) Standard Multipurpose Tray Standard Lower Feeder Unit Optional Duplex Unit Optional 5-bin Mailbox Optional 64 MB Memory Expansion Optional English Features *5 = color; 20 = monochrome black The following drawings illustrate the parts of your printer referred to throughout this guide, so please take some time to become familiar with t
Left Side/Rear Side View English 1—Ventilation grille 2—Interface 3—AC power connector 4—Top cover 5—Output tray 6—Main power switch 7—Hand grips for moving printer 8—Media tray (left side) Documentation Set Your magicolor 2200 comes with one CD-ROM. All the documentation is on this CD-ROM unless otherwise noted below. It is provided in Adobe Acrobat PDF format. You may discover movie camera icons in the manuals.
Setting up Your Printer WARNING! English The printer weighs 87.1 lbs (39.5 kg) without consumables. To avoid injury, at least two people must lift and move the printer. Attention Do not plug in the printer’s power cord before completing all installation steps.
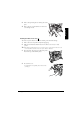
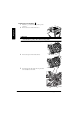
4 With another person’s help, lift the printer from the carton, and place it in its intended location. A third person’s assistance may be required if the printer is lifted above waist level. English When lifting and carrying the printer, use the hand grips and the pull-out carrying bars . 5 Open the front cover. Use both hands to avoid putting uneven strain on the front cover hinges. 6 Remove the cardboard/foam spacers and the tape from the laser lens cover.
Remove the tape holding the toner cartridge carousel in place. 9 Remove the piece of foam attached to the front of the toner cartridge carousel. English 8 Installing the Waste Toner Pack The waste toner pack collects the excess toner remaining on the OPC drum cartridge. 1 2 Remove the waste toner pack from its plastic shipping bag. Make sure the transfer belt unit left release lever is still set to its correct (2 o’clock) position.
Installing the Fuser Oil Roller Push the top cover latch and open the top of the printer . 2 Remove the fuser oil roller from its box. English 1 Attention Lift and hold the fuser oil roller only by the handle. Do not allow the roller surface to contact the table or get dirty. This could lower image quality. 6 3 Rotate the two small levers to the unlocked position. 4 Remove the tape from the media exit area.
6 With the top of the printer open, rotate the two fuser oil roller levers to the locked position. If the fuser oil roller release levers are not correctly set, English the top cover cannot be closed. 7 Close the top cover gently to avoid jarring the fuser oil roller. Removing the Tape from the Transfer Roller 1 Press the right cover release button and open the right cover . 2 Remove the tape from the transfer roller unit.
English 3 Make sure the transfer roller unit handles remain in the down position. 4 Close the right cover. Loading Media Loading the Media Tray 8 1 2 Slide out the media tray. 3 Push the media pressure plate down to lock it in position. Remove the tape and the packing material from the media pressure plate.
4 Adjust the media guides to fit the size paper you’re loading. English Squeeze the retainers, move the guides to the appropriate location (media sizes are listed on the tray), and release the retainers. Attention The media should fit easily between the guides. Improperly adjusted guides may cause poor print quality, media jams, or printer damage. 5 Load the media face-up, short edge toward the right of the tray. Often, an arrow on the media package label indicates the printing-side of the media.
6 Slide the media tray all the way in. English If you have removed the tray from the printer, slightly tilt up the front of the tray to insert it into the guide rails to slide it back in. 1 Open the multipurpose tray. 2 Open the media support. 3 Load the media face down, short edge toward the printer. Often, an arrow on the media package label indicates the face-up side of the media.
English A fill limit mark is provided on the inside of the media guides on the multipurpose tray. The multipurpose tray holds 150 sheets of 20 lb bond (75 g/m²) paper. Attention Load only one type or size of media per tray at a time. 4 Adjust the media guides to fit the size media you’re loading. LTR LG . EXE. L. A5 B5 A4 Attention Always adjust the media guides after inserting the media. A guide that is not properly adjusted can cause poor print quality, media jams, or printer damage.
Plugging in/Turning on the Printer 1 Make sure the printer is turned off. 2 Plug the printer power cord into the printer and English into the dedicated, grounded, surge-protected electrical outlet. WARNING! Do not overload the outlet. For products installed outside North America, do not connect the groundwire to gas or water pipes or grounding for telephones. 3 Turn on the printer. After a brief warmup, your printer displays “IDLE” on the message window.
Control Panel Indicators Indicator Off On The printer is not receiving data. The printer is receiving data from one or more of its interfaces. No problem. The printer requires operator attention (usually accompanied by a status message in the message window). Control Panel Keys Key MP SIZE Function PressOn line First? N/A This key has no function on the magicolor 2200 DeskLaser but is used to set the mutipurpose tray media size on magicolor 2200 Crown printers.
Configuration Menu Overview Language English Sample Page Engine Network Service Error recovery Energy saver Print density Chain inputbins Chain outputbins IP address HW address Subnet mask Conn. timeout Ethernet speed Default router NMS1 NMS2 NMS3 Page count Clear care Language Status and error messages as well as configuration menus and options can be displayed in the message window in one of the available languages. Menu Language Purpose Change the message window language.
Sample Page This menu item initiates the printing of a sample page that can be used to check print quality. Sample Page Purpose Prints a sample page. Choices Yes—Prints a sample page. No—Doesn’t print a sample page. Default Yes English Menu Engine The following menus allow you to configure the hardware control settings of your printer. Error Recovery When the Error Recovery feature is On, the printer will automatically reprint pages that are halted due to media jams or other errors.
Chain Inputbins English This menu item is available only if an optional media cassette is installed. Menu Engine/Chain Inputbins Purpose Allows you to “chain” cassettes (inputbins) so that when the first cassette empties, the printer automatically draws media from the other cassette. Choices On—Switch to the next cassette with the same size and type of media when the default cassette is empty. Off—Don’t switch cassettes; use only the default cassette.
Subnet Mask Menu Network/Subnet mask Choices Each xxx.xxx.xxx.xxx triplet can have a value of 001–254. Default 000.000.000.000 Notes If subnets are not used with your network, the subnet mask should remain 000.000.000.000. (Check with your network administrator.) This allows the interface to provide automatic sensing of gateways. If you identify a subnet mask, this automatic sensing is disabled. Once you save your changes to this menu, the printer automatically reboots.
NMS1–NMS3 SNMP (Simple Network Management Protocol) is a standard protocol used to monitor devices and the networks to which they attach. English The NMS1, NMS2, NMS3 menus allow you to identify and configure up to three Network Management Stations (NMSs). You must provide the following information about each NMS that you want to be able to access the printer: address, community name, and access.
The 3 NMS’s are recognized by the printer in sequential order, with NMS1 first and NMS3 last. When a connection is made, the printer looks for a matching IP address assigned to the NMS’s, and stops looking once a match is found. Since the IP address setting of 000.000.000.000 is treated as a wildcard, if NMS1 has this setting, then the other 2 NMS’s have the access assigned to NMS1. If a match isn’t made, then the printer looks for a match with NMS2, and if necessary, NMS3.
Installing Printer Drivers and Software The printer driver and additional software found on the Utilities and Documentation CD-ROM can be installed on PCs using any of the following operating systems: — Windows XP English — Windows Me — Windows 2000 — Windows NT4 — Windows 98 — Windows 95(B) Plug and Play Printer Driver Installation 1 2 Ethernet connections don’t support Plug and Play technology. If you’re using an Ethernet network connection, skip to the next section.
Selecting the Crown Port 1 2 3 From the Start menu, choose Settings. 4 5 Choose Properties. 6 From the Print To The Following Port list, choose the Crown port that was added during the Crown Print Monitor installation. 7 8 Choose OK to close the Printer Properties window. English The Crown Print Monitor for Windows XP/2000/NT4/Me/98/95 transports print jobs to a print device using the TCP/IP protocol and provides status information to the host.
Symptom Cause English Printer power The power cord is not is not on. correctly plugged into the outlet. Solution Turn the power switch off (O) position, then remove the power cord from the outlet and plug it back in. The power switch is not correctly turned on. Set the power switch to the off (O) position, then set it back to the on (I) position. Something is wrong with the outlet you are using for the printer. Plug another electrical appliance into the outlet and see whether it operates properly.
Symptom Cause Waste toner pack cannot be installed. The transfer belt left release lever is Turn the left release lever clockwise to the 2 o’clock not set correctly. position, then install the waste toner. Solution The toner cartridge carousel dial is Toner turned clockwise. cartridge carousel will not turn. Turn the carousel dial counterclockwise. The toner cartridge Toner carousel release button was not cartridge carousel dial pressed. will not turn.
English Description Remark(s) Media Tray, 500 Sheet Purchasing extra trays may be convenient when changing media formats and/or media qualities vary. Printer Stand/Cabinet Various models are available. Crown Conversion Kit Converts a magicolor 2200 DeskLaser to a magicolor 2200 Crown printer model.
FCC (USA) Title 47 CFR Ch. I, Part 15 Industry Canada (Canada) ICES-003 Issue 3 International (EU) EN 55022 VCCI (Japan) VCCI V-1/98.
Class A This is a class B device, but with an optional Token-Ring or LocalTalk interface installed, it changes to a Class A device. English This equipment has been tested and found to comply with the limits for a Class A digital device, pursuant to Part 15 of the FCC Rules. These limits are designed to provide reasonable protection against harmful interference in a commercial environment.
Don’t return any merchandise to the manufacturer without calling for a return merchandise authorization (RMA) number. Refer to the Service & Support Guide for the Support telephone number where you can obtain an RMA number. Consumables and Your Warranty Use of consumables not manufactured by MINOLTA-QMS or use of non-supported print media may cause damage to your printer and void your warranty.
Manufacturer’s Declaration of Conformity—Europe 220 Volt We: MINOLTA-QMS Europe B.V.
Manufacturer’s Declaration of Conformity—Latin America 110 Volt We: MINOLTA-QMS, Inc.
Manufacturer’s Declaration of Conformity—Latin America 220 Volt We: MINOLTA-QMS, Inc.