
User Guide


Internal IDE Hard Disk Drive 127
1
Ensure that the printer is turned off and the power cord and all interface cables are
disconnected.
2
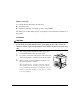
Loosen five screws from the controller board and, using
the tab on the lower side of the panel, pull the controller
board from the printer.
3
Position the controller board on a flat surface so the
controller board lies flat and the interface panel is
facing you.
4
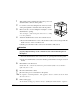
Attach the IDE hard disk to the hard disk bracket.
Attach the IDE hard disk to the
bracket with the grooved-end
of the bracket facing the ribbon
cable. The screw holes in the
bottom of the hard disk should
match up with the holes on the
hard disk bracket. Fasten the
hard disk to the bracket with
the screws provided.
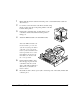
5
Position the hard disk so that
the four support posts face the
controller board, the colored
stripe on the ribbon cable faces
away from you, and the con-
nector is down.
6
Insert ribbon cable connector pin 1 (the colored stripe side of the cable) in hard disk
connector pin 1.
IIIIIIIIIIIIIIIIIIIIIIIIIIIIIIIIIIIIIIIIIIIIIII IIIIIIIIIIIIIIIIIIIIIIIIIIIIIIIIIII IIIIIIIII
................................................ ........................ ..........
................................................ ........................ ..........
................................................ ........................ ..........
................................................ ........................ ..........