
User Guide


Time-of-Day Clock (Standard on Models EN and DP) 131
3
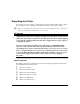
Attach the time-of-day clock
to the controller board.
Attention
Make sure that the pins on the time-of-day clock are properly aligned with
those in the receiving socket on the controller board. Damage to the time-of-day
clock and/or controller board could result if the pins are misaligned.
a
Locate the time-of-day clock socket on the controller board and the pin 1 notch or
printed label.
b
Locate the pin 1 indicator mark on the top of the time-of-day clock.
This mark may be a notch or a slight depression on one end of the clock.
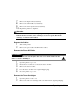
c
Align this indicator mark with the pin 1 notch or printed label on the controller
board.
d
Gently press down on the time-of-day clock until it’s firmly seated.
5
Reinstall the controller board.
Gently slide the controller board into the printer until it is fully seated, and then
tighten the two screws.
6
Reconnect all interface cables.
IIIIIIIIIIIIIIIIIIIIIIIIIIIIIIIIIIIIIIIIIIIIIII IIIIIIIIIIIIIIIIIIIIIIIIIIIIIIIIIII IIIIIIIII
................................................ ........................ ..........
................................................ ........................ ..........
................................................ ........................ ..........
................................................ ........................ ..........