magicolor 2300 DL Installation Guide ® 1800686-002C
Thank You Thank you for purchasing a magicolor 2300 DL. You have made an excellent choice. Your magicolor 2300 DL is specially designed for optimal performance in Windows and TCP/IP networking environments. Trademarks The following are registered trademarks of MINOLTA-QMS, Inc.: QMS, the MINOLTA-QMS logo, and magicolor. Minolta is a trademark of Minolta Co., Ltd. Other product names mentioned in this guide may also be trademarks or registered trademarks of their respective owners.
Contents Getting Acquainted with Your Printer ........................................................1 Documentation Set .......................................................................................1 Space Requirements .....................................................................................2 Locate your Printer ......................................................................................2 Printer Parts ........................................................................
iv Contents
Getting Acquainted with Your Printer Features Print speed (A4 or letter) Resolution SDRAM 200-sheet Tray 1 200-sheet face-down output tray 500-sheet lower feeder unit with Tray 2 Duplex option IEEE-1284 parallel Ethernet USB Details 16 ppm monochrome black/4 ppm color 600 x 600, 1200 x 600, or 2400 x 600 dpi 32 MB Standard Standard Optional (only one feeder allowed) Optional Standard Standard Standard Documentation Set If you’re using the Acrobat PDF version of this guide, click this icon to play a QuickT
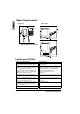
Space Requirements Top View Side View Side View with Accessories Locate your Printer With these characteristics... But away from... On a hard, flat, stable, level (±1° or less slant at any point around the machine) surface. Direct sunlight. Heating and cooling sources, wind, and dust. Close to an easily accessible grounded power supply (on an exclusively dedicated power outlet) that meets printer specifications. Near your computer. At the length 2 m (6.
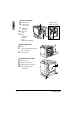
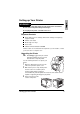
WARNING! Obstructing the ventilation grilles could present a fire hazard. Attention For products installed outside North America, do not connect the groundwire to gas or water pipes or grounding for telephones. For further details, refer to the User’s Guide on the Utilities and Documentation CD-ROM. Printer Parts The following illustrates the parts of your printer are referred to throughout this guide, so please take some time to become familiar with them.
Front Inside View 15 16 17 18 19 Transfer belt Transfer belt release lever Waste toner bottle removed 15 16 OPC drum cartridge Waste toner bottle Toner cartridges in carrousel (cyan/ magenta/yellow/black) 19 17 18 Right Inside View 20 21 22 20 Fuser Misfeed-clearing dial (manual paper feed dial) 21 22 Transfer roller View with Accessories 23 24 25 26 Duplex option Duplex option cover 23 Optional lower feeder unit 24 Tray 2 media tray (A4 or letter only) 25 26 4 Printer Parts
Setting up Your Printer WARNING! Your printer weighs approximately 28 kg (62 lbs) with consumables. Be sure to have help when lifting and moving it. Do not plug in the power cord until told to do so. Shipment Contents Printer (with four toner cartridges, OPC drum cartridge and output tray support installed) A Waste toner bottle Media support for Tray 1 Power cable Utilities and Documentation CD-ROM Interface cables are not included in the shipment.
4 5 Remove the cardboard from Tray 1. Pull the right-side door release , and then open the right-side door . 6 Remove the tags from the base of both green levers at the top of the fuser unit. Make sure that the green levers are in the downward position. 7 8 We suggest that you save the tags in case you ever need to move or ship the printer. Close the right-side door. Grasp the front door latch and carefully open the front door .
9 10 Remove the tape from the inside of the printer. Pressing on the transfer belt unit with one hand, take the tag attached to the transfer belt unit fixture with your other hand, and pull the fixture straight toward you. This fixture protects the transfer belt during initial transportation. 11 Dispose of the fixture according to your local regulations. Insert the waste toner bottle. a Insert the bottom of the waste toner bottle b into the printer.
Installing the Tray 1 Media Support Remove the media support from its plastic shipping bag, and then attach it to Tray 1. Insert the three tabs on the media support into the three holes in Tray 1, and then lower the two tabs into their corresponding holes below Tray 1. Loading Tray 1 (Multipurpose Tray) The multipurpose tray is used for all supported media types, including envelopes, labels, Japanese-sized postcards, thick stock, and transparencies. Check www.minolta-qms.
3 Load the media face up, short edge first. Often, an arrow on the media package label indicates the face-up (printing) side of the paper. 4 A fill limit mark is provided on the inside of the media guides. Tray 1 holds 200 sheets of 80 g/m² (22 lb bond) media. Adjust the media guides to fit the media. Attention Always adjust the media guides after inserting the media. Guides that are not properly adjusted can cause poor print quality, media jams, or printer damage.
Installing Accessories Attention Installing accessories always requires that the printer be turned off and unplugged. If you purchased any additional printer accessories (such as a duplex option or additional memory), then install them now. If installation instructions are included with the accessory, follow them. If not, instructions are included in the User’s Guide (in PDF on the Utilities and Documentation CD-ROM). Plugging in/Turning on the Printer 1 Make sure the printer is turned off.
What’s Next? You have now completed the hardware setup of your printer. There are some more important steps: 1 2 3 4 If your language is other than English, refer to “Selecting a Message Window Language” on page 14. Select the message window language you prefer. If you print via the parallel or USB port, skip to step 3 Set your IP address in one of the following ways: a.
Configuration Menu Overview IDLE/MAGICOLOR 2300DL MENU/ LANGUAGE MENU/ ENGINE MENU/ SPECIAL PAGES MENU/ NETWORK MENU/ CONSUMABLE USAGE MENU/LANGUAGE SET ENGLISH SET FRENCH SET GERMAN SET ITALIAN SET PORTUGUESE SET SPANISH SET CZECH SET JAPANESE MENU/SPECIAL PAGES PRINT CONFIG PAGE PRINT DEMO PAGE PRINT MENU MAP* MENU/ENGINE CHANGE TONER SZ REPLACE TONER AUTO CONTINUE ENERGY SAVER CHAINING TRAY ** SERVICE MENU/NETWORK IP ADDRESS Default: 192.168.1.2 SUBNET MASK Default: 255.255.
About the Control Panel The control panel, located on the top of the printer, allows you to direct the printer’s operation. In addition, it displays the current status of the printer, including any condition that needs your attention. Two indicators (LEDs) to provide printer status information. A message window displays status and configuration information. Six keys allow you to control the printer’s configuration through access to frequently used printer functions.
Number Key Function 4 5 6 7 8 Initially enters the menu system If within the menu system and on a menu level, moves down in in the menu structure If within the menu system and on a selectable item, selects the displayed choice (no matter what position the cursor is in) Moves up in the menu structure If within a selectable menu choice that is changeable character by character, scrolls upward through the available characters Moves right in the menu structure Moves right thro
Press Key (Until) Display Reads LANGUAGE SET/ENGLISH Press the Right or Left key until the appropriate language is displayed. is selected. IDLE/MAGICOLOR 2300DL Manually select an Ethernet IP Address You must enter a unique IP address compatible with your local Ethernet network environment. When manually setting the IP address, turn off DHCP and BOOTP first. Attention You should always notify your network administrator before changing the printer’s IP address.
Press Key Use the and (Until) Display Reads keys to move to each of the four number triplets. With the and keys you may increment/decrement each number triplet. Leading zeros of each triplet are automatically suppressed (".001." will display as ".1.", etc.). IP ADDRESS IDLE/MAGICOLOR 2300DL You are advised to verify the correct IP address by means of printing a Configuration page as follows: IDLE/MAGICOLOR 2300DL MENU/LANGUAGE MENU/SPECIAL PAGES PRINT/CONFIGURATION PAGE A Configuration page will print.
Troubleshooting Although your printer is designed to be highly reliable, it may occasionally experience a problem. The following table helps you to identify the cause of possible installation problems and suggests some solutions. For detailed troubleshooting information, refer to “Troubleshooting” in the User’s Guide (in PDF on the Utilities and Documentation CD-ROM). Symptom No lights or messages appear on the control panel.
If you’ve followed all of the instructions and still have problems you can’t solve, refer to the User’s Guide or see the Service & Support Guide for sources of service and support in the Americas and how to contact the MINOLTA-QMS office closest to you. The most up-to-date worldwide information can be found at www.minolta-qms.com. Accessories and Consumables Contact your local vendor or www.minolta-qms.com for purchase information, parts numbers, and pricing. To order approved media, go to www.q-shop.com.
Regulatory Compliance CE Marking (Declaration of Conformity) For European Users This product complies with the following EU directives: 89/336/EEC, 73/23/EEC, and 93/68 EEC directives. This declaration is valid for the areas of the European Union. This device must be used with shielded interface cables. The use of non-shielded cable is likely to result in interference with radio communications, and is prohibited under EU directives.
FCC Compliance Statement For American Users This equipment has been tested and found to comply with the limits for a Class B digital device, pursuant to Part 15 of the FCC Rules. These limits are designed to provide reasonable protection against harmful interference when the equipment is operated in a commercial installation.
The internal components of the print head unit are NOT A FIELD SERVICEABLE ITEM. Therefore, the print head unit should not be opened under any circumstances. 1 - Print head unit 2 - Laser aperture 1 2 Laser Caution For United States Users—CDRH Regulations This printer is certified as a Class I laser product under the Regulation Performance Standard according to the Food, Drug, and Cosmetic Act of 1990.
Warranty Considerations Various factors can affect a printer’s warranty, such as electrostatic damage, unsupported consumables, and other actions listed below. Read your printer warranty carefully. For information about your warranty, go to www.minolta-qms.com/support, then click on the Answer Base.