
Instruction Manual


Table Of Contents
- Network Interface Card
- Foreword
- Contents
- Ch.1 Introduction
- Ch.2 Installing the Network Interface Card
- Ch.3 Utilizing Windows Programs
- Ch.4 NetWare Configuration
- 4.1 Configuring NetWare 2.15 and 3.x
- 4.1.1 Start PCONSOLE and Select File Server
- 4.1.2 Create Print Queues
- 4.1.3 Enter the Print Server Name
- 4.1.4 Configure the Print Server
- 4.1.5 Assign Print Queues to the Printer
- 4.1.6 Set Up Notify Options for the Printer (Optional)
- 4.1.7 Installing the Print Server on Multiple File Servers
- 4.1.8 Primary File Server
- 4.1.9 Preferred File Servers
- 4.2 Configuring NetWare 4.x - Bindery Emulation
- 4.3 Configuring the NIC in Novell Directory Services
- 4.4 NIC Configuration
- 4.5 Using the Novell PCONSOLE Utility
- 4.1 Configuring NetWare 2.15 and 3.x
- Ch.5 AppleTalk Configuration
- Ch.6 TCP/IP Configuration
- 6.1 Installation in a Windows Environment
- 6.2 UNIX Printing
- 6.2.1 Configuring the IP Address on the NIC
- 6.2.2 lpd Printing
- 6.2.2.1 Setting Up a BSD Remote Printer to Use lpd
- 6.2.2.2 Setting Up an AIX 2.5 Remote Printer to Use lpd
- 6.2.2.3 Setting Up an AIX 4.0 System
- 6.2.2.4 Setting Up an HP/UX Remote Printer to Use lpd
- 6.2.2.5 Setting Up an AS/400 Systems to Use lpd
- 6.2.2.6 Setting Up a DEC ULTRIX 4.3 RISC or OSF1/ ALPHA Remote Printer
- 6.2.2.7 Setting Up a SCO UNIX Remote Printers to Use lpd
- 6.2.2.8 Setting Up System V Rel.4 and Solaris 2.X to Use lpd
- 6.2.3 Installing TCP/IP for NIC If Not Running lpd
- 6.2.3.1 Loading the Software
- 6.2.3.2 Script Selection of Filters
- 6.2.3.3 Manual Selection of Filters
- 6.2.3.4 Installing and Printing on Solaris 1.X and OSF1/ALPHA Systems
- 6.2.3.5 Installing & Printing on an DEC ULTRIX 4.3 RISC System
- 6.2.3.6 Installing and Printing on the HP/UX System
- 6.2.3.7 Installing and Printing on a System V (Solaris 2.X)/System V Rel.4 386-based Machine
- 6.2.3.8 Installing & Printing on a SCO UNIX System
- 6.2.3.9 Installing and Printing on an AIX RISC System/6000
- 6.3 Running Telnet
- 6.4 FTP Printing
- 6.5 Dynamic Host Configuration Protocol
- Ch.7 Operation and Troubleshooting
- 7.1 LED Status Indicator
- 7.2 Status/Configuration Report
- 7.3 Resetting the NIC to Factory Default
- 7.4 How to Diagnose Problems
- 7.5 Troubleshooting Checklists
- 7.5.1 Troubleshooting Network Hardware Connections
- 7.5.2 Troubleshooting NetWare Protocol
- 7.5.2.1 NetWare Checklist
- 7.5.2.2 File Server Checklist
- 7.5.2.3 Workstation Checklist
- 7.5.2.4 NIC Configuration Checklist
- 7.5.2.5 Printer Server/File Server/Printer Checklist
- 7.5.2.6 Workstation to NIC Connection Checklist
- 7.5.2.7 NIC Loses Its File Server Connection
- 7.5.2.8 Unable to Print from a Different Context
- 7.5.3 Troubleshooting AppleTalk Protocol
- App.A Jumper Settings
- App.B Specifications
- App.C Using a Web Browser
- App.D Index
3.1 Discovery Program – Management Access Program (MAP)
3-3
Utilizing Windows Programs
Chapter 3
You can use the following procedure to manually install the MAP.
1. Insert the CD-ROM into your workstation’s CD-ROM drive.
2. Run the program. (In this example, we assume that drive D: is
your workstation’s CD-ROM drive.)
D:\Map\Setup.exe
3. Follow the instructions that appear on the screen.
The default installation directory is C:\Program Files\Map. You can
change to a different directory if you want.
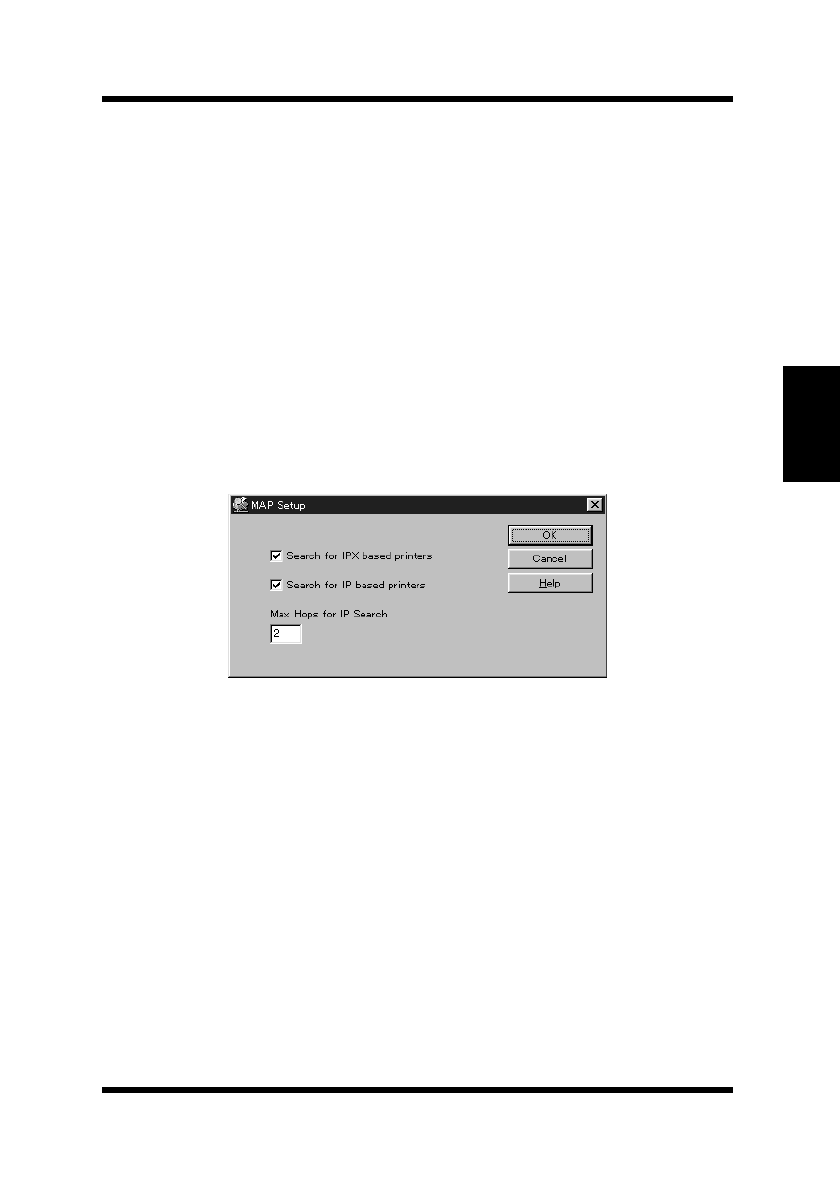
3.1.2 Configuring the MAP
1. Click Start, point to Programs, and then point to MAP.
2. Click
MAP Setup.
Search for IPX based printers:
Check this option to search for IPX/SPX based printers.
Search for IP based printers:
Check this option to search for TCP/IP based printers.
Max Hops for IP Search:
Type in a maximum hop value. The initial default value is 2.
3.1 Discovery Program – Management Access Program (MAP) –
PageWorks.book Page 3 Tuesday, August 4, 1998 11:21 AM