
Instruction Manual


Table Of Contents
- Network Interface Card
- Foreword
- Contents
- Ch.1 Introduction
- Ch.2 Installing the Network Interface Card
- Ch.3 Utilizing Windows Programs
- Ch.4 NetWare Configuration
- 4.1 Configuring NetWare 2.15 and 3.x
- 4.1.1 Start PCONSOLE and Select File Server
- 4.1.2 Create Print Queues
- 4.1.3 Enter the Print Server Name
- 4.1.4 Configure the Print Server
- 4.1.5 Assign Print Queues to the Printer
- 4.1.6 Set Up Notify Options for the Printer (Optional)
- 4.1.7 Installing the Print Server on Multiple File Servers
- 4.1.8 Primary File Server
- 4.1.9 Preferred File Servers
- 4.2 Configuring NetWare 4.x - Bindery Emulation
- 4.3 Configuring the NIC in Novell Directory Services
- 4.4 NIC Configuration
- 4.5 Using the Novell PCONSOLE Utility
- 4.1 Configuring NetWare 2.15 and 3.x
- Ch.5 AppleTalk Configuration
- Ch.6 TCP/IP Configuration
- 6.1 Installation in a Windows Environment
- 6.2 UNIX Printing
- 6.2.1 Configuring the IP Address on the NIC
- 6.2.2 lpd Printing
- 6.2.2.1 Setting Up a BSD Remote Printer to Use lpd
- 6.2.2.2 Setting Up an AIX 2.5 Remote Printer to Use lpd
- 6.2.2.3 Setting Up an AIX 4.0 System
- 6.2.2.4 Setting Up an HP/UX Remote Printer to Use lpd
- 6.2.2.5 Setting Up an AS/400 Systems to Use lpd
- 6.2.2.6 Setting Up a DEC ULTRIX 4.3 RISC or OSF1/ ALPHA Remote Printer
- 6.2.2.7 Setting Up a SCO UNIX Remote Printers to Use lpd
- 6.2.2.8 Setting Up System V Rel.4 and Solaris 2.X to Use lpd
- 6.2.3 Installing TCP/IP for NIC If Not Running lpd
- 6.2.3.1 Loading the Software
- 6.2.3.2 Script Selection of Filters
- 6.2.3.3 Manual Selection of Filters
- 6.2.3.4 Installing and Printing on Solaris 1.X and OSF1/ALPHA Systems
- 6.2.3.5 Installing & Printing on an DEC ULTRIX 4.3 RISC System
- 6.2.3.6 Installing and Printing on the HP/UX System
- 6.2.3.7 Installing and Printing on a System V (Solaris 2.X)/System V Rel.4 386-based Machine
- 6.2.3.8 Installing & Printing on a SCO UNIX System
- 6.2.3.9 Installing and Printing on an AIX RISC System/6000
- 6.3 Running Telnet
- 6.4 FTP Printing
- 6.5 Dynamic Host Configuration Protocol
- Ch.7 Operation and Troubleshooting
- 7.1 LED Status Indicator
- 7.2 Status/Configuration Report
- 7.3 Resetting the NIC to Factory Default
- 7.4 How to Diagnose Problems
- 7.5 Troubleshooting Checklists
- 7.5.1 Troubleshooting Network Hardware Connections
- 7.5.2 Troubleshooting NetWare Protocol
- 7.5.2.1 NetWare Checklist
- 7.5.2.2 File Server Checklist
- 7.5.2.3 Workstation Checklist
- 7.5.2.4 NIC Configuration Checklist
- 7.5.2.5 Printer Server/File Server/Printer Checklist
- 7.5.2.6 Workstation to NIC Connection Checklist
- 7.5.2.7 NIC Loses Its File Server Connection
- 7.5.2.8 Unable to Print from a Different Context
- 7.5.3 Troubleshooting AppleTalk Protocol
- App.A Jumper Settings
- App.B Specifications
- App.C Using a Web Browser
- App.D Index
4.2 Configuring NetWare 4.x — Bindery Emulation
4-12
NetWare Configuration
Chapter 4
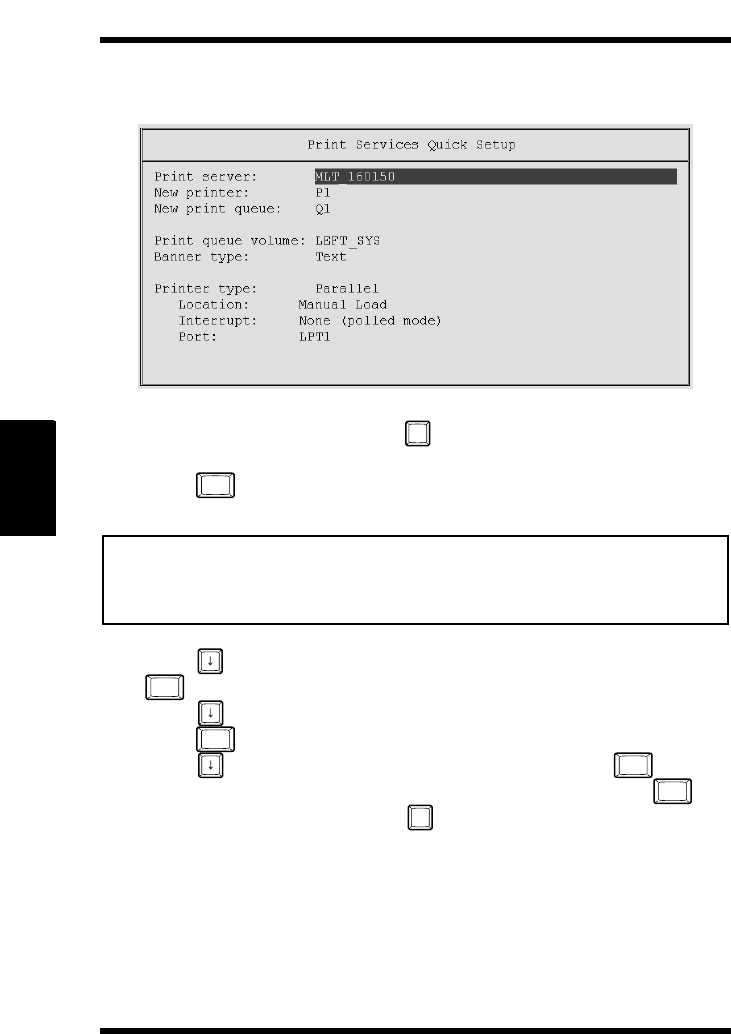
Use Quick Setup to connect your print server, print queue and
printer correctly. You can modify these later if you need to.
5. Select
Print server and press to modify the entry.
6. Type the name of the print server in the
Print server field and
press .
Note
7. Press to move to the New printer field. Type a name and press
.
8. Press to move to the
New print queue field. Type a name and
press .
9. Press to move to the
Printer type field and press . From
the list of printer types, select
Other/Unknown and press .
10. When you are finished, press to save the configuration.
Repeat steps 5 through 10 for each file server that the printer
server services.
11. To view, add, delete, or modify print servers or queues after the
initial setup, select either the
Print Queues or Print Servers
option on the
Available Options screen.
• The print server name is printed under the Novell Network Information
on the status report. The factory default name is MLT_<serial num-
ber>.
F3
Enter
Enter
Enter
Enter
Enter
F10
Chap4.fm Page 12 Monday, August 17, 1998 9:58 AM