
User Guide


- 4 -
HOW TO SETUP YOUR E-RDA850 TRAINER
Insert the left side of the skewer (Q/R lever side) into the left side cou-
pling, and adjust the rotation of the coupling so the skewer lever sits
securely in the large cut-out (see Fig. F). This will prevent damage to the
skewer during use.
(Fig. B)
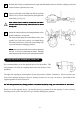
Open the frame support legs and fit the rubber feet at the correct angle so the base is in full contact with
the floor. Do NOT remove the round metal plates from inside the rubber feet when fitting. Ensure the
rubber foot caps are facing outwards as incorrect fitting may compromise the stability of the trainer.
NOTE: If the both legs don’t touch the floor at same time and if one side of the leg is still slightly raised, pull up the
leg upward strongly then place the trainer on the floor again.
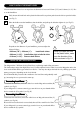
Open both couplings by turning the left side knob (see Fig. C) and the right side hub handle (see Fig. D)
anti-clockwise.
Do not over-loosen the couplings, otherwise the knob or the hub handle may become unthreaded inside
the frame.
1
2
3
(Fig. C)
(Fig. D)
Left Side Knob
Right Side Hub Handle
Install the Mag resistance unit on the left side slot and
the assistant roller on the right side slot beside the trainer
pillar by the supplied M6x12 bolts. (see Fig. B)
NOTE: We recommend you to use the reinforcement plate
(SR-13) for installing the Mag unit. This plate will sandwich
the slot plate from outside for mounting the heavy Mag unit
and giving it extra stability.
<Required Tools: M5 hex wrench>
(Fig. E)
4
NOTE:NOTE:
NOTE:NOTE:
NOTE: We suggest not using the left side coupling for major adjustment. Moving
it too much to one side will cause misalignment. The left side coupling is used
only to provide easy intitial adjustment for your hub length. (see Fig. E)
(Fig. F)