FCC STATEMENT This device complies with Part 15 of the FCC Rules. Operation is subject to the following two conditions: (1) This device may not cause harmful interference, and (2) This device must accept any interference received, including interference that may cause undesired operation. Note: This equipment has been tested and found to comply with the limits for Class B digital devices, pursuant to Part 15 of the FCC rules.
READ THIS FIRST Trademark Information Microsoft® and Windows® are U.S. registered trademarks of Microsoft Corporation. Pentium® is a registered trademark of Intel Corporation. Macintosh is a trademark of Apple Inc. SD™ is a trademark. SDHC™ is a trademark. Other names and products may be trademarks or registered trademarks of their respective owners. Product Information Product design and specifications are subject to change without notice.
SAFETY INSTRUCTIONS Read and understand all Warnings and Cautions before using this product. Warnings If foreign objects or water have entered the camera, turn the power off and remove the battery. Continued use might cause fire or electric shock. Consult the store of purchase. If the camera has fallen or its case has been damaged, turn the power off and remove the battery. Continued use might cause fire or electric shock. Consult the store of purchase. Do not disassemble, change or repair the camera.
Cautions Insert the battery paying careful attention to the polarity (+ or –) of the terminals. Inserting the battery with its polarities inverted might cause fire and injury, or damage to the surrounding areas due to the battery rupturing or leaking. Do not fire the flash close to anyone’s eyes. This might cause damage to the person’s eyesight. Do not subject the LCD monitor to impact. This might damage the glass on the screen or cause the internal fluid to leak.
Notes on Battery Usage When you use the battery, carefully read and strictly observe the Safety Instructions and the notes described below: Use only the specified battery (3.7V). Avoid extremely cold environments as low temperatures can shorten the battery life and reduce camera performance.
CONTENTS 7 INTRODUCTION 27 MENU OPTIONS 7 7 Overview Package Contents 8 GETTING TO KNOW YOUR CAMERA 27 29 30 32 8 8 9 Front View Rear View LCD Monitor Display 11 GETTING STARTED 11 Preparation 11 Charging the Battery 12 Initial Settings 14 CAPTURE MODE 14 Capturing Images 15 Setting the Scene Mode 16 Taking Images with Intelligent Scene mode 17 Taking and Combining Panoramic Pictures 17 Taking Images When the Smile Feature Is On 18 Mode of Skin Soften and De-blemish 18 Recording Shots using Face
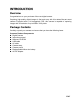
INTRODUCTION Overview Congratulations on your purchase of the new digital camera. Capturing high-quality digital images is fast and easy with this state-of-the-art smart camera. Equipped with a 14.0-megapixel CCD, this camera is capable of capturing images with a resolution of up to 4288 x 3216 pixels.
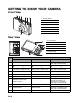
GETTING TO KNOW YOUR CAMERA Front View 1. Shutter button 2. ON/OFF Power button 3. Flash 4. Self-timer LED 5. Microphone 6. Speaker 7. Lens Rear View A. LCD monitor B. Status LED C. Strap holder D. USB and AV OUT terminal E. Battery / Memory card cover F. Tripod socket Item 1. 2. 3.
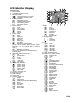
LCD Monitor Display Capture mode 1. Zoom status 2. Available number of shots 3. Storage media [ ] Internal memory (no card) [ ] SD/SDHC memory card 4. Battery condition [l] Full battery power [o] Medium battery power [n] Low battery power [m] No battery power 5. Focus setting [K] Auto [ ] AF Tracking [ ] Face Detect [O] Macro [Q] Infinity 6. Flash mode [b] Auto [a] Flash On [d] Flash Off [c] Red-eye [`] Slow Sync [_] Pre-flash 7.
Video mode 1. Zoom status 2. Storage media 3. Battery condition 4. Focus setting 5. Flash off 6. Self-timer icon 7. Video resolution 8. Elapsed time/Available recording time 9. Main focus area 10. Date and time 11. Video quality 12. Audio off 13. Mode icon Playback mode - Still image playback 1. Voice memo 2. DPOF icon 3. Protect icon 4. Folder / File number 5. Storage media 6. Battery condition 7. Image size resolution 8. Set key: Play hint icon 9. Date and time 10. Histogram 11.
GETTING STARTED Preparation 1. 2. 3. 4. Attach the camera strap. Open the battery/memory card cover. Insert the supplied battery with correct orientation as shown. (label side back) Insert an SD/SDHC memory card (Optional). The camera has 32MB internal memory(10MB available for image storage), but you can load an SD/SDHC memory card to expand the camera’s memory capacity. Be sure to format the memory card with this camera before its initial usage. 5.
Initial Settings The language & date/time needs to be set if and when: The camera is turned on for the first time. The camera is turned on after leaving the camera without the battery for an extended period of time. 1. Press the ON/OFF button to turn the power on. 2. Press any button to enter language setup. Select the displayed language with the e / f / c / d buttons and press the SET button. 3. Select the date format with the c / d buttons, and press the SET button. 4.
Choosing the Language Specify in which language menus and messages are to be displayed on the LCD monitor. 1. Press the MODE button, and set the camera mode to [ ] or [ ]; or press the 7 button. 2. Press the MENU button. 3. Select the [Setup] at the end of the Menu with the c / d buttons, and press the SET button. 4. Select [Language] with the c / d buttons and press the SET button. 5. Select the displayed language with the e / f / c MENU / d buttons and press the SET button. The setting will be stored.
CAPTURE MODE Capturing Images Your camera is equipped with a 2.7” full color TFT LCD monitor to help you compose images, playback recorded images/video clips or adjust menu settings. 1. Press the ON/OFF button to turn the power on. 2. Press the MODE button, and set the camera mode to [ ]. 3. Compose your image in the LCD monitor. Pressing the button zooms in on the subject, and enlarges the subject on the LCD monitor. Pressing the button zooms out on the subject, and provides a wider angle image. 4.
Setting the Scene Mode By simply selecting one of the available scene modes, you can capture the image with the most appropriate settings. 1. Press the MODE button, and set the camera mode to [ 2. Select the desired scene mode with the e / f / c / d buttons, and press the SET button. 3. Compose the image and press the shutter button. ], and press the SET button.
Scene mode Landscape Description Select this mode when you want to capture an image with infinity focus, hard sharpness and high saturation. Sports Select this mode when you want to capture fast-moving subjects. Night Portrait Select this mode when you want to capture people with an evening or night scene background. Night Scene Select this mode when you want to capture dark scenes such as night views.
Taking and Combining Panoramic Pictures Pictures are manually shot, and the camera automatically combines pictures in the camera. 1. Press the MODE button, and set the camera mode to [ ], and press the SET button. 2. Select [Panorama PanCapture] with the e / f / c / d buttons, and press the SET button. 3. Select the photographic direction with the e / f buttons. 4. Shoot the first image. The next image appears beside the previous image. 5.
Mode of Skin Soften and De-blemish In order to make face taken look better and younger, mode of Skin Soften is added to reduce artifacts on faces, while the mode of De-blemish is to reduce obvious blemishes and big spots on faces. 1. Press the MODE button, and set the camera mode to [ ], and press the SET button. 2. Select [Skin Soften] or [De-blemish] with the e / f / c / d buttons, and press the SET button. 3. Compose the image, and press the shutter button down fully.
Self-portrait Function Use this function to take pictures of yourself or include yourself in pictures. 1. Press the MODE button, and set the camera mode to [ ]. 2. Press the e button, and select [ ] icon with the e / f buttons. Press the SET button. 3. Press the shutter button. 4. If the camera detect and track any faces, after twice blinking of the self-timer LED, one image will be captured. Press the shutter button to exit.
VIDEO MODE Recording Video Clips This mode allows you to record video clips at a resolution of 320 x 240 / 640 x 480 / 720p pixels. 1. Press the MODE button, and set the camera mode to [ ]. 2. Compose the image. 3. Press the shutter button. The recording of the video clip will start. Pressing the shutter button one more time will end the recording of the video clip. The recording time depends on the storage size and the subject of the image to be recorded.
PLAYBACK MODE Playing Back Still Images You can play back the still images on the LCD monitor. 1. Press the 7 button. The last image appears on the screen. 2. The images can be displayed in forward or reverse sequence with the e / f buttons. To view the previous image, press the e button. To view the next image, press the f button. Pressing the button enlarges the image. To return to normal magnification, press the button. An [ ] icon is displayed with the video data.
Removing Red-eye You can use this function to remove the red-eye effect after an image is taken. 1. Press the 7 button. The last image appears on the screen. 2. Select the image that you want to edit with the e / f buttons. 3. Press the MENU button. 4. Select [Fix Red Eyes] with the c / d buttons, and press the SET button. 5. Select [Execute] with the e / f buttons, and press the SET button. 6. View the changes on the corrected image. 7.
Attaching Voice Memos A maximum of 30 seconds of audio can be recorded as a memo for captured still images. The voice memo can be recorded only once. 1. Press the 7 button. The last image appears on the screen. 2. Select the image to which you want to attach the voice memo with the e / f buttons. 3. Press the MENU button. 4. Select [Voice Memo] with the c / d buttons, and press the SET button. 5. Press the SET button. [VOICE RECORDING] is displayed on the screen and recording starts. 6.
Protecting Images Set the data to read-only to prevent images from being erased by mistake. 1. Press the 7 button. Setup The last image appears on the screen. 2. Select the image that you want to protect with the Date/Time e / f buttons. 2010.01.01 3. Press the MENU button. Language 4. Select [Protect] with the c / d buttons, and press English the SET button. Auto Off Off 5. Select [Single] or [All] with the e / f buttons, and MENU ; SET ; press SET button. 6.
DPOF Settings DPOF is the abbreviation for Digital Print Order Format, which allows you to embed printing information on your memory card. You can select the images to be printed and how many prints to make with the DPOF menu in the camera and insert the memory card to the card compatible printer. When the printer starts printing, it will read the embedded information on the memory card and print the specified images. 1. Press the 7 button. The last image appears on the screen. 2.
Erasing Images Erasing a single image / Erasing all images 1. Press the 7 button. The last image appears on the screen. 2. Select the image you want to erase with the e / f buttons. 3. Press the MENU button. 4. Select [Delete] with the c / d buttons, and press the SET button. 5. Select [Single] or [All] with the e / f buttons, and press the SET button. [Single]: Erases the selected image or the last image. [All]: Erases all of the images except for the protected images. 6.
MENU OPTIONS Capture Menu This menu is for the basic settings to be used when capturing still images. 4 MP AUTO MENU ; SET ; MENU ; SET ; 1. 2. 3. 4. Press the ON/OFF button to turn the power on. Press the MODE button, and set the camera mode to any scene mode. Press the MENU button to enter the [Capture] menu. Select the desired option item with the c / d buttons, and press the SET button to enter its respective menu. The selectable items may vary in different capture modes. 5.
Metering This sets the metering method for calculating the exposure. * Center: * Spot: * Average: Averages the light metered from the entire frame, but gives greater weight to the subject matter at the center. A very small portion of the center of the screen is measured to calculate the correct exposure. The exposure is measured all of the image area. Capture Md. This sets the recording method at the time of capturing images. * Single: * Continuous: * AEB: * Burst: * Cont. flash: * Pre-shot: * Coupl.
Video Menu This menu is for the basic settings to be used when recording video clips. MENU ; SET ; MENU ; SET ; 1. Press the MODE button, and set the camera mode to [ ]. 2. Press the MENU button to enter the [Video] menu. 3. Select the desired option item with the c / d buttons, and press the SET button to enter its respective menu. 4. Select the desired setting with the e / f buttons, and press the SET button. 5. To exit from the menu, press the MENU button.
Playback Menu In the [7] mode, choose which settings are to be used for playback. MENU ; SET ; MENU ; SET ; 1. Press the 7 button. 2. Press the MENU button. 3. Select the desired option item with the c / d buttons, and press the SET button to enter its respective menu. 4. Select the desired setting with the e / f buttons, and press the SET button. 5. To exit from the menu, press the MENU button. Delete Refer to the section in this manual titled “Erasing Images” for further details.
Qual. Change Changes the quality (compression) of a recorded image. Compress images down to half of their size or less, overwrite old size images with newly compressed images. It is only possible to reduce the image quality/size, never to increase it. Copy to Card Allows you to copy your files from the camera’s internal memory to an SD/SDHC memory card. Of course, you can only do this if you have a memory card installed and some files in internal memory.
Setup Menu Set your camera’s operating environment. MENU ; SET ; MENU ; SET ; 1. Press the MODE button, and set the camera mode to [ ] or [ ]; or press the 7 button. 2. Press the MENU button. 3. Select the [Setup] at the end of the Menu with the c / d buttons, and press the SET button. 4. Select the desired option item with the c / d buttons, and press the SET button to enter its respective menu. 5. Select the desired setting with the e / f buttons, and press the SET button. 6.
Fr. No. Reset This creates a new folder. The captured images are recorded to the newly created folder from number 0001. * Cancel / Execute Light Freq. This camera supports different lighting frequencies: 50 Hz and 60 Hz. When photographing under fluorescent lighting, select the correct frequency setting depending in your local area's voltage. * 50 Hz / 60 Hz LCD Bright. Select a brightness level for the LCD monitor.
TRANSFERRING FILES TO YOUR COMPUTER System Requirement Windows Macintosh Pentium III 1GHz or equivalent Windows 7/XP/Vista 512MB RAM 150MB available hard disk space CD-ROM drive Available USB port PowerPC G3/G4/G5 OS 10.3.9 or later 256MB RAM (512 MB recommended) 128MB available hard disk space CD-ROM drive Available USB port Downloading Your Files 1. Turn on your camera. 2. Connect the camera to your computer with the USB cable. 3.
EDITING SOFTWARE INSTALLATION Software is included on the CD-ROM: ArcSoft MediaImpression™ - Easily, creatively, and productively manage your multimedia files. Create your own movies or photo slide shows, and share your photo, video and music files easily through simple email attachments or popular photo printing and video sharing websites. To install software: 1. Insert the CD-ROM that came with the camera into your CD-ROM drive. The welcome screen appears. 2. Click the respective software name.
SPECIFICATIONS Item Description Image sensor 1/2.33” CCD sensor (14.0 megapixels) Image resolution Still image 14M(4288 X 3216), 8M(3264 x 2448), 4M(2304 x 1728), 2M(1600 x 1200), VGA(640 x 480) Video clip HD(720p)/30fps, VGA(640 x 480)/30fps, QVGA(320 x 240)/30fps LCD monitor 2.7” full color TFT LCD (230K pixels) Recording media 32MB internal memory (10MB available for image storage) Supports SD/SDHC memory card (up to 32GB) (optional) File format DCF, JPEG (EXIF 2.
APPENDIX Possible Number of Shots Possible number of shots (still image) The table shows the approximate shots that you can capture at each setting based on the capacity of the SD/SDHC memory card.
Troubleshooting Refer to the symptoms and solutions listed below before sending the camera for repairs. If the problem persists, contact your local reseller or service center. Symptom Cause The power does not come on. The battery is not inserted. Solutions / Corrective Actions Insert the battery correctly. The battery is exhausted. Recharge the battery. The battery runs out quickly. The battery is not fully charged. The battery is not used for an extended period of time after being charged.
A. Information on Disposal for Users (private households) 1.In the European Union Attention: If you want to dispose of this equipment, please do not use the ordinary dust bin! Used electrical and electronic equipment must be treated separately and in accordance with legislation that requires proper treatment, recovery and recycling of used electrical and electronic equipment.