Warranty Policy This camera is under warranty for one full year from the date of purchase by the original purchaser. In case of defects in materials or workmanship, we will replace or repair the camera free of charge. This warranty applies to the camera only. This warranty does not include batteries, or other accessories which have not been manufactured by our company. This warranty will not be honored if the camera has been mishandled or tampered with, or altered by anyone other than the manufacturer.
READ THIS FIRST Notice: 1. Product design and specifications are subject to change without notice. This includes primary product specifications, software, software drivers, and user’s manual. This User Manual is a general reference guide for the product. 2. The product and accessories that come with your camera may be different from those described in this manual.
WARNING Do not use this camera if it is emitting smoke, becomes unusually hot to be touched, emitting any unusual odor or noise, or if it is in any other abnormal states. Operating the camera in any of these situations may cause a fire or an electrical shock. Stop using the camera immediately, turn the camera off, and then disconnect the power source (batteries or AC power adapter). (If you are using the AC power adapter, unplug the adapter from the AC power outlet after you have disconnected the camera.
WARNING Do not attempt to modify this camera. This may cause a fire or an electrical shock. Do not remove the camera casing. This may cause an electrical shock. Internal inspection, maintenance and repairs should only be carried out by your dealer or local authorized service facility. Avoid using this camera in the bathrooms. Exposure to excessive moisture may cause a fire or an electrical shock. Do not touch the power plug during a thunderstorm if you are using the AC power adapter.
CAUTION Do not place this camera in damp or dusty locations. This may cause a fire or an electrical shock. Do not place this camera in a location affected by oil fumes or steam, such as near a cooking stove or humidifier. This may cause a fire or an electrical shock. Do not leave this camera in a location subject to extremely high temperatures, such as in a sealed vehicle or in direct sunlight. Exposure to high temperatures may adversely affect the camera case and internal components and may cause a fire.
TABLE OF CONTENTS 8 Introduction 8 Package Contents 8 Optional Accessories 9 Preparing the Camera 9 9 10 10 11 11 11 12 12 12 13 13 13 13 14 14 Getting to Know the Camera Name of Parts Dial Knob Attaching the Strap Preparing Power Supply Loading Batteries Using the Power Adapter (Optional Accessory) Inserting/Removing the Memory Card (Optional Accessory) Inserting a Memory Card Removing a Memory Card Getting Started Turning the Camera On/Off Checking Batteries Turning the LCD Monitor On and Off F
21 21 21 22 22 22 23 23 24 25 25 25 25 26 26 26 27 28 28 29 30 31 32 32 33 33 33 33 34 34 35 35 35 35 36 Capture Menu Navigation Buttons Mode Quality ISO Sensitivity Exposure White Balance Photometry AE Mode Playback Mode LCD Monitor Icon Indicator LCD Button Playback Single Image Thumbnail Display Zoom Playback Viewing Image on a TV monitor Playback Menu Erase All Images Erase Single Image Protect Print Setting Setup Menu Date Setting Card Formatting Language LCD Brightness Beep Auto Shut Off Video
INTRODUCTION Congratulations on your purchase of the new digital camera. Capturing high-quality digital pictures is fast and easy with this state-of-the-art smart camera. Equipped with a 4.0 Megapixel CCD, this camera is capable of capturing pictures with a resolution of up to 2272 x 1704 pixels. Other cool features provided by the camera include the following: LCD Monitor - The 1.6" full-color LCD at the back of the camera makes it easy to frame your subject when taking pictures.
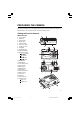
PREPARING THE CAMERA This section introduces you to the digital camera. Follow the instructions in this section to install batteries, use the power adapter, and install a memory card. Getting to Know the Camera Names of Parts 1. Shutter button 2. Dial knob 3. Power button 4. Built-in flash 5. Self-timer LED 6. Lens cover knob 7. Lens/Lens cover 8. Viewfinder 9. Viewfinder LED 10. Optical viewfinder 11. Navigation buttons / button / button / button 5 8 4 7 6 / button 12. WIDE button 13.
Dial Knob It also allows you to choose from three camera modes: Capture mode ( ) – This mode enables taking pictures and stores pictures on the memory card. ) – This mode enables you to view pictures you have taken. Playback mode ( Setup mode ( ) – This mode sets basic camera settings such as Date Setting, Card Formatting, Language, LCD Brightness, Beep, Auto Shut Off and Video Out. Attaching the Strap To attach the strap to the camera: 1. Insert the thin end of strap into the strap attachment. 2.
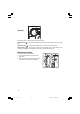
PREPARING THE CAMERA Preparing Power Supply Always turn off the camera’s power before changing power supply. Loading Batteries To load the batteries into the camera: 1. Open the battery cover. 2. Load batteries in the battery compartment. Make sure they are loaded in their polarity as shown inside the battery compartment. 3. Close the battery door. Make sure that the battery cover is firmly closed. Note: It is recommended to use either two AA size Ni-MH rechargeable or one CR-V3 for battery power supply.
Inserting/Removing the Memory Card (Optional Accessory) Always turn off the camera’s power and confirm the card access LED is off before inserting/ removing the memory card, otherwise the card may be damaged. You can use either the SD card (Secure Digital Memory Card) or the MMC(Multi Media Card). Inserting a Memory Card Your camera can store pictures on a removable memory card. Make sure a memory card is inserted into the camera before you start taking pictures. To insert a memory card into the camera: 1.
GETTING STARTED Once you have installed batteries or connected a power adapter and inserted a memory card into the camera, you are ready to use the camera. Turning the Camera On/Off You can turn camera on or off by pressing power button. Checking Batteries Located on the LCD monitor, the low battery indicator will be displayed if the battery is weaken with the icon while the camera is on. The number of pictures that can be taken varies according to the performance and usage conditions of the batteries.
Formatting the Memory Card In most cases, you can directly use a newly purchased memory card to store pictures. But to avoid any possible problems, it is recommended that a new memory card be formatted first before using it. 1. Set the dial knob to SETUP. The main menu of the setup mode is displayed on the LCD monitor. 2. Press the • or button to choose CARD FORMATTING, and press the ENTER button. 3. To format a memory card, select YES with the or button, and press the ENTER button again to confirm.
CAMERA OPERATION The camera can capture the image and stores it on the memory card in Capture mode( ). The camera shows the preview image on the LCD monitor. To adjust the current setting, switch the dial knob to appropriate mode and press the menu button. CAPTURE MODE Switch the dial knob to , the camera enables you to capture the image and stores it on the memory card. You can frame subjects using either the optical viewfinder or 1.6” full color LCD monitor.
CAPTURE MODE LCD button Each press of the LCD button switches the display format as follows: ICON OFF Î LCD OFF Î LCD and ICON ON Taking Pictures 1. Make sure that a memory card is properly inserted. 2. Press the power button to turn on the camera’s power. Open the lens cover beforehand. 3. Set the dial knob to . Toggle the button to select the desired scene program(refer to page 18). Toggle the button to select the desired flash mode (refer to page 19).
Zoom Control This camera features two types of zooming, optical zooming (2.8x) and digital zooming (2x). Optical Zoom 1.Press hold the WIDE button, it will move the lens towards to the wide-angle position, which means zooming away from your subject. 2.Press hold the TELE button, it will move the lens towards the telephoto position, which means zooming in your subject. Digital Zoom If you want your subject to appear larger and closer when the picture is taken, use your camera’s Digital Zoom feature.
Selecting the Scene Program The camera provides three scene program modes besides the standard mode, which are Landscape mode, Portrait mode and Night View mode. Toggle the button to select the desired Scene program. Portrait mode Suitable for portrait shot of person. The background get slightly blurred and a subject becomes in-focus in this mode. The camera automatically sets the proper shootingn conditions. Landscape mode Suitable for shot of the landscape.
Focus Mode Setting Toggle the button to select the desired focus mode. Focus Mode Auto Focus Icon Indicator Focusing Range 70cm to infinity Macro 10cm to 70cm (WIDE) Infinity 25cm to 70cm (TELE) Infinity Note: The auto focus operation activates when the shutter button is pressed halfway in AF mode and Macro mode. The focus is locked as long as this button is kept pressing. The image is captured when the shutter button is fully pressed.
Self-timer Photography The camera can be set with 10 seconds delayed shutter. Press the button to toggle the selftimer on/off. The camera start counting the time and the self-timer LED turns on when a user fully pressed the shutter button. The self-timer LED lights steadily for 7 seconds and then blinks another 3 seconds, after which the shot is taken. 1. Set the dial knob to . 2. Toggle the button to turn on the self-timer function. It is indicated by icon on the LCD monitor. 3. Press the shutter button.
CAPTURE MENU By pressing the menu button in Capture mode , the following Menu 1 is displayed, when the Standard scene program is selected at Scene program. When the other is selected at the program, the following Menu 2 is displayed. The Scene program can be set by pressing the button in the Capture Mode. Menu 1 (Scene: Standard) Menu 2 (Scene: Landscape/Night View/Portrait) Navigation Buttons Press the or button to select the desired setting. The selected setting item can be seen with highlighted icon.
Quality Set the quality mode of any image to be captured. IMAGE QUALITY Fine ICON RESOLUTION 2272 x 1704 pixels Standard 1600 x 1200 pixels Basic 1280 x 960 pixels Economy 640 x 480 pixels 1. Set the dial knob to . 2. Press the menu button. 3. Press the 4. Press the or or button to select QUALITY. button to select the desired quality setting. 5. Press the menu button to exit from the menu mode. ISO Sensitivity Set the ISO sensitivity.
White Balance Set the white balance mode. WHITE BALANCE Auto WB ICON DESCRIPTION Automatic white balance mode (default) Daylight Day light mode Fluorescence Fluorescent light mode Incandescence Incandescence light mode 1. Set the dial knob to . 2. Press the menu button. 3. Press the or button to select WHITE BALANCE. 4. Press the or button to select the desired white balance setting. 5. Press the menu button to exit from the menu mode. Photometry Set the photometry.
AE Mode Set the AE mode. The effective range of the auto-exposure of the standard mode is from LV 6 to LV 16 at ISO 100. By halfway pressing the shutter button, the AE is also locked together with auto white balance. The camera provides three AE modes available with Standard scene program mode: AE MODE Action ICON DESCRIPTION Faster shutter speed. To capture a moving subject. Normal Normal shutter speed. Creative Slower shutter speed. To capture a still-life subject. 1. Set the dial knob to . 2.
PLAYBACK MODE Switch the dial knob to to preview the recorded images on the LCD monitor. LCD Monitor Display 1 2 3 4 5 6 7 Icon Indicator 1. Captured Date & Time 2. Battery 3. Magnification 4. DPOF (Print Setting) 5. Protected 6. Quality 7. DCF Directory-file Number Note: The icons showing the image status cannot be displayed when the card status icon is on the screen. However the low battery indicator can be displayed if the battery is weaken.
Playback Single Image 1. Set the dial knob to . The camera displays a latest stored image on the memory card. 2. Press the or button, which has the function to backward/forward, to browse through the recorded images. Note: If no image in the card, the icon is displayed on the LCD monitor. Thumbnail Display For quicker selection of pictures, you can display them as the thumbnails on the LCD monitor. A set of 9 thumbnails can be displayed per screen. 1. Set the dial knob to . 2.
Viewing Images on a TV Monitor Television sets can be used to compose images for playback. To do this, the camera must first be connected to the TV. We recommend using the AC adapter on an indoor power outlet when available. 1. First, connect the TV to your digital camera. Plug one end of the video cable to the VIDEO port of the digital camera, and connect the other end of the cable to the video-in port on the television. 2.
PLAYBACK MENU When you press the menu button in Playback mode You can select the option by pressing the MENU, press the menu button again. or , the following menu is displayed. button. To quit the PLAYBACK Erase All Images Erase all images in the memory card except the protected images (if any). . 1. Set the dial knob to 2. Press the menu button. 3. Press the or button to select ERASE ALL IMAGES and press the ENTER button, the following sub menu is displayed. 4.
Erase Single Image Erase the selected image. 1. Set the dial knob to . 2. Press the menu button. 3. Press the or button to select ERASE SINGLE IMAGE and press the ENTER button, the following sub menu is displayed. 4. Press the or button to select the image to be erased. 5. To erase an image, use the or button to select YES, and press the ENTER button to confirm. 6. Toggle the menu button to exit from the menu mode. Note: In case the display image is protected, it is indicated by icon.
Protect Toggle the protection status of the selected image. When the images are protected, they cannot be erased until unlocked. However, the protected images can be lost if the memory card (SD card or MMC) is formatted by the camera. 1. Set the dial knob to . 2. Press the menu button. 3. Press the or button to select PROTECT and press the ENTER button, the following sub menu is displayed. 4. Press the or button, to select the image to be protected. 5.
Print Setting Print setting allows you to select and mark images for printing. The camera also lets you specify the number of copies to print for each selected image. When you insert your memory card to a DPOF-compatible printer, only the marked images will be printed. [PRINT SETTING] Enables you to set the print setting. 1. Set the dial knob to . 2. Press the menu button. 3. Press the or button to select PRINT SETTING, and press the ENTER button, the following sub menu is displayed. 4.
SETUP MENU This feature allows to set up the default settings for using this camera. The settings are held in memory even if the camera is turned off. By switching the dial knob to SETUP, the SETUP MENU appears. You can select the each setting item by pressing the or button.
Card Formatting Format the card in the camera. This will erase all data stored in the card. For more detail information, please refer to page 14. Language Set the on-screen display language of menus displayed on the LCD monitor. 1. Set the dial knob to SETUP. button to select LANGUAGE, 2. Press the• or and press the ENTER button. 3. Press the or button to choose one the desired language. LCD Brightness Adjust the brightness of the LCD monitor.
Auto Shut Off If no operation is carried out for a fixed amount of time, power consumption is set to its minimum state (power almost turned off) to prevent battery wear. This setting allows you to set the time when the camera turns off automatically. To return to the normal state after the Auto Shut Off has been executed, press the Power button to turn the power on again. When the camera power is supplied by an AC adapter, the auto shut off is fixed at 5 minutes. 1. Set the dial knob to SETUP. 2.
TRANSFERRING PICTURES TO THE COMPUTER Before you can transfer the pictures from the memory card to your computer, you need to install first the camera software into your computer. (Driver installation: Applicable only on Windows 98 and Mac OS 8.6) System Requirements Before installing the camera software, make sure your computer meets the following system requirements: Windows 98/2000/Me/XP, Pentium 166 MHz or higher for PC Users Mac OS 8.6/9.0/9.
Downloading Pictures Once you have properly connected the camera to your computer, you are now ready to transfer pictures. 1. Make sure the USB cable is properly connected between your camera and computer. 2. Turn on your camera’s power. The camera gets into the PC mode regardless the dial knob position. 3. To access the pictures on the memory card: If you are using Windows, double-click My Computer on the desktop. You will then see a drive labeled “Removable disk”. Click that drive letter.
Warning and Error Messages Error Message Related the Memory Card in the Playback Mode If the card error occurs in either the Capture mode or the Playback mode , the following icon is displayed according to the situation on the background. ICON Status It is displayed when the card is not inserted into the camera. MODE Capture Mode Playback Mode It is displayed when the “unknown” card (the camera cannot Capture Mode Playback Mode recognize it) is inserted into the camera.
SPECIFICATIONS Image Sensor Image Quality File Format Recording Medium File System Print File System Lens Focal Length Focal Range Digital Zoom Viewfinder Type Shutter Speed Exposure Metering Exposure Control Exposure Compensation White Balance Sensitivity Flash Flash Range Self-timer LCD monitor Connectors Weight Dimension 4.0 Megapixels (1/1.8” CCD sensor) 2272 x 1704 pixels (Fine) 1600 x 1200 pixels (Standard) 1280 x 960 pixels (Basic) 640 x 480 pixels (Economy) Still & Burst files: Exif 2.