Digital Camera >> FCC STATEMENT This device complies with Part 15 of the FCC Rules. Operation is subject to the following two conditions: (1) This device may not cause harmful interference, and (2) This device must accept any interference received, including interference that may cause undesired operation. Note: This equipment has been tested and found to comply with the limits for Class B digital devices, pursuant to Part 15 of the FCC rules.
Microsoft R and Windows R are U.S. registered trademarks of Microsoft Corporation. Pentium R is a registered trademark of Intel Corporation. Macintosh is a trademark of Apple Computer, Inc. SDTM is a trademark. Other names and products may be trademarks or registered trademarks of their respective owners. User’s Manual >> TRADEMARK INFORMATION READ THIS FIRST Notice: 1. Product design and specifications are subject to change without notice.
WARNING Digital Camera >> Do not use this camera if it is emitting smoke (or an unusual odor), if it becomes unusually hot to the touch, produces a peculiar noise, or exhibits any other abnormal conditions. Operating the camera in any of these circumstances may cause a fire or an electrical shock. Stop using the camera immediately, turn the camera off and remove the battery. Contact your dealer or authorized service facility for repairs.
Do not place this camera in a location affected by oil fumes or steam, such as near a cooking stove or humidifier. This may cause a fire or an electrical shock. Do not leave this camera in a location subject to extremely high temperatures, such as in a sealed vehicle or in direct sunlight. Exposure to high temperatures may adversely affect the camera case and internal components and may cause a fire. User’s Manual >> CAUTION Do not cover or wrap the camera with a cloth or quilt.
Digital Camera >> CONTENTS 8 INTRODUCTION 8 10 Overview Package Contents 11 GETTING TO KNOW THE VIVICAM 4000 11 12 14 15 16 Front View Rear View Mode dial Viewfinder LED Indicator LCD Monitor Icons 19 GETTING STARTED 19 19 21 23 24 25 26 27 28 Attaching the Camera Strap Inserting and Removing the Battery (Optional Accessory) Charging the Battery Inserting and Removing the SD Card (Optional Accessory) Turning the Power On/Off Formatting an SD Card Choosing the OSD Language Setting the Date and Time Se
49 51 53 54 55 56 57 58 60 ] PLAYBACK MODE Playing Back Still Images Playing Back Video Clips Playing Back Still Images/Video Clips on a TV Recording Voice Memos Thumbnail Display Zoom Playback Slideshow Display Protecting Images [ ] Erasing Images User’s Manual >> 49 [ 62 MENU OPTIONS 62 64 67 69 70 72 Photography Menu (Picture tab) Photography Menu (Function tab) Photography Menu (AE/AWB tab) Playback Menu Setup Menu (Basic tab) Setup Menu (Custom tab) 74 TRANSFERRING RECORDED IMAGES AND VIDEOS TO Y
Digital Camera >> INTRODUCTION Overview Congratulations on your purchase of the new digital Vivicam 4000. Capturing high-quality digital images is fast and easy with this state-of-the-art smart camera. Equipped with a 6.3 Mega pixel CCD, this Vivicam 4000 is capable of capturing images with a resolution of up to 2816 x 2112 pixels. The Vivicam 400 is fully automatic. It will adjust focus, exposure, and lighting balance resulting in superior images. The Vivicam 4000 has full manual control, as well.
Your images will be sharp and clear with a variety of focus modes. Autofocus provides crisp focus under most conditions, however you may also specify the focal distance using macro (for closeups), infinity, or fixed focus at 3 m (9 feet), or 1 m (3 feet.) Self-timer mode The self-timer may set to 2 seconds, 10 seconds, 10+2 seconds, or a defined capture interval allowing for some creative effects.
Digital Camera >> Package Contents Carefully unpack your Vivicam 4000 and ensure that you have the following items. Common Product Components: Digital camera A/V cable User’s manual USB cable Software CD-ROM Camera strap Camera pouch Common (Optional) Accessories: SD card AC power adapter Rechargeable lithium-ion battery Battery charger The components and accessories that come with your Vivicam 4000 may be different from those described in this manual.
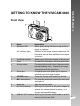
Front View # 1. 2. 3. 4. 5. 6. 7. 8. 9. 10. User’s Manual >> GETTING TO KNOW THE VIVICAM 4000 Name Self-timer LED Description Blinks green during Self-timer mode until the image is captured. (AF auxiliary light) Effective for still image capture mode when the luminance value of Auto and Macro focus mode is below 6. Viewfinder window Allows you to frame the subject of the picture. Flash Provides flash illumination in one of several modes.
Digital Camera >> Rear View # 1. 2. 3. 4. 5. 6. 7. 8. 9. 10. 11. 12. 13. 14. 12-E Name Description Diopter adjustment dial Provides a clearer image when using the optical viewfinder. Viewfinder window Allows you to compose your subject using the optical viewfinder. Viewfinder LED Indicates the cameras operational status. (Zoom in) button Zooms the lens to telephoto position. (Zoom out) button Zooms the lens to wide-angle position. Speaker For playback or recorded audio.
User’s Manual >> SET /Direction button # 1. Name SET button 2. button 3. 4. (Focus) button Allows you to choose the appropriate focus setting. button Scrolls downwards. (Self-timer) Allows you to toggle the self-timer on/off, button selects the desired self-timer mode or choose the interval photography. button Scrolls left. (Exposure compensation / Backlight 5. Description Enters the menu page and confirms the chosen setting. Scrolls upwards.
Digital Camera >> Mode dial : photography mode # Mode 1. Auto photography Description The Vivicam 4000 is automatically sets for exposure, etc. 2. P Program In program mode the shutter speed and (auto exposure) aperture will be set automatically, but other parameters may be set manually. 3. Tv Shutter speed priority You may specify the shutter speed while the camera sets the corresponding aperture value. 4.
The viewfinder LED indicates the current operational status of the camera. The meaning of the LED changes depending upon what the camera is doing (powered-off, capturing, re-playing, or downloading.) Color Status During power off On Green Flashing On Red Flashing On Orange The battery is charging. Camera is operating from AC adapter. - Batterycharging is being initialized. Flashing - During photography Auto focusing successful.
Digital Camera >> LCD Monitor Icons For Photography modes: [ 1. Mode 2. Focus setting 3. Long-exposure time warning icon (potential for handshake blur) 4. Zoom status 5. Focus area (When the shutter button is pressed halfway.) 6. Voice memo 7. Battery condition ][ ][ ][ ] 8. 9. 10. 11. 12. 13. Flash-mode Image size (resolution) Image quality setting Burst-mode Self-timer icon Possible number of shots remaining 14. White balance 15. Metering 16. Backlight correction 17.
1. Mode 2. Focus setting 3. Long-exposure time warning icon (potential for hand-shake blur) 4. Zoom status 5. Focus area (When the shutter button is pressed halfway.) 6. Voice memo 7. Battery condition 8. Flash mode 9. Image size (resolution) User’s Manual >> For Photography modes: [ P ] [ Tv ] [ Av ] [ M ] 10. 11. 12. 13. Image quality setting Burst mode Self-timer icon Possible number of shots remaining 14. White balance 15. Metering 16. Exposure compensation 17. Shutter speed 18. Aperture 19.
Digital Camera >> For Movie mode: [ ] 1. 2. 3. 4. 5. 6. 7. 8. Movie-mode icon Focus setting Zoom status Battery condition Movie resolution Movie quality Self-timer icon Possible recording time/ elapsed time 9. Recording indicator Playback mode [ ]-Still Image Playback 1. 2. 3. 4. 5. Playback mode [ ]-Video Playback 1. 2. 3. 4. 5. 6. 7. 8.
User’s Manual >> GETTING STARTED Attaching the Camera Strap Attach the camera strap as shown in the illustration. Inserting and Removing the Battery (Optional Accessory) It is highly recommend using the original rechargeable lithium-ion battery to fully demonstrate the camera's full functionality. Charge the battery fully before using the Vivicam 4000. Make sure that the camera is off and the AC adapter line is disconnected before inserting or removing the battery. Inserting the Battery 1.
Digital Camera >> 2. Insert the battery in the correct orientation shown. Tilt the battery lock lever in the direction of the arrow and orient the battery so that its label is facing the front side of the camera, and then insert the battery. 3. Close the battery/SD card cover. 2 1 Removing the Battery Open the battery/SD card cover and then release the battery lock lever. When the battery has come out a little, slowly pull it out the rest of the way.
To maximize performance and lifetime, we recommend that you fully charge the battery and discharge it for at least one complete cycle before use. Using the optional AC power adapter charges the battery while the battery is inside the camera. Make sure that the camera is powered off and the AC adapter is disconnected from the camera before inserting or removing a battery. User’s Manual >> Charging the Battery 1. Insert one end of the AC power adapter into the DC IN 5V terminal of the camera. 2.
Digital Camera >> 22-E Use only the specified AC power adapter. Damage caused by the use of an incorrect adapter is not covered under the warranty. The battery may feel warm after it has been charged or immediately after being used. This is normal and not a malfunction. When using the camera in cold conditions, keep the camera and battery warm by storing it in a warm place such as an interior pocket between shots.
Images captured with the Vivicam 4000 will be stored on a Secure Digital (SD) memory card. You must have an SD card in place to use the Vivicam 4000. Before inserting or removing the SD card, make sure that the power of the camera is off. Inserting an SD card 1. Open the battery/SD card cover. 2. Insert the SD card in the correct orientation as shown. Hold the SD card with the contact pins facing the rear side of the camera. Insert the card as far as it can go.
Digital Camera >> Turning the Power On/Off Load the battery and insert an SD card before starting. Turning the power on Press the POWER button to turn the power on. The viewfinder LED lights green and the camera is initiated. When the power is turned on, the camera will start in the mode that is currently selected by the mode dial. Turning the power off Press the POWER button to turn the power off.
Formatting a SD card will erase all of the images and folders that have been recorded on the SD card. Formatting is not possible when the SD card in the locked condition. ]. 1. Set the mode dial to [ [Basic] of the set-up menu is displayed. User’s Manual >> Formatting an SD Card 2. Select [Format] with the / buttons from [Basic] of the set-up menu, then press the SET button. / buttons, 3. Select [Execute] with the and press the SET button. To cancel formatting, select [Cancel] and press the SET button.
Digital Camera >> Choosing the OSD Language When you first turn the Vivicam 4000 on, choose an On-Screen Display (OSD) language for information displayed on the LCD monitor. 1. Set the mode dial to [ ] and press the button [Custom] of the set-up menu is displayed. 2. Select [Language] with the / buttons and press the SET button. The available OSD languages will be displayed. Select the displayed language using the / buttons and press the SET button. The setting will be stored.
The date/time needs to be set if/when: Camera is turned on for the first time. Camera is turned on after leaving the camera without a battery for an extended period of time. When the date and time information is not displayed on the LCD monitor, follow these steps to set the correct date and time. User’s Manual >> Setting the Date and Time 1. Set the mode dial to [ ] and press the button. [Custom] of the set-up menu is displayed. 2. Select [Date/Time] with the / buttons and press the SET button.
Digital Camera >> Setting Image Resolution and Quality Resolution and quality settings determine the pixel size (dimension), image file size, and compression ratio for your images. These settings affect the number of images that can be stored on a memory card. As you get to know the Vivicam 4000, it is recommended that you try each quality and resolution setting to get an appreciation for the effects that these settings will have on your images.
The following table shows the approximate shots that you can capture at each setting based on an optional SD card from 32MB to 512MB.
Digital Camera >> Possible recording time/sec (Video clip) Image size Quality SD card capacity 128MB 256MB 32MB 64MB 512MB (Fine) 01:45 03:34 07:13 14:23 28:59 (Standard) 02:36 05:20 10:46 21:28 43:13 320 x 240 * The data shows the standard testing results. The actual capacity varies according to the shooting conditions and scene content. The memory card testing results for 512MB are based on Toshiba, Panasonic, and San Disk SD memory cards.
[ ] Auto Mode Auto photography mode is perhaps the most commonly used photography mode. Images can be captured simply because the exposure (the combination of shutter speed and aperture setting) is determined automatically to suit the photographic conditions. You can use either the optical viewfinder and/or the 2.0" LCD monitor to compose your images. Capturing images using the optical viewfinder will conserve the battery power.
Digital Camera >> 3. Compose your image in the viewfinder. Turn the “diopter adjustment dial” until the image appears clearly within the viewfinder. 4. Press the shutter button. Pressing the shutter button down halfway automatically focuses and adjusts the exposure. Pressing the shutter button down fully captures the images. The focus-area frame turns blue and the viewfinder LED lights green when the camera is focused and exposure is determined.
Make sure that the battery is inserted before capturing images. 1. Press the POWER button to turn the power on. 2. Set the mode dial to [ ]. By default, the LCD monitor setting is on. 3. Compose your image in the LCD monitor. 4. Press the shutter button down halfway, then press it down fully. User’s Manual >> Using the LCD Monitor Using the Optical Zoom Zoom photography allows you to capture images magnified up to 3 times or wide-angle photography depending on the distance up to the subject.
Digital Camera >> Using the Digital Zoom Using a combination of 3 times optical zoom and 4.4 times digital zoom permits zoom photography up to 13.2 times to suit the subject and the distance. Digital zoom is a compelling feature, however, the more an image is enlarged (zoomed), the more pixilated (grainer) the image will appear. 1. Set the mode dial to one of the photography modes. 2. Turn on the LCD monitor by pressing the button. 3. To enable the digital zoom: a. Press the MENU button. b.
Set the flash for capturing images. The flash mode can selected for the particular photographic conditions. 1. Set the mode dial to one of the photography modes. The available flash modes are dependant on the selected photography mode, scene mode, and capture mode. 2. Toggle the flash mode. User’s Manual >> Setting the Flash button to select the desired Each press of the button moves the icon one step through the sequence and displays it on the screen.
Digital Camera >> The table below will help you choose the appropriate flash mode: Flash mode Description [ Blank] Auto The flash fires automatically to suit the photographic conditions. This flash mode is only available when the camera is set to the [ ] [ ] mode. Use this mode to reduce the red-eye phenomenon Red-eye Reduction when you want to capture natural-looking photographs of people and animals in low-light conditions.
Setting the Focus focus [ ]. You may over-ride the auto focus and specify macro, [ ] infinity, [ 3M ] fixed at 3 m (9 feet), or [ 1M ] fixed at 1 m (3 feet). Specifying the focus manually can give you precise focus control and it also reduces the shutter latency-time slightly. (The time delay between pressing the shutter button and the time of actual image capture.) The focus setting will be maintained even when the power is turned off or when Auto Power Off is activated.
Digital Camera >> The table below will help you choose the appropriate focus mode: Focus mode Description [ Blank] Select auto focus for most occasions when you want Auto Focus the camera to automatically determine the focus setting. Using auto focus any object at a range of focus is 80 cm (32 inches) or greater can be in focus. [ ] Select macro to capture close-up images. When the Macro lens is zoomed to its widest position you may focus objects as close as 9 cm (4 inches).
This setting allows images to be captured with the self-timer and allows interval photography. 1. Set the mode dial to one of the photography modes. 2. Toggle the button to select the User’s Manual >> Self-timer/Interval Photography setting. Each press of the button moves the icon one step through the sequence and displays it on the screen. OFF [ [ Intv ] Interval For the [ OFF 10S ] 10 sec. [ [ 2S ] 2 sec. 10+2 ] 10+2 sec. ] movie mode and burst mode ([Continuous] and [Auto Exp.
Digital Camera >> The table below will help you choose the appropriate self-timer mode: Self-timer mode Description [ 10S ]10 sec. The image is captured about 10 seconds after the shutter button is pressed. [ 2S ] 2 sec. The image is captured about 2 seconds after the shutter button is pressed. [ 10+2 ]10+2 sec. The first image is captured about 10 seconds after the shutter button is pressed. Then the camera prepares for a second image by charging the flash, if required.
Your camera automatically adjusts the exposure for each scene. However, there may be situations where you wish to manually override the automatic determination of the camera and under- or over- expose the image. This is called EV compensation. The EV compensation can be adjusted from [-2.0 EV] to [+2.0 EV] in 0.3 EV steps.
Digital Camera >> Effective Subjects and Set Values * * * * + (positive) compensation Printed matter comprising black text on whitish paper Backlighting Bright scenes or strong reflected light such as ski slopes When the sky accounts for a large area on the screen * * * - (negative) compensation People illuminated by a spotlight, in particular, against dark background Printed matter comprising white text on blackish paper Weak reflecting bodies such as evergreen trees or darkish leaves * * Backlight c
In this mode, images are captured with the priority given to shutter speed. The aperture is automatically set according to the shutter speed. If you set a fast shutter speed, you can capture images of moving subjects that look as if they are still. If you set a slow shutter speed, you can capture images that give the impression that the subject is in motion. User’s Manual >> [ Tv ] Shutter Speed Priority Photography Mode 1. Set the mode dial to [ Tv ] and press the button. 2.
Digital Camera >> The shutter speed and corresponding aperture value are displayed on the screen. If an appropriate combination cannot be set, the aperture value is displayed in red, but images can be captured regardless. 3. Compose the image, press the shutter button down halfway, then press it down fully. Setting the shutter speed slower than 0.5 second will result in long exposure photography and the [ ] will be displayed on the screen.
In this mode, images are captured with the priority given to aperture. The shutter speed is automatically set according to the aperture. The aperture will affect the depth-of-field of the camera. If you set a small aperture (higher F value), you can capture portrait images with an out-of-focus background.
Digital Camera >> [ M ] Manual Mode In manual mode, the aperture value and the shutter speed can be varied individually. 1. Set the mode dial to [ M ]. 2. Select the shutter speed or the aperture with the button. 3. Set the shutter speed or the aperture value with the selection wheel. 4. Compose the image, press the shutter button down halfway, then press it down fully. In the flash photography mode, when [ ] and [ ] are set, the fastest shutter speed is 1/250 second.
This sets the scene setting such as [ scene and captures the image. ] portrait, [ ] sports or [ ] night 1. Set the mode dial to one of the scene modes. When the camera mode is set to the [ ] or [ ], [ ] macro cannot be selected. 2. Compose the image, press the shutter button down halfway, then press it down fully.
Digital Camera >> [ ] Movie Mode This mode is for recording video clips. Voice can also be recorded. 1. Set the mode dial to [ ]. 2. Compose the image with the zoom button. Optical zoom and/or digital zoom should be set while composing the scene. Optical zoom cannot be used during movie capture. 3. Fully pressed the shutter button. The recording of the video clip will start. Pressing the shutter button again will end the recording and save the video on the SD card.
] PLAYBACK MODE Playing Back Still Images You can play back the still images on the LCD monitor. Insert the SD card into the camera and turn on the power before starting. User’s Manual >> [ 1. Set the mode dial to [ ]. The last image appears on the screen. 2. Turn the selection wheel dial to move forward or reverse. Turn to the direction: go back to the previous frame. Turn to the direction: advance to the next frame. The images can also be advanced forward or reverse by pressing the / buttons.
Digital Camera >> Image Display Information You can switch the state of the information display by pressing the button when playing back images. Each press of the button switches the information display state in the following order: Pressing the / buttons during image playback will rotate the image 90 degrees. The button rotates the image clockwise, whereas the button rotates the image counterclockwise. Pressing the opposite button opposite will return the image to the normal display.
You can play back video clips recorded on the Vivicam 4000. You can also play back voice. 1. Set the mode dial to [ ]. The last image appears on the screen. 2. Select the desired video clip with the selection wheel. You can also select the desired video clip with the / buttons. 3. Press the SET button to playback a movie clip. Pressing the / buttons during playback initiates fast forward / fast reverse. To stop video playback: Press the button. This stops playback and returns to the start of the video clip.
Digital Camera >> Button Operations During playback (Forward play) Pressing the Pressing the button will sequentially invoke 2X fastbutton reverse, 4X fast-reverse, regular play Pause 2x-speed playback Reverse playback Cancels pause Stop (The display returns to the 1st frame playback) button SET button During a Stop button will sequentially invoke 2X fastbutton forward, 4X fast-forward, regular play.
You can playback your images on a TV. Before connecting your camera to any video devices, make sure to select NTSC / PAL to match the broadcast standard of the video equipment to which you are going to connect to the camera. It is recommended to use the AC power adapter while transferring the recorded images and video files. 1. Set the mode dial to [ User’s Manual >> Playing Back Still Images/Video Clips on a TV ]. 2. Connect one end of the A/V cable to the A/ V OUT terminal of the camera. 3.
Digital Camera >> Recording Voice Memos A maximum of 30 seconds of audio can be recorded as a memo annotation for each still image. A voice memo can be recorded only once. 1. Set the mode dial to [ ]. The last image appears on the screen. 2. Select the image with the selection wheel. 3. Press the shutter button. [VOICE RECORDING] is displayed on the screen and recording starts. 4. To stop recording voice memo during recording, press the shutter button again.
This function allows you to view nine thumbnail images on the LCD monitor simultaneously, so you can quickly search for the image that you want. 1. Set the mode dial to [ ]. The images appears on the screen. 2. Press the button once. The images are displayed in the thumbnail display. Images that have been selected with the / / / buttons or the selection wheel will be indicated by a green frame. When there are ten or more images, scroll the screen with the / buttons or the selection wheel 3.
Digital Camera >> Zoom Playback Images that are played back can be enlarged by a factor of two, or four times. This allows you to enlarge a selected portion of an image to examine fine details. 1. Set the mode dial to [ ]. 2. Press the / buttons to select the image you want to enlarge. You can also select the image you want to enlarge with the selection wheel or from the thumbnail display. 3. Adjust the enlargement ratio with the / buttons. Pressing the button enlarges the image.
The slideshow function enables you to playback your still images automatically in sequential order as a slideshow. ]. 1. Set the mode dial to [ 2. Press the MENU button. The playback menu is displayed. 3. Select [Slide Show] with the / buttons, and press the SET button. The slideshow starts. 4. To stop the slide show during playback, press the SET button. The image is displayed on screen when you press the SET button.
Digital Camera >> Protecting Images You may protect an image from accidental deletion, or erasure. Protecting Images 1. Set the mode dial to [ ]. 2. Select the image that you want to protect with the selection wheel. 3. Press the MENU button. The playback menu is displayed. 4. Select [Protect] with the / buttons, and press the SET button. 5. Select [Single] or [All] with the buttons, and press the SET button. / 6. Select [Set] with the / buttons, and press the SET button.
To cancel protection for only one image, display the image that you want to remove the image protection. 1. Select [Protect] with the / buttons from the playback menu, and press the SET button. 2. Select [Single] or [All] with the / buttons, and press the SET button. 3. Select [Cancel Protect] with the / buttons, and press the SET button. The image is no longer protected and the camera returns to the play mode. User’s Manual >> Canceling Protection Protecting multiple images 1.
Digital Camera >> [ ] Erasing Images Immediate Erasure (Quick Delete Function) The quick delete function enables you to erase the last-captured image during capture. 1. Set the mode dial to one of the photography modes. 2. Press the button. The last image and quick delete menu appear on the screen. 3. Press the SET button to erase the image. To not erase, select [Cancel], and press the SET button. Erasing in Playback Mode Erasing a single image / Erasing all images 1. Set the mode dial to .
User’s Manual >> Single: Erases the selected image or the last image. All: Erases all of the images on the SD card except for protected images. Select: Erases a set of selected images. 5. Select [Execute] with the / buttons, and press the SET button. To not erase, select [Cancel], and press the SET button. Erasing an image will not affect sequential image numbering. For example, if you erase image number 240 the next captured image will be numbered 241 even though 240 no longer exists.
Digital Camera >> MENU OPTIONS Photography Menu (Picture tab) This menu is for basic settings used when capturing images in the photography modes. These settings are retained even if the camera is turned off or the Auto Power Off function is activated. 1. Set the mode dial to one of the photography modes. 2. Press the MENU button. The [Picture] tab of the photography menu is displayed. 3. Select the desired [Picture] option item with the / buttons, and press the SET button to enter its respective menu.
This sets the quality (compression rate) at which the image is captured. Fine: Low compression Standard: Normal Economy: High compression TIFF: Lossless compression (the absolute highest image quality and the largest file sizes.) The economy setting is not available in the movie [ ] mode. TIFF setting is only available at resolution 2816 x 2112.
Digital Camera >> Photography Menu (Function tab) 1. Set the mode dial to one of the photography modes. 2. Press the MENU button, and select the [Function] menu with the button. The [Function] tab of the photography menu is displayed. 3. Select the desired [Function] option item with the / buttons, and press the SET button to enter its respective menu. 4. Select the desired setting with the / buttons, and press the SET button. 5. To exit from the photography menu, press the MENU button.
User’s Manual >> a scene. Using AEB the camera will capture a sequential burst of three images at three different exposure settings. One shot will be at the level of exposure automatically determined by the camera, eV0. The two complementary shots will be underexposed (eV -0.67), and overexposed (eV +0.67) respectively. Afterwards, you may review the sequence of shots to select the best exposure. For continuous (burst) photography, press and hold the shutter button until all five images have been captured.
Digital Camera >> Digital Zoom This enables or disables digital zoom. ON: Enable digital zoom. OFF: Disable digital zoom. Date Print The date of recording can be printed directly on still images. This function must be activated before the image is captured. ON: Imprints the date on still images when capturing images. OFF: Does not imprint the date on the still images when capturing images. Interval/Count Automatically captures a specified number of images over a fixed interval.
1. Set the mode dial to one of the photography modes. 2. Press the MENU button, and select the [AE/AWB] menu with the button. The [AE/AWB] tab of the photography menu is displayed. 3. Select the desired [AE/AWB] option item with the / buttons, and press the SET button to enter its respective menu. 4. Select the desired setting with the / buttons, and press the SET button. 5. To exit from this menu, press the MENU button.
Digital Camera >> Metering This sets the exposure-metering method for calculating proper exposure. Multi: The entire area of the screen is measured, and the exposure is calculated. Spot: A very small portion of the center of the screen is measured, and the exposure is calculated. ISO This sets the light sensitivity for capturing images. When the sensitivity is raised (the ISO figure is increased), the camera sensitivity is enhanced for low-lighting, but your images will appear more pixilated (grainy).
In the [ ] mode, you may adjust playback settings. These settings are not canceled even if the camera is turned off or the Auto Power Off function is activated. 1. Set the mode dial to [ ]. 2. Press the MENU button. The playback menu is displayed. 3. Select the desired option item with the / buttons, and press the SET button to enter its respective menu. / 4. Select the desired setting with the buttons, and press the SET button. 5. To exit from the playback menu, press the MENU button.
Digital Camera >> Setup Menu (Basic tab) In the setup menus you may adjust your Vivicam 4000's operating environment. The settings will be retained after the power has been turned off or Auto Power Off is activated. ]. 1. Set the mode dial to [ The [Basic] tab of the set-up menu is displayed. 2. Select the desired [Basic] option item with / buttons, and press the SET the button to enter its respective menu. / 3. Select the desired setting with the buttons, and press the SET button. 4.
This function reformats the SD card loaded in your camera and thereby erases all images as well as any other non-image data on the memory card. Even protected images are. An SD card cannot be formatted if it is write-protected. Refer to section in this manual titled “Formatting an SD Card” for further details. Sound Enables or mutes playback sound portion of voice memos and video clips. ON: Enables playback-sound. OFF: Mutes playback-sound.
Digital Camera >> Setup Menu (Custom tab) 1. Set the mode dial to [ ], and select the [Custom] menu with the button. The [Custom] tab of the set-up menu is displayed. 2. Select the desired [Custom] option item with the / buttons, and press the SET button to enter its respective menu. 3. Select the desired setting with the / buttons, and press the SET button. 4. To exit from the set-up menu, change the mode dial setting. Date/Time This sets the date and the time.
~ This sets the language that is displayed on the LCD monitor. Refer to section in this manual titled “Choosing the OSD Language” for further details. English: English Francais:French Deutsch: German ~ Spanish Espanol: Italiano: Italian : Chinese (Traditional) : Chinese (Simplified) User’s Manual >> Language Video Output This sets video output standard of the camera so you may connect your camera to video equipment. NTSC: NTSC broadcast standard. PAL: PAL broadcast standard. System Info.
Digital Camera >> TRANSFERRING RECORDED IMAGES AND VIDEOS TO YOUR COMPUTER To transfer images/video clips from the Vivicam 4000 to your computer, follow these steps: Step 1: Installing the USB driver (Windows 98SE users only) Step 2: Connecting the Vivicam 4000 to your computer Step 3: Downloading images and video files System Requirements (Windows) Pentium 400 MHz or higher Windows 98SE/Me/2000/XP 128 MB RAM 300 MB available hard disk space CD-ROM drive Available USB port or SD card reader System Requir
For Windows 98 computers only The USB driver on the CD-ROM is exclusively for Windows 98 computers. Installing the USB driver on computers running Windows 2000/ME/XP is not necessary. 1. Insert the CD-ROM that Vivicam 4000 with the camera into your CD-ROM drive. The welcome screen appears. 2. Click "Install USB Driver". Follow the onscreen instructions to complete the installation. After the USB driver has been installed, restart your computer.
Digital Camera >> to find more folders. Your recorded images and video clips will be inside these folders. Copy & Paste or Drag-N-Drop image and video files to a folder on your computer. Mac users: Double-click the "untitled" or "unlabeled" disk drive icon on our desktop. iPhoto or iPhoto2 should automatically launch. Step 3: Downloading Images and Video Files When the Vivicam 4000 is turned on and connected to your computer, it is considered to be a disk drive, just like a floppy disk or CD.
Presto! Mr. Photo is an ideal program for creating, sharing, and managing digital images and videos. In this new edition, users can add sound to their files for useful real-life effects. The straightforward, powerful photo enhancement functions can make your images come alive. You can also adjust the photo quality and convert the file format for other applications. Mr. Photo also provides fun photo templates, motion shows, slideshows, e-mail, html, and links to other applications.
Digital Camera >> INSTALLING PRESTO! IMAGE FOLIO Image Folio is a comprehensive multimedia image-processing program. It enables you to process images, graphics, and drawings captured from scanners, VCRs, a laser discs, digital cameras, video capture boxes and any other location that the computer can capture images from. You can create new images by using the Image Folio's powerful tools. This sophisticated set of image-editing tools enables you to quickly create new images or enhance pre-existing ones.
The CD-ROM includes a PDF (portable document format) copy of the user's manual. To view a PDF you must have Acrobat Reader installed in your computer. Acrobat Reader is included on the camera CD ROM. Using Acrobat Reader, you can read the user's manual and print sections of interest. 1. Insert the CD-ROM that came with the camera into the CD-ROM drive. The welcome screen appears. 2. Click "Install Acrobat Reader". Follow the on-screen instructions to complete the installation.
Digital Camera >> USER'S MANUAL ON CD-ROM A copy of the user's manual on is provided on the CD-ROM in PDF format. It is a backup copy of the printed manual. If you misplace the printed guide, you may print another copy from the CD-ROM. The only requirement for viewing the User Manual on the CD-ROM is that you have Acrobat Reader installed on your computer. Updates to this manual, and versions in other languages may be found on our website. 1.
User’s Manual >> CONNECTING THE VIVICAM 4000 TO OTHER DEVICES E-81
Digital Camera >> 82-E VIVICAM 4000 SPECIFICATIONS Item Image sensor Description 1/1.8" CCD sensor Total number of pixels: 6.3 mega pixels Number of effective pixels: 5.95 mega pixels Image resolution 2816 x 2112, 2272 x 1704, 1600 x 1200, 640 x 480
4.4x (Capture mode) 2x and 4x enlargement (Playback mode) Metering system Multi metering, Spot metering Shooting Modes Program AE/Shutter speed priority/Aperture priority/ Manual/Portrait /Sports / Night scene Exposure compensation -2EV - +2EV (in 0.3EV increments) White balance Auto/Incandescent/Fluorescent 1/Fluorescent 2/ Day light/Cloudy/Manual Flash Modes Auto/Red-eye reduction/Flash Off/Forced flash Flash effective range 0.6 m –3.