Mobi DV Instruction manual
Table of Contents Chapter 1: Caution, Safety, and Introduction 3 Chapter 2: Machine 4 2-1 List of Accessories 4 2-2 Instruction of Operation 6 Chapter 3: Product 10 3-1 Brief Introduction of Product 10 3-2 Description 11 3-3 Functions 13 Chapter 4: Function Mode 16 4-1 Mode 16 4-2 Digital Video Camcorder 18 4-3 Digital Camera 24 4-4 Music Player 30 4-5 Video Recorder 33 4-6 Play Mode 35 4-7 Function Setup 38 4-8 Spotlight 41 Chapter 5: Connected to the Computer 42 Appendi
Chapter 1: Caution, Safety, and Introduction Correct Usage Please operate the unit in strict accordance with this manual. Storage Guidelines This product is not waterproof. It should not be stored anywhere that the temperature rises above 60 (100 ). Breakage Despite the rigid construction of this product, it should be handled with due care and attention. It may suffer damage if dropped. Maintenance and Repair Please consult a qualified technician if this product requires any repairs.
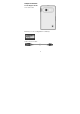
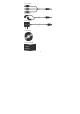
Chapter 2: Machine 2-1 Package Contents A. DV Camcorder B. Battery (3.7 volts, rechargeable Li-ion Battery) C.
D.A/V cable E. Earphone F. AC Adapter G. Driver CD H.
2-2 Operation guides Battery Installation / Removal The battery release button is located at the upper side of the unit. Press the button and open the cover to install the battery. The metal contact end of the battery should face left, slide the battery into the bay with 45° slant angle, then push the entire battery into bay. When the battery is in the proper position, replace the cover.
Recharging the Battery Charging by AC-Adapter Plug the AC end of the adaptor into the socket and plug the USB end of the adaptor into the USB port of the unit. The red backlight will turn on when the battery is being charged; it will turn off when the unit is fully charged. Charging by PC / Notebook The battery can be charged by connecting the unit to a PC or a Notebook via the USB cable. Connect the thick end of the cable to the USB port of the computer and the thin end to the USB port of the unit.
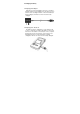
Installing The Memory Card Insert the SD/MMC card according to the diagram below. To remove the memory card, push the card firmly into the slot, then release. The card will be ejected from the slot.
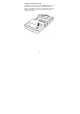
Storage for Spare Memory Card In addition to the memory card installed in the SD slot, a spare card can be stored in the unit underneath the battery compartment as shown in the figure below. Due to the limited space, only a thin card (such as a MMC card) can be stored.
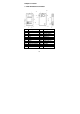
Chapter 3: Product 3-1 Brief Introduction of Product No. 1 2 3 4 5 6 7 8 9 10 11 12 Description No.
3-2 Description Power On /Off Power On: Press Power key for 1 second to turn on the unit, the screen will display start-up Power Off: Press Power key for 2 seconds, the screen will turn blank and the LED light will be off. Caution! If the Power key is pressed for 2 seconds while data is being written to the memory card, the unit will shut down, but the memory writing will continue until it is finished. Under other conditions, pressing the Power key will stop all actions and turn off the unit.
Under normal conditions, when the Mode key is pressed, the Mode selection menu will appear on the screen. Use the directional keys or Mode key to move the cursor to the desired function and press the Enter button to make your selection. While the unit is in Mode selection, the Menu key, Display key and shutter key are all disabled. When data is being written (shooting videos, taking pictures, or voice recording), the Mode key is disabled.
LCD On/Off Key This key controls the LCD screen On/Off. The main purpose is to save power. For example, while the unit is playing music in MP3 mode, the screen can be switched off to save power so the user can listen to music for longer. Rotating Lens While in DV or DSC mode, the user can rotate the lens to shoot videos or take pictures. 3-3 Functions Main functions Descriptions Battery status DV mode DSC mode. MP3 player mode.
Voice recorder mode. Playback mode. Spotlight mode. No memory card Memory card full Memory card lock File lock DV Video Resolution Exposure value Remaining time for video shooting. Zoom status.
Sun lamp Tungsten Shutter speed Auto flash Force to light Force not to light MP3 Play File lock Displayed song number / Total songs A to B repeat Repeat the selected song Repeat all songs Volume File number VR Recording File lock Remaining time to record Displaying Bar File number PLAY Playing Video files Photo files 15
Voice files 9-files displayed format 16
Functions 4-1 System Messages No Memory Card If the memory card is not in the DV Camcorder or it has been inserted incorrectly, the system will show the message “NO MEMORY CARD!” No Memory Space When the system is getting ready, it will check how much memory is available. If the memory is full, the system will show the message “NO MEMORY SPACE!” When the memory card is full, pressing the Shutter key won’t execute the video/photo/voice recording function.
No File After inserting the memory card and entering playback mode, if there is no file (video, photo, voice file) in the memory card, the system will show “NO FILE!” message. Card Lock The SD card has a lock function for the file protection. If the user inserts the SD card when the lock function is on they won’t be able to delete or save files: the system will display the message “CARD LOCK!”. To save or delete the file, simply un-lock the function.
flashing red light will announce “LOW BATTERY!” 4-2 Digital Video Camcorder (DV) Video Recording Video Recording 19
After entering DV mode, rotate the Lens to preview the scene. You can adjust the zoom on the LCD screen by using Up/Down button. Press the Shutter key once to start recording. The recording time are indicated on the screen. Press the Shutter key again to end the video recording. Video Playback Press the Enter button to preview the recorded video. Press the Left/Right button to the previous/next video record. Press the Up/Down button to control volume.
naming rules follow “DSF format” convention. All DV files are saved on the memory card under the subdirectory Root: \\DCIM\100AXH10\. The directory structure can be viewed when the unit is connected to a computer through the USB cable. Basic Settings ~ c Adjust Exposure Value Basic Setting~ Exposure.In the case of insufficient light when taking photos, press the Right button to enter the submenu. Adjust the EV value upward to increase brightness, for example, change the value to +0.3 or +1.5.
with this unit. Users can set the shutter speed up manually: Auto, 1/1000, 1/500, 1/250, 1/125, 1/60, 1/30, 1/15, 1/8. Under Auto setup, the shutter speed will alter according to the environmental light conditions. For example, when the light is insufficient, the shutter speed will reduce automatically. c Adjust White Balance Basic Setting ~White Balance and press the Right button to enter submenu.
however, doing so will significantly reduce the length of available recording time because of the limited size of memory. It is suggested that you use “Normal” or “Economic” setting if you are taking a lot of footage. Alternatively use a high capacity memory card. There are five quality settings available: Best, Fine, Normal, Basic, and Economic. Advanced Settings~ c Five Filter Effects Advanced Setting~ Effect. Filter of various colors is a standard accessory for professional photographers.
shutter speed to increase light exposure on the sensors. Under Sport Shooting Mode, the shutter speed is increased to capture fast moving objects. There are three predefined shooting modes: Normal, Sport, and Night Shot. c Sensitivity Value Setting Advanced Setting ~ISO optional list, press Right Button to enter submenu. Four different ISO setup values are available 100, 200, 400 and 800. The ISO setup is to enhance the sensitivity of sensor. The sensitivity is higher when ISO value setup is higher.
4-3 Digital Still Camera (DSC) Shooting photos Please rotate out the lens under DSC mode, and adjust the shooting range from the LCD screen. Press Shutter key to complete.
move the Left and Right button to switch among different pictures that have been taken before. Self-Photography Turn the lens to face yourself, press Left button to reverse the photography screen and start the photography. Note:The nearest photography distance for this unit is 80cm. Any shorter than this distance and the picture will be unclear. Playing Flashlight Setup Before taking pictures, use Right button to setup the Flashlight.
Maximum 4x Digital Zoom. Picture Rotation This function is available for pictures taken by DSC. It provides 4 types of rotating angles, including: 0° , 90° , 180° , and 270° . Select picture browsing mode then press MENU button to perform setup. The rotated picture will be automatically saved as a new picture and will not replace the original file. Picture Printing Setup This unit supports the direct printing function of DPOF(digital print order format) type printer.
File Saving Naming Rule The file of the picture taken will be named automatically from FILE0001.jpg and accumulate automatically to FILE9999.jpg.The file saved on DSC will be stored in the submenu of Root:\\DCIM\100AXH10\ of memory card. Basic Settings ~ c Adjust Exposure value Basic Setting ~ Exposure selection list, press Right button to enter sub menu. Same as DV function, total 11 sections of exposure values from -1.5 to +1.5 are available from this camera: +1.5, +1.2, +0.9, +0.6, +0.3, 0, -0.3, -0.
this unit. Users can set the shutter speed up manually: Auto, 1/1000, 1/500, 1/250, 1/125, 1/60, 1/30, 1/15, 1/8. Under Auto setup, the shutter speed will alter according to the environmental light conditions. For example, when the light is insufficient, the shutter speed will reduce automatically. c White Balance Adjusting Basic Setting~White Balance optional list, press Right button to enter submenu.
Advanced Settings~ c Five Filter Effects Advanced Setting~Effect optional list, press the Right button to enter submenu. As with DV, five different filter effects are available from DSC: Text, Sepia, R filter, G filter, and B filter. You can survey the picture effect created under a selected Mode from preview frame. c Sensitivity Value Setting Advanced Setting ~ISO optional list, press Right Button to enter submenu. Three different ISO setup values are available 100, 200, 400.
button and press Up/Down button to select on/off. c Add the Date on a Picture Advanced Setting~ Date stamp optional list, press Right button to enter submenu. Use Up/Down button to turn On/Off, then press enter button to confirm.
4-4 Music player(MP3) Saving Music to Memory Card Apply card recorder or USB connection function to save MP3 file onto memory card. Please note it should be saved in the following path directory, \\DCIM\100AXH10\.
Music Format Support This unit supports music file under *.MP3 format only. Music Playing After entering MP3 mode, press the Left/Right button to select songs, use Up/Down button to adjust volume. Press Enter button to play selected songs, press Enter button again to pause. If there is no MP3 file on memory card, “No File!” will be indicated on screen. Use Up/Down button to adjust volume, volume can be divided into 21 levels from soundless to maximum.
Basic Settings ~ c Playing Mode Selection Basic Setting~ Play Mode optional list, press Right button to enter submenu. Three playing modes are available: Normal, Repeat one, and Repeat all. c Delete Music File Basic Setting~ Delete optional list, press the Right button to enter submenu. Delete the selected MP3 file on the current memory card if needed. c Delete All Music Files Basic Setting~ Delete All selected items, press the Right button to enter submenu.
4-5 Voice Recording (VR) Voice Recording After entering the Voice Recording function, the system will check automatically if any pre-recorded voice file is available.
Under the Voice Recording function, press the Shutter key to record, press again to stop voice recording. Adjust the volume by using the Up/Down button. Auto Repeat can be activated by using the Up/Down button too. Playing Recorded Files Press the Enter button to switch to playing mode, press it again to play. Press it again to pause. Basic Settings~ c Recording Quality Setting Basic Setting~ Quality optional list, press Right button to enter submenu.
Basic Setting~Lock optional list, press Right button to lock the selected file if needed.
4-6 PLAY mode PLAY All Kinds of Recorded Media Files Under this integrated function, browsing of three formats is available: voice file, video file, and picture file. Press the Left and Right button to switch between different files. To play any kind of file format, press the Enter button and press it again to pause.
Menu Settings~ c Deleting A File Menu Setting~Delete optional list, you can select and delete specific multimedia files if desired. c Deleting All Files Menu Setting~Delect all, you can select and delete all existing multimedia files if need. c File Lock Menu Setting~Lock optional list, press the Right button to enter submenu, this function can lock selected multimedia file and avoid accidental deletion.
c Picture Printing Setup This unit supports the direct printing function of DPOF(digital print order format) type printer. In case the direct printing by this type of printer is needed, you must press Enter button to confirm “Print setup” from Menu. If you want to cancel the printing, please select No. To access this function, please enter picture browsing mode, then press Menu button to setup.
4-7 Function setup Button Sound Selection items include On/Off(Default is On) Adjust System Date Use Up/Down button to select your preferred date sequence: dd/mm/yy, yy/mm/dd, mm/dd/yy (The default is yy/mm/dd).Press Enter button to complete and save the setup. Or press the Left button continuously to quit from submenu, but the setup value won’t be saved. The system default date is 2004/05/01. Adjust System Time Operation:Use the Up/Down button in the upper part to select AM or PM (default is am).
TV Signal Output Type NTSC and PAL TV outputs are available from this unit. The system default value is NTSC. Environmental Light Adjustment Frequency To overcome the flicker created on the picture taken by DV and DSC due to indoor florescent lamp flashing frequency, this unit provides two setups for flashing frequencies of light source : 50Hz, 60Hz, and the system default value is 60Hz. Note: The flicker caused by direct shooting against light source cannot be eliminated.
Formatting Memory Card To ensure your memory card functions properly, we suggest that you format it for the first time you use it. The following window will appear when you enter your SD card. Simply select “Yes” to format your card. Set to default values If the system is in a state of disorder due to personal setup, you can use set default function, to restore all setup to default values. System version After confirmation button is pressed, the current software version will be displayed.
4-8 Spotlight This Flashlight function provides three intensities of brightness. The default of brightness is the weakest. Press the Up button to increase the brightness. Press the Enter button to turn the Flashlight off.
Chapter 5: Connected to the Computer To charge the unit, plug the USB cable into your PC. Turn on the power and enter “My computer” on the PC to find portable disc. Click mouse to enter selected item and you will see DCIM file folder and \\DCIM\100AXH10\ sub directory. This file folder stores all the files built by the user, includes video, picture, voice file, etc. The message above will be displayed on the screen when this equipment is connected to USB cable to the PC.
Appendix 1: Product Specific 1.DV CAMCORDER 2.DSC 3.MP3 PLAYER 4.VOICE RECORDER 5.SPOTLIGHT 6.SD/MMC CARD Specification Resolution 4 Mega Pixel (Using image enhance Image sensor 1/2” high speed CMOS sensor (2 Mega Lens 5G / fixed focus lens Focus Range FL=8.6mm, 0.8m ~ Infinity Aperture F=1:3.5 Rotation Lens 230 rotated Image 2304*1728 / 2048*1536 (Hardware Video 640*480 (VGA) / Max 15 fps Zoom 4X, Digital zoom (40 levels) LCD Display 1.
Self Timer 10 Second Interface Mini USB, Video Out, Ear Phone Jack, Video out TV Out (NTSC / PAL) Print out Support DPOF(Digital Print Order Format) Storage Media SD / MMC Card File Format JPEG(EXIF 2.
Appendix 2: Notes & Tips 1>If you cannot turn on the system, the battery power may be low. Please replace the battery or use the USB cable or charger to charge. 2>When charging, the battery is fully charged if the red LED light blinks for one second and then turn off. 3>If you cannot use the SD/MMC card after insering card, please check the following: 1.If the SD/MMC card is damaged, please replace a new one. Most of the reasons come from a bad controller chip inside the SD card. 2.
version(Series 9) of MediaPlayer. 6>With the memory card reading/writing functions, this equipment can be used as an external storage device to your PC. 7>If you use this unit for the first time and cannot charge with the battery charger, please check whether or not you have installed the battery properly. We recommend you charge the battery at least 2 hours to assure a fully charged battery.
obtain a better filming effect. 13>The design of the battery cover is tight, which is normal, since the battery will fall off easily if it is too easy to open. Therefore, this unit adopts a whole-piece tight battery cover. 14>This unit is bundled with a high-quality battery. If you purchase a new battery, we recommend you to buy the battery with the same quality to maintain good operations of this unit.
Environment Light Frequency : 50Hz ĺShutter Speed should be equal to or smaller than 1/100 second.
Design subject to alterations without notice. MINOX is a registered trademark of MINOX GmbH, Wetzlar. MINOX GmbH Walter-Zapp-Str. 4 D - 35578 Wetzlar, Germany Tel.: +49 (0) 6441 / 917-0 Fax: +49 (0) 6441 / 917-612 e-mail: info@minox.com www.minox.