SNMP-NV6 UPS SNMP Card (Web-Based monitoring SNMP Card) User’s Manual
SNMP-NV6 About this manual This manual contains information about the installation and the operation of the SNMP-NV6 SNMP card. Save this Manual This manual contains instructions and warnings that should be followed during the installation, operation and storage of this product. Failure to heed these instructions and warnings will void the product warranty. Electromagnetic Interference This is a Class A product.
SNMP-NV6 Table of Contents 1. Overview .................................................................................... 6 1.1 Features ............................................................................................... 6 1.2 Package Contents ................................................................................ 7 2. Description ................................................................................ 7 2.1 Ports .............................................................
SNMP-NV6 5.5.1.6 Battery Replacement Date ..................................................... 23 5.5.1.7 External Battery Pack............................................................. 23 5.5.1.8 Outlet Banks........................................................................... 23 5.5.1.9 Economy Mode ...................................................................... 23 5.5.2 Control............................................................................................. 23 5.5.2.
SNMP-NV6 7. Specifications ......................................................................... 39 7.1 Technical Specifications ..................................................................... 39 7.2 DIP Switch Settings ............................................................................ 39 7.3 LED Indicators .................................................................................... 39 8. Troubleshooting .....................................................................
SNMP-NV6 1. Overview SNMP-NV6 card is an interface between the UPS and the network. It can obtain the information from a UPS and issue commands to it. SNMP-NV6 card supports two kinds of protocols – SNMP and HTTP for user access. Through the SNMP NMS and Web Browser, the user can setup the SNMP-NV6 card obtain information from the UPS and issue commands to UPS.
SNMP-NV6 1.2 Package Contents The SNMP-NV6 card package contains the following items. Quantity Item 1 SNMP-NV6 SNMP Card 1 CD 1 RJ45 to DB9 serial cable 1 Quick Install 1 Product Warranty Card 2. Description The SNMP-NV6 card’s components are described as below. Network Port LED Indicators Console Port Reset Button Dipswitch 2.1 Ports Item Description Network Port Connect to the Network. LED Indicators Indicate operational status.
SNMP-NV6 2.1.1 LED Indicators No. Yellow LED Green LED Description 1 --- OFF Hardware or network error 2 Flashing (1sec) --- UPS is disconnected ON Normal operation Without Temp/Humidity probe Flashing (50 ms) 3 With Temp/Humidity probe 4 5 Flashing (50 ms) Flashing (50 ms) Normal operation Flashing (50 ms) ON Temp/Humidity probe is disconnected 2.1.2 Dipswitch Settings No.
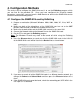
SNMP-NV6 4. Configuration Methods The easiest way to configure the SNMP-NV6 card is to run the EzSetting program, which you can find on the provided CD. Once you have configured the essential network parameters successfully, you can launch a Web Browser or telnet to the SNMP-NV6 card to execute more detailed configuration. 4.1 Configure the SNMP-NV6 card by EzSetting 1. Prepare a workstation (Microsoft Windows 2000, 2003, 2008, XP, Vista, Win7 or later). 2.
SNMP-NV6 9. Select the SNMP-NV6 card in the Device List and then click on the Modify button. Enter the account and password. The default account and password are admin and password respectively. 10. Click on the Configuration button and then configure the essential network parameters. 4.2 Configure the SNMP-NV6 card through COM Port 1. Prepare a workstation (Microsoft Windows 2000, 2003, 2008, XP, Vista, Win7 or later). 2.
SNMP-NV6 6. Set both of the dipswitches of the SNMP-NV6 card to ON position (configuration mode). After the message appears on the screen, key in the account (default account is admin’) and password (default password is password). Then the SNMP-NV6 card’s Main Menu will appear on the screen. Refer to section 4.4 Configure the SNMP-NV6 card via Text Mode for more information. 4.3 Configure the SNMP-NV6 card through Telnet 1. Connect the SNMP-NV6 card to the network. 2.
SNMP-NV6 4.4.1.1 User Manager +========================+ | User Manager | +========================+ RADIUS [1]. RADIUS Auth: Disable [2]. Server: [3]. Secret: [4]. Port: 1812 ---------------Local Auth Administrator [5]. Account: admin [6]. Password: ******** [7]. Limitation: Only in This LAN Device Manager [8]. Account: device [9]. Password: ******** [a]. Limitation: Only in This LAN Read Only User [b]. Account: user [c]. Password: ******** [d]. Limitation: Allow Any [0].
SNMP-NV6 4.4.1.2 TCP/IP Setting +========================+ | TCP/IP Setting | +========================+ [1]. IPv4 Address: 192.168.001.100 [2]. IPv4 Subnet Mask: 255.255.255.000 [3]. IPv4 Gateway IP: 192.168.001.254 [4]. IPv4 DNS or WINS IP: 192.168.001.001 [5]. DHCPv4 Client: Enable [6]. IPv6 Address: fe80::230:abff:fe25:900 [7]. IPv6 Prefix Length: 64 [8]. IPv6 Gateway IP: :: [9]. IPv6 DNS IP: :: [a]. DHCPv6: Enable [b]. Host Name (NetBIOS): SNMP-NV6 [c]. System Contactor: [d]. System Location: [e].
SNMP-NV6 4.4.1.3 Network Parameter +========================+ | Network Parameter | +========================+ [1]. HTTP Server: Enable [2]. HTTPS Server: Enable [3]. Telnet Server: Enable [4]. SSH/SFTP Server: Enable [5]. FTP Server: Enable [6]. Syslog: Enable [7]. HTTP Server Port: 80 [8]. HTTPS Server Port: 443 [9]. Telnet Server Port: 23 [a]. SSH Server Port: 22 [b]. FTP Server Port: 21 [c]. Syslog Server1: [d]. Syslog Server2: [e]. Syslog Server3: [f]. Syslog Server4: [g]. SNMP Get, Set Port: 161 [0].
SNMP-NV6 4.4.1.4 Time Server There are two ways to set the SNMP-NV6 card’s current time and date. One is to set the system time manually, but this is not the best way. The ideal way is to set up a timeserver. The SNMP-NV6 card does support SNTP, which is supported by Windows XP. To configure a Windows PC to act as a timeserver, please install the Simple TCP/IP Services from the Add/Remove Windows Components. +========================+ | Time Server | +========================+ [1].
SNMP-NV6 5. Web Interface 5.1 Run a Web Browser 1. Make sure that you have a TCP/IP network already installed. 2. Start your Web Browser. Enter http://host_name or http://ip_address in the address bar for the plain web transmission or https://host_name or https://ip_address for the encrypted web transmission. The SNMP-NV6 card will then ask for your user name and password. After keying in the correct user name and password, the SNMP-NV6 card’s Home Page will appear on the screen. 3.
SNMP-NV6 5.2.1 UPS Properties This page gives a snapshot of all the principal UPS parameters. The values will update automatically. To set the refresh time, select the menu Administration – Web – Web Refresh Period. 5.2.2 Battery Parameters This page displays a list of the UPS battery parameters.
SNMP-NV6 5.2.3 In/Out Parameters Select In/Out Parameters from the UPS Information on the main menu to get a list of the UPS input, and output parameters. 5.2.4 Identification Select Identification from the UPS Information menu to get a list of the UPS information.
SNMP-NV6 5.2.5 Status Indication This page lists the UPS events and indicates which event has occurred by turning the button on or off. 5.2.6 ShutdownAgent The SNMP-NV6 card will interface with the ShutdownAgent software. See the ShutdownAgent software user’s manual to configure the SNMP-NV6 card to communicate with the ShutdownAgent software.
SNMP-NV6 5.3 Monitor History 5.3.1 Event Log This table lists all the events that have occurred. The existing values are overwritten when the maximum number of entries (rows) has been reached. You can also download all of the event logs to your computer. 5.3.2 Data Log This table lists all of the saved UPS data. The existing values are over written when the maximum number of entries has been reached. You can also download the data log to your computer.
SNMP-NV6 5.3.3 Configure This page allows you to clear the event log, the data log and assign the time interval to record the data. 5.4 Monitor About 5.4.1 Information This menu provides important information about the OpenSSL toolkit that the SNMP-NV6 card utilizes. 5.5 Device (UPS) Management Because different UPSs provide different functions, the UPS you have may not support the same configuration or control items.
SNMP-NV6 5.5.1 Configure The configure page is designed to set the configurable values of the UPS and/or SNMP card. These values will be stored in the UPS and/or SNMP card. Note: Different UPS models support different configuration options. 5.5.1.1 Auto Restart The card sends the command to the UPS to configure the auto restart function. 5.5.1.2 UPS Buzzer The card sends the command to the UPS to configure the buzzer function. 5.5.1.
SNMP-NV6 5.5.1.6 Battery Replacement Date After the battery replacement dates are assigned, the card then sends the command to store these dates in the UPS. 5.5.1.7 External Battery Pack If you are using an External Battery Pack with this UPS, the UPS must be configured so that; the UPS will report the correct estimated runtime. 5.5.1.8 Outlet Banks Configure the Outlet Banks to turn off once a power event occurs.
SNMP-NV6 If you only want to shutdown the UPS mark the UPS Shutdown Delay check box and fill in the delay time. If you only want to restart the UPS mark the UPS Restart Delay check box and fill in the delay time. If you want to perform both the shutdown and the restart mark both of the check boxes and fill in both of the delay times. 5.5.2.3 Smart Shutdown The Smart Shutdown feature is used to shutdown all of the connected computers and the UPS safely.
SNMP-NV6 5.5.4 Specific Schedule This menu allows you to modify the parameters of the shutdown/restart/test events associated with certain days of the year. 5.5.5 Event Level Each individual event can be configured for Information, Warning or Alarm. You can change the event for e-mail or SNMP trap by modifying the event level.
SNMP-NV6 5.6 System Administration 5.6.1 User Manager The SNMP-NV6 card supports RADIUS. You can assign your RADIUS server to the card for the login authentication through HTTP, Telnet, SSH, FTP, SFTP and EzSetting. If the RADIUS option is disabled then you still can manage the login authentication locally by assigning 3 different level of users account and password. 5.6.2 TCP/IP This menu allows the administrator to set the local network configuration parameters in SNMP-NV6 card.
SNMP-NV6 5.6.2.1 TCP/IP Settings for IPv4 DHCP Client: Enable/Disable DHCP to get the IP address from DHCP server. IP Address: The IP address of the card (e.g. 192.168.1.100). Subnet Mask: The Subnet Mask for your network (e.g. 255.255.255.0). Gateway IP: The IP address of the network gateway (e.g. 192.168.1.254). DNS IP: The IP address of the domain name server (e.g. 192.168.1.1).
SNMP-NV6 5.6.3.1 Web HTTP: Enabling or disabling the HTTP connection with the SNMP-NV6 card. HTTPS: Enabling or disabling the HTTPS connection with the SNMP-NV6 card. HTTP Port: The user may configure HTTP protocol to use a port number other than standard HTTP port (80). HTTPS Port: The user may configure HTTPS protocol to use a port number other than standard HTTPS port (443). Web Refresh Period: The period of time to update the web pages. 5.6.3.
SNMP-NV6 5.6.4.3 Authentication Public Key Public Key: Provide the public key to authenticate the SSL connection. The public key can be generated by openssh or putty. 5.6.5 FTP This menu allows the administrator to enable or disable the FTP communication protocols available in the SNMP-NV6 card. 5.6.5.1 FTP FTP: Enabling or disabling the FTP connection with the SNMP-NV6 card. FTP Port: The user may configure FTP protocol to use a port number other than standard FTP port (21). 5.6.
SNMP-NV6 5.6.6.1 Simple Network Time Server Time Zone: Select the time zone where the SNMP-NV6 card is installed. Primary/Secondary Time Server: The SNMP-NV6 card searches both of the Time Servers and follows the first reply server’s time. The card synchronizes with the Time Server every hour. Enable Daylight Saving: This option is used to setup a daylight saving time. During the period of daylight saving time, the SNMP-NV6 card will add 1 hour automatically. 5.6.6.
SNMP-NV6 5.6.9 Upgrade The easiest way to upgrade the SNMP-NV6 card’s firmware is through the web interface. The administrator just needs to assign the firmware file from your local disk then press the Upload button to transmit the firmware file to the SNMP card for upgrading. Note: The SNMP-NV6 card can also be upgraded using the EzSetting program.
SNMP-NV6 5.7 System Notification 5.7.1 SNMP Access The SNMP-NV6 card supports the SNMP protocol. You can use an NMS to manage a UPS through a network. You must enter the IP address of the workstation in the SNMP Access Table to prevent any unauthorized users from configuring the SNMP-NV6 card via SNMP protocol. The maximum number of IPs is 256.
SNMP-NV6 There can be 8 SNMPv3 users for the SNMP-NV6 card. After configuring the account parameters you can access the card using SNMPv3 protocol. This user table is related to the SNMPv3 Trap. To test the SNMPv3, find a Linux operating system and open the terminal shell then key in the following command to get the reply: snmpwalk -v 3 -u -l authPriv -A -X -n t 3 1.3.6.1.2.1.1.1.0 Where: -v: 1 for SNMPv1, 2 for SNMPv2c, 3 for SNMPv3.
SNMP-NV6 5.7.4 Mail Server The administrator can set up the SMTP Mail Server and the e-mail receiver so the designated recipient can receive the e-mail notification from the SNMP-NV6 card whenever a power event occurs. Gmail accounts are supported. The maximum number of e-mail users is 256. SMTP Server Name or IP: This is the hostname of a SMTP Mail Server used to send the email message from the SNMP-NV6 card. When entering a hostname, you are also required to enter the DNS IP in the TCP/IP page.
SNMP-NV6 5.7.5 Wake On LAN The Wake On LAN function can start up the client PC from the network by the MAC address. From this page, you can set 256 MAC addresses of the clients to be restarted after the power is restored or when the SNMP-NV6 card starts up. 5.8 Environment 5.8.1 Information The ENV Probe is an option for the SNMP-NV6 card that supports temperature and humidity and has 4 contact closure inputs for monitoring environmental status such as smoke, fire, water, and security alarms.
SNMP-NV6 5.8.2 Configuration This page allows you to change the values in the Temperature Warning and Alarm Thresholds and Humidity Warning and Alarm Thresholds, and then click on the Submit button to update the changes. If the temperature or humidity exceeds the alarm threshold, the event will be displayed in red on the Event log page. The ENV Probe can be configured to send an SNMP trap to the assigned target hosts.
SNMP-NV6 6. Upgrade The EzSetting program can be used to perform the firmware upgrade. program is compatible with the Windows operating system. The EzSetting Note: The firmware can also be upgraded by using the upgrade function in the web interface. 1. Make sure the SNMP-NV6 card is in the Subnet that has been specified. If it is not in the specified subnet configure the subnet and subnet mask to match the SNMP-NV6 card that you want to upgrade. 2.
SNMP-NV6 4. On the main screen press the Upgrade button. When the upgrade dialog box appears press the Browse button to locate the new firmware file. Verify the firmware version is the new file, which is listed in the File Information field then press the Upgrade Now button. The SNMP-NV6 card will response to the upgrade request in approximately 20-seconds 5. After the upgrade procedure is finished, the following dialog box will appear. Please wait approximately 1-minute for SNMP-NV6 card to reboot. 6.
SNMP-NV6 7. Specifications 7.1 Technical Specifications Network Connection RJ-45 connector Operating Temperature 0 ~ 40 C Operating Humidity 10 ~ 80 % Power Input 9~24V DC Power Consumption 2 Watt Maximum Size 130 mm x 60 mm (L x W) Weight 75g 7.2 DIP Switch Settings No. Dip1 Dip2 Description 1 OFF OFF Normal operation 2 OFF ON N/A 3 ON OFF Sensor Mode (with ENV Probe) 4 ON ON Console Mode 7.3 LED Indicators No.
SNMP-NV6 8. Troubleshooting 1. How do I setup a SNTP (Simple Network Time Protocol) server? Answer: In the Windows XP operating system, click Start select Control Panel choose Add/Remove Programs click the Add/Remove Windows Components button click Networking Services select the Simple TCP/IP Services check box and then click ‘OK’ to finish the installation of Simple TCP/IP Services. After that, enter in the host’s IP address on the Time Server page. 2.
SNMP-NV6 Use the Terminal Mode to reset the SNMP-NV6 card's IP address. Change your PC's IP address to allow connection via the LAN. 7. I am unable to perform the SNMP Get operation? Answer: Check the SNMP settings stored in the SNMP-NV6 card. The IP address of the PC you are using must be entered in one of the SNMP Access Control NMS IP fields, with Read or Read/Write permission. The community string on the PC and the SNMP-NV6 card must match. 8.
SNMP-NV6 12 How do I generate a private SSL certificate file (PEM format) for HTTPS? Answer: 1) Download the openssl from http://www.openssl.org and install it on the Linux machine. 2) Open the command shell and enter the following command to create your own certificate file: Openssl req –x509 –nodes –days 3650 –newkey rsa:1024 –keyout cert.pem –out cert.pem 3) Once it is complete the cert.pem will be created in the current working directory. 4) Upload the cert.
SNMP-NV6 9. Limited Product Warranty Para Systems Inc. (Para Systems) warrants this equipment, when properly applied and operated within specified conditions, against faulty materials or workmanship for a period of three years from the date of original purchase by the end user. For equipment sites within the United States and Canada, this warranty covers repair or replacement of defective equipment at the discretion of Para Systems. Repair will be from the nearest authorized service center.