Parts and Instruction Manual X839 Asbestos Series Wet/Dry Vacuum
This manual is furnished with each new MINUTEMAN X839 Asbestos Vacuum. This provides the necessary operating and preventive maintenance instructions. Operators must read and understand this manual before operating or servicing this machine. This machine was designed to give you excellent performance and efficiency. For best results and minimal cost, please follow the general guidelines below: · Operate the machine with reasonable care.
Table of Contents IMPORTANT SAFETY INSTRUCTIONS .............................................................................................. 1 Inspection ............................................................................................................................................ 2 Electrical - 115 Volt ............................................................................................................................. 2 Electrical - 240 Volt .........................................
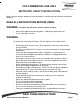
FOR COMMERCIAL USE ONLY IMPORTANT SAFETY INSTRUCTIONS When using an electrical appliance, basic precautions should always be followed, including the following: READ ALL INSTRUCTIONS BEFORE USING WARNING - To reduce the risk of fire, electric shock, or injury: • Do not leave appliance when plugged in. Unplug from outlet when not in use and before servicing. WARNING To reduce the risk of electrical shock - Do not expose to rain. Store indoors.
Inspection Carefully unpack and inspect your machine for shipping damage. Each unit is tested and thoroughly inspected before shipment, and any damage is the responsibility of the delivery carrier who should be notified immediately. Electrical - 115 Volt This machine is designed to operate on a standard 15 amp. 115 volt, 60 hz, AC circuit. Voltages below 105 volts AC or above 125 volts AC could cause serious damage to the motor.
User Maintenance Instructions All service and repair should be performed by a qualified vacuum service representative or electrician. No user serviceable components are employed in the electrical vacuum lid head assembly. No lubrication of the motor is required. Cloth Bag & Hose Assembly Cloth bag and hose assy. are user maintenance items and can be replaced when worn out. Cloth bags can be maintained by blowing dust off of the bag and then laundered.
Tank/Filter Set-Up Procedure Refer to “Poly Tank with 1:1 Adapter” 1. When using the poly adapter for dry pick-up follow the described procedures below for poly 6 mil. bag installation. A. Insert poly bag into tank assembly draping all excess bag height over the edge of tank. Fully open bag inside tank to ensure that the bag is not bunched up and fully extended to the bottom of tank. B.
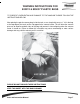
CHANGING THE PREFILTER SLEEVE The prefilter sleeve should be changed, using all of the precautions previously mentioned. The prefilter sleeve should be changed when any of the following takes place: 1. Anytime there is an indication of a filter tear during normal operation of the unit. This tear could be in any of the filters used. a. paper dust containment bag b. cloth filter bag c. paper bag protector These tears would show up during the tank clean-out procedure, or.... 2.
Poly Tank with 1:1 Adapter 1. Motor Lid Assembly 2. Cloth Filter with Frame 3. Filter Protector 4. 1:1 Poly Adapter 5. Plastic Liner for Top Fill Dry Pickup 6.
WARNING INSTRUCTIONS FOR 800012 & 805037 PLASTIC BAGS TO PREVENT OVERHEATING AND DAMAGE TO THE MACHINE PLEASE FOLLOW THE INSTRUCTIONS BELOW! After placing the plastic recovery bag inside the tank, use a sharp knife to cut a 1” slit in the bag at the top edge of the tank, on the side opposite the vacuum intake. This will allow the vacuum pressure to equalize on both sides of the bag and prevent it from collapsing when the vacuum motor is turned on.
Exploded Views Lid Assembly Parts and Instruction Manual Page 8
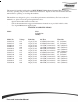
Lid Assembly BOM ITEM 1 2 3 4 5 6 7 8 8A 9 10 10A 11 11A 12 13 13A 14 15 16 17 18 19 20 21 22 23 24 25 26 27 28 29 30 31 31A 31B 32 33 34 35 36 37 38 39 40 41 42 43 44 45 46 47 48 49 50 50A 51 52 53 54 PART NO.
Bag Assembly ITEM 1 2 3 4 PART NO.
Adapter Assembly ITEM 1 2 3 4 5 6 7 8 9 10 11 12 13 14 15 16 17 18 19 Parts and Instruction Manual PART NO. 380046 390001 390002 390035 390037 390087 390088 390101 390108 390110 712530 712565 715381 760234 760260 762300 800422 800423 828893 REQ’D 1 1 1 2 1 1 1 1 1 1 2 4 1 1 1 1 1 2 8 DESCRIPTION BALL, HOLLOW RUBBER MOLDED TRIGGER SPRING-RETURN LATCH 390 SERIES COATED ADAPTER POLY 1:1 BURGUNDY GASKET DIECUT VNN GASKET PS BACK 1:1 POLY INTAKE PIN-PIVOT INTAKE ASSEMBLY ALUMINUM SCR-MC 10-24 X .
Tank Assembly ITEM 1 2 3 4 4A 5 6 7 8 9 10 11 12 13 14 15 16 17 18 19 20 21 22 *** *** PART NO. 390031 390033 390035 390041 390051 710182 711352 711444PLT 711505 711524 711594 711713 712541 712761 715119 715120 715383 804457 828894 828980 833316 833831 900008 390040 390050 Parts and Instruction Manual REQ’D 1 1 2 1 1 2 4 4 2 2 2 2 4 4 1 1 1 2 4 4 1 2 2 1 1 DESCRIPTION HANDLE PLT 390 SERIES AXLE 390 SERIES PLATED LATCH-390 SERIES COATED TANK 15GRC NO HOLES TANK 20GRC W/ NO HOLES SCR-MC 1/4-20 X 1.
Optional Industrial Tools and Accessories Parts and Instruction Manual Page 13
Hose Assemblies Parts and Instruction Manual Page 14
Minuteman International Made Simple Commercial Limited Warranty Minuteman International, Inc. warrants to the original purchaser/user that the product is free from defects in workmanship and materials under normal use. Minuteman will, at its option, repair or replace without charge, parts that fail under normal use and service when operated and maintained in accordance with the applicable operation and instruction manuals.