
DigiWalker User Manual P350 P550


Table Of Contents
- 1 Warnings and safety information
- 2 General information
- 3 Operating Mio Map (Controls)
- 3.1 Hardware buttons
- 3.2 Screen buttons and controls
- 4 Discovering the program through the screens
- 4.1 Main menu
- 4.2 The map
- 4.2.1 2D and 3D map views
- 4.2.2 Zoom levels
- 4.2.3 Daylight and night colour schemes
- 4.2.4 Streets and roads
- 4.2.5 Other objects
- 4.2.6 Current position and Lock-on-Road
- 4.2.7 Selected map point, also known as the Cursor
- 4.2.8 Visible POIs (Points of Interest)
- 4.2.9 Speed cameras
- 4.2.10 Contacts
- 4.2.11 Elements of the Active Route
- 4.3 Screens with map
- 4.3.1 Turn preview (No. 1)
- 4.3.2 Zoom in and out (No. 2 & 3)
- 4.3.3 Tilt up and down (No. 4 & 5)
- 4.3.4 Lock to GPS position and heading (No. 6)
- 4.3.5 Cursor (No. 7)
- 4.3.6 Map scale (No. 8)
- 4.3.7 Menu (No. 9)
- 4.3.8 Map orientation and Overview (No. 10)
- 4.3.9 GPS position quality (No. 11)
- 4.3.10 Battery status (No. 12)
- 4.3.11 Sound muting (No. 13)
- 4.3.12 Track Log recording/playback indicator (No. 14)
- 4.3.13 Cursor menu (No. 15)
- 4.3.14 Current street (No. 16)
- 4.3.15 Travel and Route data (No. 17)
- 4.3.16 Distance to next turn (No. 18)
- 4.3.17 Next street / Next settlement (No. 19)
- 4.3.18 Approaching next turn (No. 20)
- 4.3.19 Current speed limit (No. 21)
- 4.4 GPS Data screen
- 4.5 Route Information screen
- 4.6 Menu
- 4.7 Speed cameras
- 4.8 TMC
- 5 Find
- 5.1 Main menu Find buttons (Address, Favourites, POI, History)
- 5.2 Selection by tapping the map
- 5.3 Using the Find menu
- 5.3.1 Find an Address, Street, Intersection or City
- 5.3.2 Find in History
- 5.3.3 Find Coordinates
- 5.3.4 Find a POI
- 5.3.5 Find one of the Favourites (Home/Work)
- 6 Settings
- 6.1 General settings
- 6.2 Sound settings
- 6.3 Route parameter settings
- 6.4 Language & Units
- 6.5 Advanced settings
- 6.6 About screen
- 6.7 Manual GPS configuration
- 7 Troubleshooting guide
- 8 Glossary
- 9 Index
The arrows are buttons. Tap to move left in the list or tap to move right.
You need not confirm your selection. As soon as you leave the screen, the selected
value becomes effective.
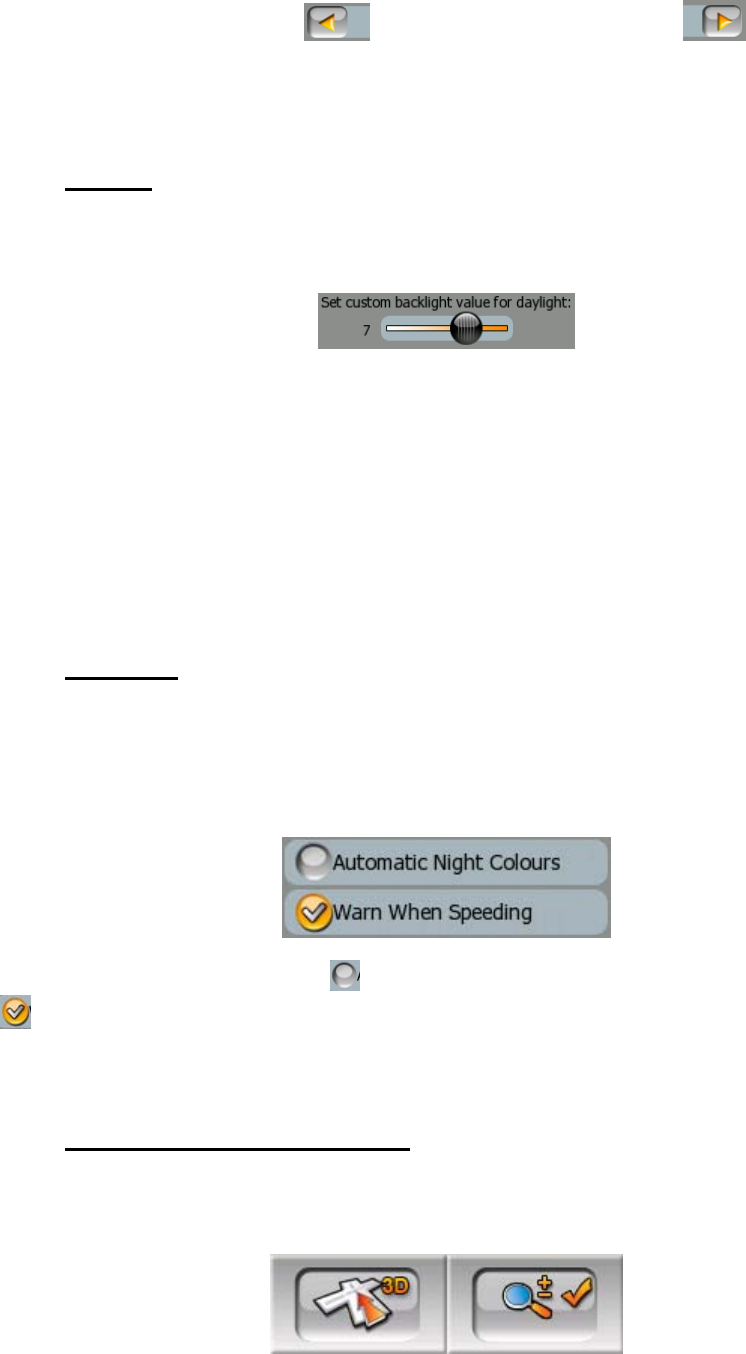
3.2.3 Sliders
When a feature has several different unnamed (numeric) values, Mio Map will show
sliders that look like analogue potentiometers to set the desired value.
If the value limits are not displayed at the ends of the slider, the leftmost position
means the minimum value, while the rightmost position represents the maximum
value. With most sliders you can check the current value on the left.
This control can be operated in two ways. Either drag the handle to move the slider
to its new position, or tap the slider where you want the handle to appear (the thumb
jumps there immediately). As with the list selectors, there is no need to confirm your
selection. As soon as you leave the screen, the selected value becomes effective.
3.2.4 Switches
When a function can only have two values (mainly Enabled and Disabled), a switch is
used. Unlike with list selectors, the horizontal line contains the name of the function
and not the actual status. There is a tick mark on the left to show whether the
function is active or not.
When the tick mark is missing (
), the function is not selected. When it is displayed
(
), the function is enabled. The whole strip works as a button. Tap anywhere to
toggle between the enabled and disabled status.
3.2.5 Switches in the Quick menu
The switches of the Quick menu (4.6.2) behave as normal switches but they look
different in order to fit in with the other menu buttons.
15