
DigiWalker User Manual P350 P550


Table Of Contents
- 1 Warnings and safety information
- 2 General information
- 3 Operating Mio Map (Controls)
- 3.1 Hardware buttons
- 3.2 Screen buttons and controls
- 4 Discovering the program through the screens
- 4.1 Main menu
- 4.2 The map
- 4.2.1 2D and 3D map views
- 4.2.2 Zoom levels
- 4.2.3 Daylight and night colour schemes
- 4.2.4 Streets and roads
- 4.2.5 Other objects
- 4.2.6 Current position and Lock-on-Road
- 4.2.7 Selected map point, also known as the Cursor
- 4.2.8 Visible POIs (Points of Interest)
- 4.2.9 Speed cameras
- 4.2.10 Contacts
- 4.2.11 Elements of the Active Route
- 4.3 Screens with map
- 4.3.1 Turn preview (No. 1)
- 4.3.2 Zoom in and out (No. 2 & 3)
- 4.3.3 Tilt up and down (No. 4 & 5)
- 4.3.4 Lock to GPS position and heading (No. 6)
- 4.3.5 Cursor (No. 7)
- 4.3.6 Map scale (No. 8)
- 4.3.7 Menu (No. 9)
- 4.3.8 Map orientation and Overview (No. 10)
- 4.3.9 GPS position quality (No. 11)
- 4.3.10 Battery status (No. 12)
- 4.3.11 Sound muting (No. 13)
- 4.3.12 Track Log recording/playback indicator (No. 14)
- 4.3.13 Cursor menu (No. 15)
- 4.3.14 Current street (No. 16)
- 4.3.15 Travel and Route data (No. 17)
- 4.3.16 Distance to next turn (No. 18)
- 4.3.17 Next street / Next settlement (No. 19)
- 4.3.18 Approaching next turn (No. 20)
- 4.3.19 Current speed limit (No. 21)
- 4.4 GPS Data screen
- 4.5 Route Information screen
- 4.6 Menu
- 4.7 Speed cameras
- 4.8 TMC
- 5 Find
- 5.1 Main menu Find buttons (Address, Favourites, POI, History)
- 5.2 Selection by tapping the map
- 5.3 Using the Find menu
- 5.3.1 Find an Address, Street, Intersection or City
- 5.3.2 Find in History
- 5.3.3 Find Coordinates
- 5.3.4 Find a POI
- 5.3.5 Find one of the Favourites (Home/Work)
- 6 Settings
- 6.1 General settings
- 6.2 Sound settings
- 6.3 Route parameter settings
- 6.4 Language & Units
- 6.5 Advanced settings
- 6.6 About screen
- 6.7 Manual GPS configuration
- 7 Troubleshooting guide
- 8 Glossary
- 9 Index
Tap the button to toggle between the two states. Remember that the sign on the
button will not indicate the current state but the state you can switch it to.
3.2.6 Virtual keyboards
Mio Map is designed in a way that you only need to enter letters or numbers when it
is inevitable. In these cases a full screen keyboard pops up that can easily be
operated with your fingertips. You can choose between a separate ABC and numeric
keypad, or a set of QWERTY-type keyboards that contain both letters and numbers.
Mio Map will remember your last choice and offer it the next time you need to enter
data.
The alphabetic keyboards in Mio Map do not contain special characters, because you
do not need to enter accents when searching for a destination. Type only the base
letters (the letter most similar to the accented one) and Mio Map will search for all
their combinations in the database (e.g. for the French street ‘Cité Bergère’ you only
need to type ‘Cite Bergere’, and the rest is done by the program).
When you type in POI or track log names, Mio Map will automatically turn all initials
into capitals to create names that look pleasant.
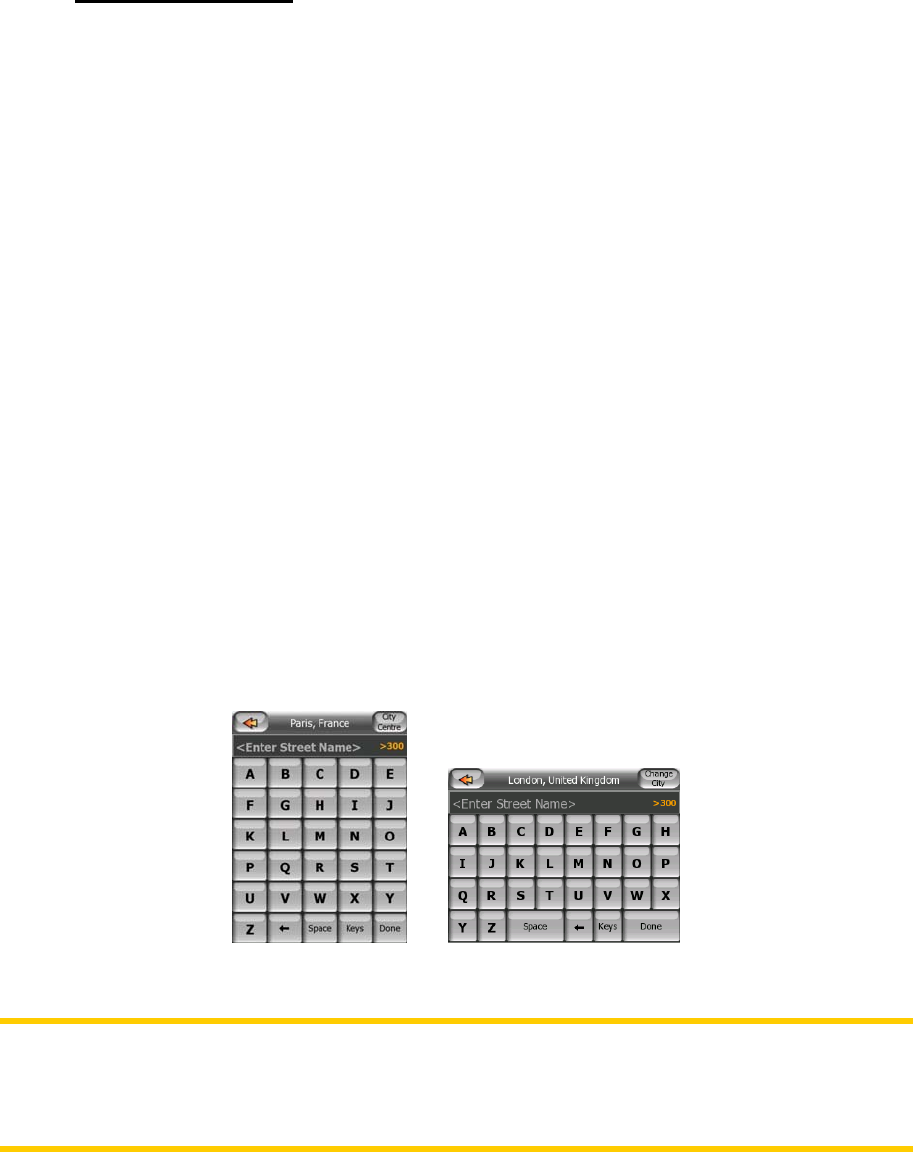
3.2.6.1 ABC-type keyboards
These keyboards contain only letters. If you wish to enter numbers, you need to tap
the Keys button to switch to the numeric keyboard.
Use Backspace (arrow pointing left between Space and Keys) to delete the last letter
you have entered if you have made a mistake, tap Space to enter more words, and
hit Done to finish entering the text.
This type of keyboard has large, finger-friendly buttons.
Note: If you have chosen a program language that uses Latin letters, only the ABC
keyboard appears. If you choose the Greek language, an additional keyboard
appears with Greek letters. Similarly Hebraic and Cyrillic letters are available when
Hebrew or Russian is chosen in Setup / Languages (6.4.1).
16