
DigiWalker User Manual P350 P550


Table Of Contents
- 1 Warnings and safety information
- 2 General information
- 3 Operating Mio Map (Controls)
- 3.1 Hardware buttons
- 3.2 Screen buttons and controls
- 4 Discovering the program through the screens
- 4.1 Main menu
- 4.2 The map
- 4.2.1 2D and 3D map views
- 4.2.2 Zoom levels
- 4.2.3 Daylight and night colour schemes
- 4.2.4 Streets and roads
- 4.2.5 Other objects
- 4.2.6 Current position and Lock-on-Road
- 4.2.7 Selected map point, also known as the Cursor
- 4.2.8 Visible POIs (Points of Interest)
- 4.2.9 Speed cameras
- 4.2.10 Contacts
- 4.2.11 Elements of the Active Route
- 4.3 Screens with map
- 4.3.1 Turn preview (No. 1)
- 4.3.2 Zoom in and out (No. 2 & 3)
- 4.3.3 Tilt up and down (No. 4 & 5)
- 4.3.4 Lock to GPS position and heading (No. 6)
- 4.3.5 Cursor (No. 7)
- 4.3.6 Map scale (No. 8)
- 4.3.7 Menu (No. 9)
- 4.3.8 Map orientation and Overview (No. 10)
- 4.3.9 GPS position quality (No. 11)
- 4.3.10 Battery status (No. 12)
- 4.3.11 Sound muting (No. 13)
- 4.3.12 Track Log recording/playback indicator (No. 14)
- 4.3.13 Cursor menu (No. 15)
- 4.3.14 Current street (No. 16)
- 4.3.15 Travel and Route data (No. 17)
- 4.3.16 Distance to next turn (No. 18)
- 4.3.17 Next street / Next settlement (No. 19)
- 4.3.18 Approaching next turn (No. 20)
- 4.3.19 Current speed limit (No. 21)
- 4.4 GPS Data screen
- 4.5 Route Information screen
- 4.6 Menu
- 4.7 Speed cameras
- 4.8 TMC
- 5 Find
- 5.1 Main menu Find buttons (Address, Favourites, POI, History)
- 5.2 Selection by tapping the map
- 5.3 Using the Find menu
- 5.3.1 Find an Address, Street, Intersection or City
- 5.3.2 Find in History
- 5.3.3 Find Coordinates
- 5.3.4 Find a POI
- 5.3.5 Find one of the Favourites (Home/Work)
- 6 Settings
- 6.1 General settings
- 6.2 Sound settings
- 6.3 Route parameter settings
- 6.4 Language & Units
- 6.5 Advanced settings
- 6.6 About screen
- 6.7 Manual GPS configuration
- 7 Troubleshooting guide
- 8 Glossary
- 9 Index
Button to open History Section
5.3.2
Button to open Cockpit screen Section
4.3
Button to exit Mio Map
4.2 The map
The most important and most frequently used screens of Mio Map are the two
screens with the map (Map screen and Cockpit screen). They are similar in look and
in possible controls but are optimised for different uses. The map they display is
common. The elements of the map are described here. For the controls and special
functions of the two map screens see 4.3.
The current version of Mio Map is primarily intended for land navigation. That is why
maps in Mio Map look similar to paper roadmaps (when using daytime colours and
2D map mode). However, Mio Map provides much more than regular paper maps
can. The look and the contents can be changed.
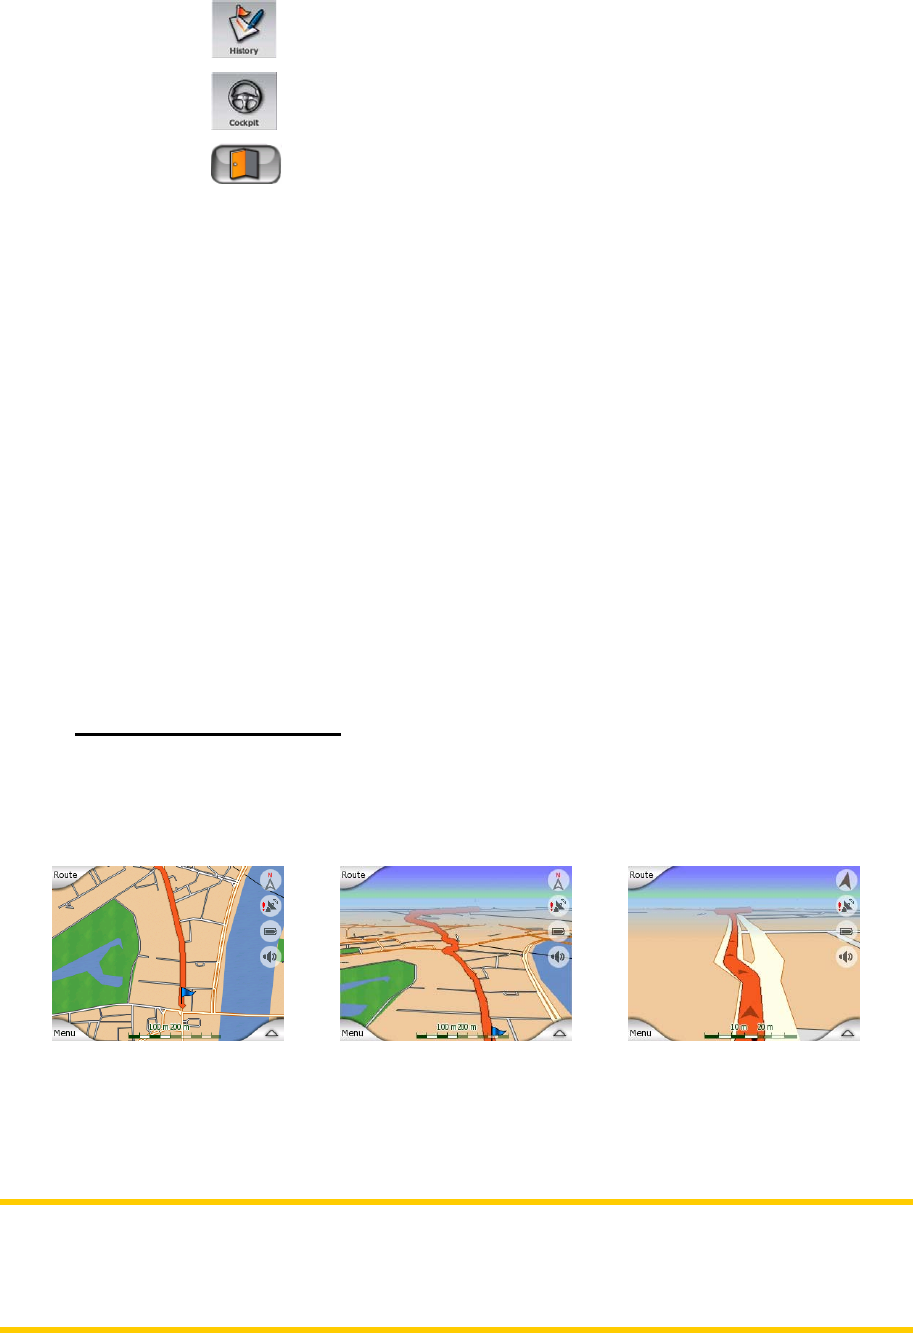
4.2.1 2D and 3D map views
Besides the classical top down view of the map (called 2D mode), you have the
possibility to tilt the map to have a perspective view (3D mode) that gives a view
similar to that seen through the windscreen with the possibility to see far ahead.
It is easy to change between 2D and 3D modes. You have two options. You can use
the semi-transparent screen icons (
4.3.3) to tilt the map seamlessly between 2D and
all 3D angles, or you can use the switch in the Quick menu (4.6.2.1) to quickly switch
between the two modes.
Note: You may find that 2D mode is more useful in North-up Map mode when looking
for a certain part of the map or an object to select as destination. On the other hand,
3D mode in Track-up Cockpit mode with Smart Zoom makes navigation very
comfortable. The description of these modes will come later in this manual.
19