
DigiWalker User Manual P350 P550


Table Of Contents
- 1 Warnings and safety information
- 2 General information
- 3 Operating Mio Map (Controls)
- 3.1 Hardware buttons
- 3.2 Screen buttons and controls
- 4 Discovering the program through the screens
- 4.1 Main menu
- 4.2 The map
- 4.2.1 2D and 3D map views
- 4.2.2 Zoom levels
- 4.2.3 Daylight and night colour schemes
- 4.2.4 Streets and roads
- 4.2.5 Other objects
- 4.2.6 Current position and Lock-on-Road
- 4.2.7 Selected map point, also known as the Cursor
- 4.2.8 Visible POIs (Points of Interest)
- 4.2.9 Speed cameras
- 4.2.10 Contacts
- 4.2.11 Elements of the Active Route
- 4.3 Screens with map
- 4.3.1 Turn preview (No. 1)
- 4.3.2 Zoom in and out (No. 2 & 3)
- 4.3.3 Tilt up and down (No. 4 & 5)
- 4.3.4 Lock to GPS position and heading (No. 6)
- 4.3.5 Cursor (No. 7)
- 4.3.6 Map scale (No. 8)
- 4.3.7 Menu (No. 9)
- 4.3.8 Map orientation and Overview (No. 10)
- 4.3.9 GPS position quality (No. 11)
- 4.3.10 Battery status (No. 12)
- 4.3.11 Sound muting (No. 13)
- 4.3.12 Track Log recording/playback indicator (No. 14)
- 4.3.13 Cursor menu (No. 15)
- 4.3.14 Current street (No. 16)
- 4.3.15 Travel and Route data (No. 17)
- 4.3.16 Distance to next turn (No. 18)
- 4.3.17 Next street / Next settlement (No. 19)
- 4.3.18 Approaching next turn (No. 20)
- 4.3.19 Current speed limit (No. 21)
- 4.4 GPS Data screen
- 4.5 Route Information screen
- 4.6 Menu
- 4.7 Speed cameras
- 4.8 TMC
- 5 Find
- 5.1 Main menu Find buttons (Address, Favourites, POI, History)
- 5.2 Selection by tapping the map
- 5.3 Using the Find menu
- 5.3.1 Find an Address, Street, Intersection or City
- 5.3.2 Find in History
- 5.3.3 Find Coordinates
- 5.3.4 Find a POI
- 5.3.5 Find one of the Favourites (Home/Work)
- 6 Settings
- 6.1 General settings
- 6.2 Sound settings
- 6.3 Route parameter settings
- 6.4 Language & Units
- 6.5 Advanced settings
- 6.6 About screen
- 6.7 Manual GPS configuration
- 7 Troubleshooting guide
- 8 Glossary
- 9 Index
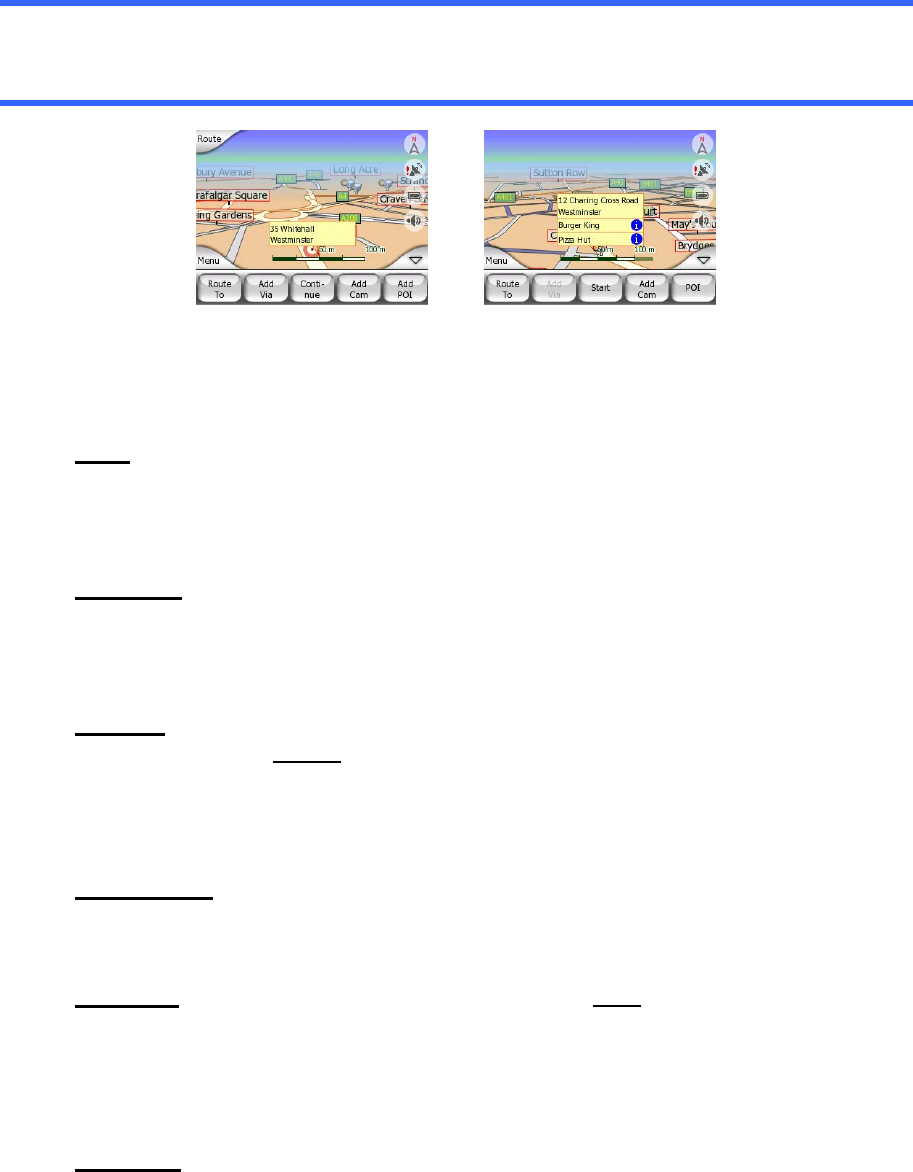
reappear by reopening the Cursor menu using the arrow in the bottom right corner.
When you open the menu manually, it will stay on until you close it or switch to
another screen.
Tip: If you want to see the map around the Cursor, close the Cursor menu and
reopen it. When this menu is opened manually, the map is always moved to have the
cursor in the centre.
The content of the Cursor menu depends on the screen (Map or Cockpit) and it is
slightly different if there is an active route already planned. You have the following
options:
Start• : use the Cursor as the departure point for your route. This menu point is
available only in Map mode and when there is no active route. In Cockpit
mode the departure point of the route is always the GPS position or if it is not
available, the last known GPS position.
Route To• : use the Cursor as the destination of your route. This button is to
start a new route. The previous route (if it exists) will be deleted and replaced.
If a multi-point route is active, Mio Map will ask you whether you really want to
delete it together with all its via points.
Add Via• : by inserting the selected map point as a via, you instruct Mio Map to
cross this location
before the destination of the route. This is the way to build a
multi-point route in reverse order (when you wish to insert a stopover ‘go to A
but first get some fuel at B’ or want to influence the direction of the route). This
menu point works only if a route is already active.
Remove Via
•
: removes the ‘via point’ near or at the Cursor. The route will be
recalculated immediately excluding the deleted point. This menu point
replaces Add Via and is available only if the Cursor is near or at a via point.
Continue• : add a new destination to be reached after the previous destination.
The new destination replaces the old one, which is now demoted to a via
point. This is the way to build your multi-point route in straight order (when you
wish to visit several destinations ‘go to A then to B’). This menu point is
available only if a route is already active.
Add Cam• : this button will place a speed camera at the position of the Cursor.
A new window opens where you can set the type of the camera (fixed, mobile,
built-in, or section control camera), the direction of the monitored traffic (your
direction, the opposite direction, both directions or all directions), and the
speed limit.
34