
DigiWalker User Manual P350 P550


Table Of Contents
- 1 Warnings and safety information
- 2 General information
- 3 Operating Mio Map (Controls)
- 3.1 Hardware buttons
- 3.2 Screen buttons and controls
- 4 Discovering the program through the screens
- 4.1 Main menu
- 4.2 The map
- 4.2.1 2D and 3D map views
- 4.2.2 Zoom levels
- 4.2.3 Daylight and night colour schemes
- 4.2.4 Streets and roads
- 4.2.5 Other objects
- 4.2.6 Current position and Lock-on-Road
- 4.2.7 Selected map point, also known as the Cursor
- 4.2.8 Visible POIs (Points of Interest)
- 4.2.9 Speed cameras
- 4.2.10 Contacts
- 4.2.11 Elements of the Active Route
- 4.3 Screens with map
- 4.3.1 Turn preview (No. 1)
- 4.3.2 Zoom in and out (No. 2 & 3)
- 4.3.3 Tilt up and down (No. 4 & 5)
- 4.3.4 Lock to GPS position and heading (No. 6)
- 4.3.5 Cursor (No. 7)
- 4.3.6 Map scale (No. 8)
- 4.3.7 Menu (No. 9)
- 4.3.8 Map orientation and Overview (No. 10)
- 4.3.9 GPS position quality (No. 11)
- 4.3.10 Battery status (No. 12)
- 4.3.11 Sound muting (No. 13)
- 4.3.12 Track Log recording/playback indicator (No. 14)
- 4.3.13 Cursor menu (No. 15)
- 4.3.14 Current street (No. 16)
- 4.3.15 Travel and Route data (No. 17)
- 4.3.16 Distance to next turn (No. 18)
- 4.3.17 Next street / Next settlement (No. 19)
- 4.3.18 Approaching next turn (No. 20)
- 4.3.19 Current speed limit (No. 21)
- 4.4 GPS Data screen
- 4.5 Route Information screen
- 4.6 Menu
- 4.7 Speed cameras
- 4.8 TMC
- 5 Find
- 5.1 Main menu Find buttons (Address, Favourites, POI, History)
- 5.2 Selection by tapping the map
- 5.3 Using the Find menu
- 5.3.1 Find an Address, Street, Intersection or City
- 5.3.2 Find in History
- 5.3.3 Find Coordinates
- 5.3.4 Find a POI
- 5.3.5 Find one of the Favourites (Home/Work)
- 6 Settings
- 6.1 General settings
- 6.2 Sound settings
- 6.3 Route parameter settings
- 6.4 Language & Units
- 6.5 Advanced settings
- 6.6 About screen
- 6.7 Manual GPS configuration
- 7 Troubleshooting guide
- 8 Glossary
- 9 Index
• - green means 3D reception. The GPS receiver has enough satellites to
calculate altitude. Position is generally correct (yet it can still be inaccurate due
to different environmental factors). Mio Map is ready for navigation.
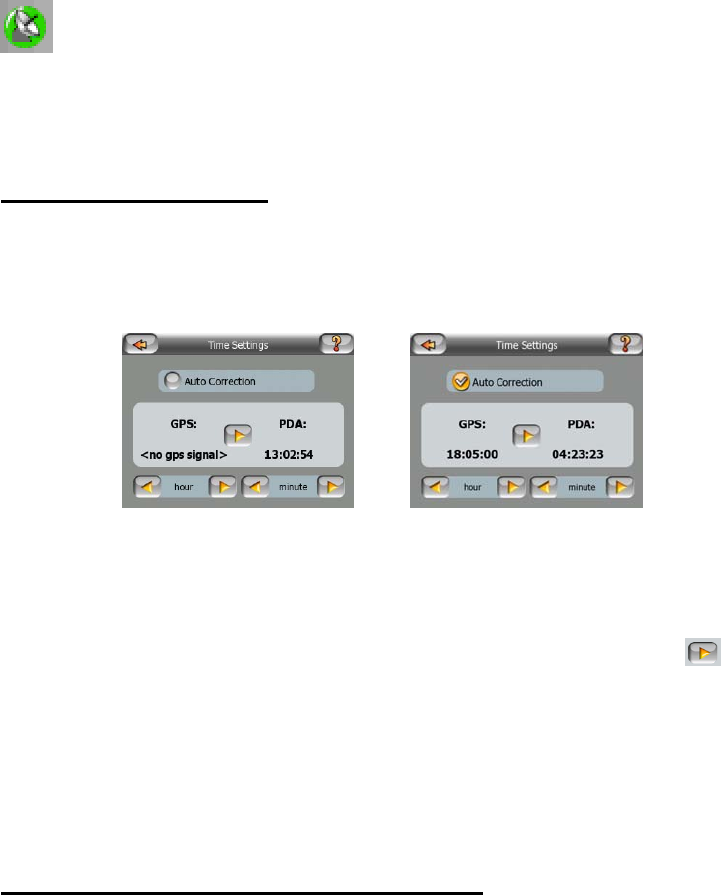
4.4.4 Time synchronization
In the top right corner of the screen you have another button that leads to a new
screen where you can synchronize the clock of your PDA to the very accurate time
provided by the GPS.
Turn on the Auto Correction switch to let Mio Map frequently check and correct the
PDA time with the GPS time.
Below that button you will see the current values of the GPS and the PDA clocks.
You can check here whether any correction is needed. Tap the button to
manually synchronize the time.
Below the PDA time you have hour and minute controls to manually correct the time
with or without a valid GPS time. It also gives you the chance to correct the time after
synchronization if your PDA does not support time zones or daylight saving time.
4.4.5 GPS configuration (Detect and Config.)
You have two black buttons in this screen. These buttons open the automatic
(Detect) and the manual (Config.) GPS Setup screens. For information on how to set
up the GPS connection refer to section
6.7.
4.5 Route Information screen
The Route Information screen has all the data and some of the functions you need
while you navigate. Some additional functions can be found in the Route menu
(4.6.3). Without an active route one of the buttons is inactive and route data cannot
be displayed.
As a reminder, you can open this screen three ways: pushing the Route Information
hardware button (3.1.6), tapping the Info button in the Route menu (4.6.3.6), or
tapping one of the Route Data fields on the Cockpit screen.
39