
DigiWalker User Manual P350 P550


Table Of Contents
- 1 Warnings and safety information
- 2 General information
- 3 Operating Mio Map (Controls)
- 3.1 Hardware buttons
- 3.2 Screen buttons and controls
- 4 Discovering the program through the screens
- 4.1 Main menu
- 4.2 The map
- 4.2.1 2D and 3D map views
- 4.2.2 Zoom levels
- 4.2.3 Daylight and night colour schemes
- 4.2.4 Streets and roads
- 4.2.5 Other objects
- 4.2.6 Current position and Lock-on-Road
- 4.2.7 Selected map point, also known as the Cursor
- 4.2.8 Visible POIs (Points of Interest)
- 4.2.9 Speed cameras
- 4.2.10 Contacts
- 4.2.11 Elements of the Active Route
- 4.3 Screens with map
- 4.3.1 Turn preview (No. 1)
- 4.3.2 Zoom in and out (No. 2 & 3)
- 4.3.3 Tilt up and down (No. 4 & 5)
- 4.3.4 Lock to GPS position and heading (No. 6)
- 4.3.5 Cursor (No. 7)
- 4.3.6 Map scale (No. 8)
- 4.3.7 Menu (No. 9)
- 4.3.8 Map orientation and Overview (No. 10)
- 4.3.9 GPS position quality (No. 11)
- 4.3.10 Battery status (No. 12)
- 4.3.11 Sound muting (No. 13)
- 4.3.12 Track Log recording/playback indicator (No. 14)
- 4.3.13 Cursor menu (No. 15)
- 4.3.14 Current street (No. 16)
- 4.3.15 Travel and Route data (No. 17)
- 4.3.16 Distance to next turn (No. 18)
- 4.3.17 Next street / Next settlement (No. 19)
- 4.3.18 Approaching next turn (No. 20)
- 4.3.19 Current speed limit (No. 21)
- 4.4 GPS Data screen
- 4.5 Route Information screen
- 4.6 Menu
- 4.7 Speed cameras
- 4.8 TMC
- 5 Find
- 5.1 Main menu Find buttons (Address, Favourites, POI, History)
- 5.2 Selection by tapping the map
- 5.3 Using the Find menu
- 5.3.1 Find an Address, Street, Intersection or City
- 5.3.2 Find in History
- 5.3.3 Find Coordinates
- 5.3.4 Find a POI
- 5.3.5 Find one of the Favourites (Home/Work)
- 6 Settings
- 6.1 General settings
- 6.2 Sound settings
- 6.3 Route parameter settings
- 6.4 Language & Units
- 6.5 Advanced settings
- 6.6 About screen
- 6.7 Manual GPS configuration
- 7 Troubleshooting guide
- 8 Glossary
- 9 Index
This function has a special role if you have used the Avoid feature during your
journey. When you arrive at your destination, the route line disappears on the map
and navigation stops. The route is now practically deleted, but if you plan a new
route, the roads, manoeuvres and areas excluded from your route will also be
avoided when planning the new route. Tap Delete to completely delete your previous
route together with its Avoid restrictions.
Note: When a POI item is used as a route waypoint, deleting the route will not delete
the POI item itself, just its role in the route.
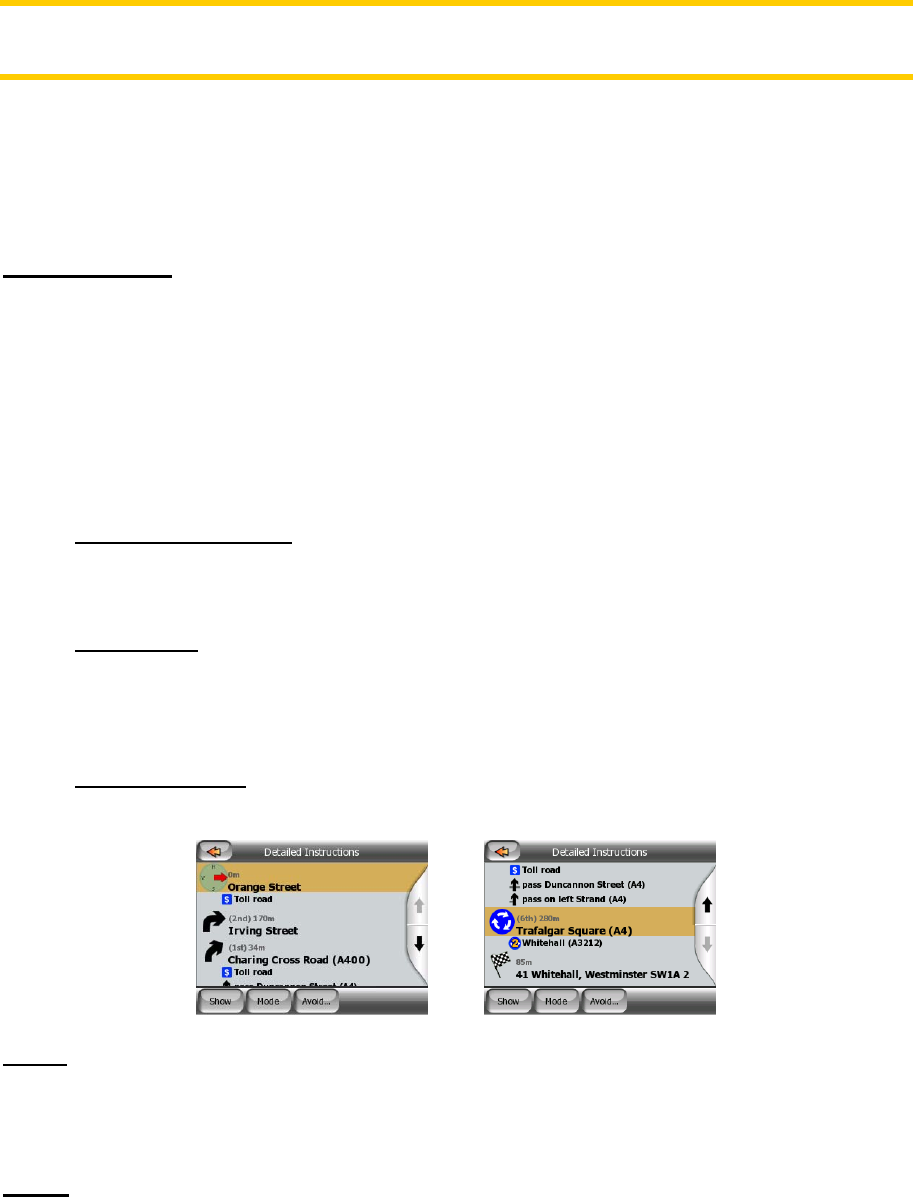
4.6.3.3 Itinerary
This function opens the itinerary (route event list) of the active route. The Itinerary
has three different display modes and two functions.
Display modes
Display modes are different only in the number of events displayed in the list. List
items are always shown with all information available including pictograms of the
needed action and distance of the event from the previous list item.
The Itinerary is live and constantly updated when navigating a route. The list item
coming next in navigation is the highlighted one until you highlight another one by
tapping. After that, the highlight remains on the item you have selected.
• Detailed Instructions: this is the list displayed when Itinerary is opened. It is the
list of events in full detail. All significant junctions are shown in the list, even
ones to be passed.
• Instructions: by tapping the Mode button once you will see the list of events
that need your attention, i.e. the list of manoeuvres during the route. These
are the events shown in the Turn preview field and announced by the voice
instructions.
• Route summary: tapping the Mode button again will show an overview of the
route that contains only the significant roads and intersections.
Show
Tap this button to see the highlighted list item on the map. This will help you identify
route events in the list.
Avoid
53