
DigiWalker User Manual P350 P550


Table Of Contents
- 1 Warnings and safety information
- 2 General information
- 3 Operating Mio Map (Controls)
- 3.1 Hardware buttons
- 3.2 Screen buttons and controls
- 4 Discovering the program through the screens
- 4.1 Main menu
- 4.2 The map
- 4.2.1 2D and 3D map views
- 4.2.2 Zoom levels
- 4.2.3 Daylight and night colour schemes
- 4.2.4 Streets and roads
- 4.2.5 Other objects
- 4.2.6 Current position and Lock-on-Road
- 4.2.7 Selected map point, also known as the Cursor
- 4.2.8 Visible POIs (Points of Interest)
- 4.2.9 Speed cameras
- 4.2.10 Contacts
- 4.2.11 Elements of the Active Route
- 4.3 Screens with map
- 4.3.1 Turn preview (No. 1)
- 4.3.2 Zoom in and out (No. 2 & 3)
- 4.3.3 Tilt up and down (No. 4 & 5)
- 4.3.4 Lock to GPS position and heading (No. 6)
- 4.3.5 Cursor (No. 7)
- 4.3.6 Map scale (No. 8)
- 4.3.7 Menu (No. 9)
- 4.3.8 Map orientation and Overview (No. 10)
- 4.3.9 GPS position quality (No. 11)
- 4.3.10 Battery status (No. 12)
- 4.3.11 Sound muting (No. 13)
- 4.3.12 Track Log recording/playback indicator (No. 14)
- 4.3.13 Cursor menu (No. 15)
- 4.3.14 Current street (No. 16)
- 4.3.15 Travel and Route data (No. 17)
- 4.3.16 Distance to next turn (No. 18)
- 4.3.17 Next street / Next settlement (No. 19)
- 4.3.18 Approaching next turn (No. 20)
- 4.3.19 Current speed limit (No. 21)
- 4.4 GPS Data screen
- 4.5 Route Information screen
- 4.6 Menu
- 4.7 Speed cameras
- 4.8 TMC
- 5 Find
- 5.1 Main menu Find buttons (Address, Favourites, POI, History)
- 5.2 Selection by tapping the map
- 5.3 Using the Find menu
- 5.3.1 Find an Address, Street, Intersection or City
- 5.3.2 Find in History
- 5.3.3 Find Coordinates
- 5.3.4 Find a POI
- 5.3.5 Find one of the Favourites (Home/Work)
- 6 Settings
- 6.1 General settings
- 6.2 Sound settings
- 6.3 Route parameter settings
- 6.4 Language & Units
- 6.5 Advanced settings
- 6.6 About screen
- 6.7 Manual GPS configuration
- 7 Troubleshooting guide
- 8 Glossary
- 9 Index
Note: When appearing automatically, the Cursor menu remains open for a few
seconds only. If you decide not to choose any of the actions listed, the menu closes
automatically. When you open it manually, it will remain until you close it or switch to
another screen.
Tip: If you want the selected point shown in the centre of the map, close and reopen
the Cursor menu or wait until it closes and open it again. By opening the Cursor
menu manually, the map will be moved to have the selected location in the centre.
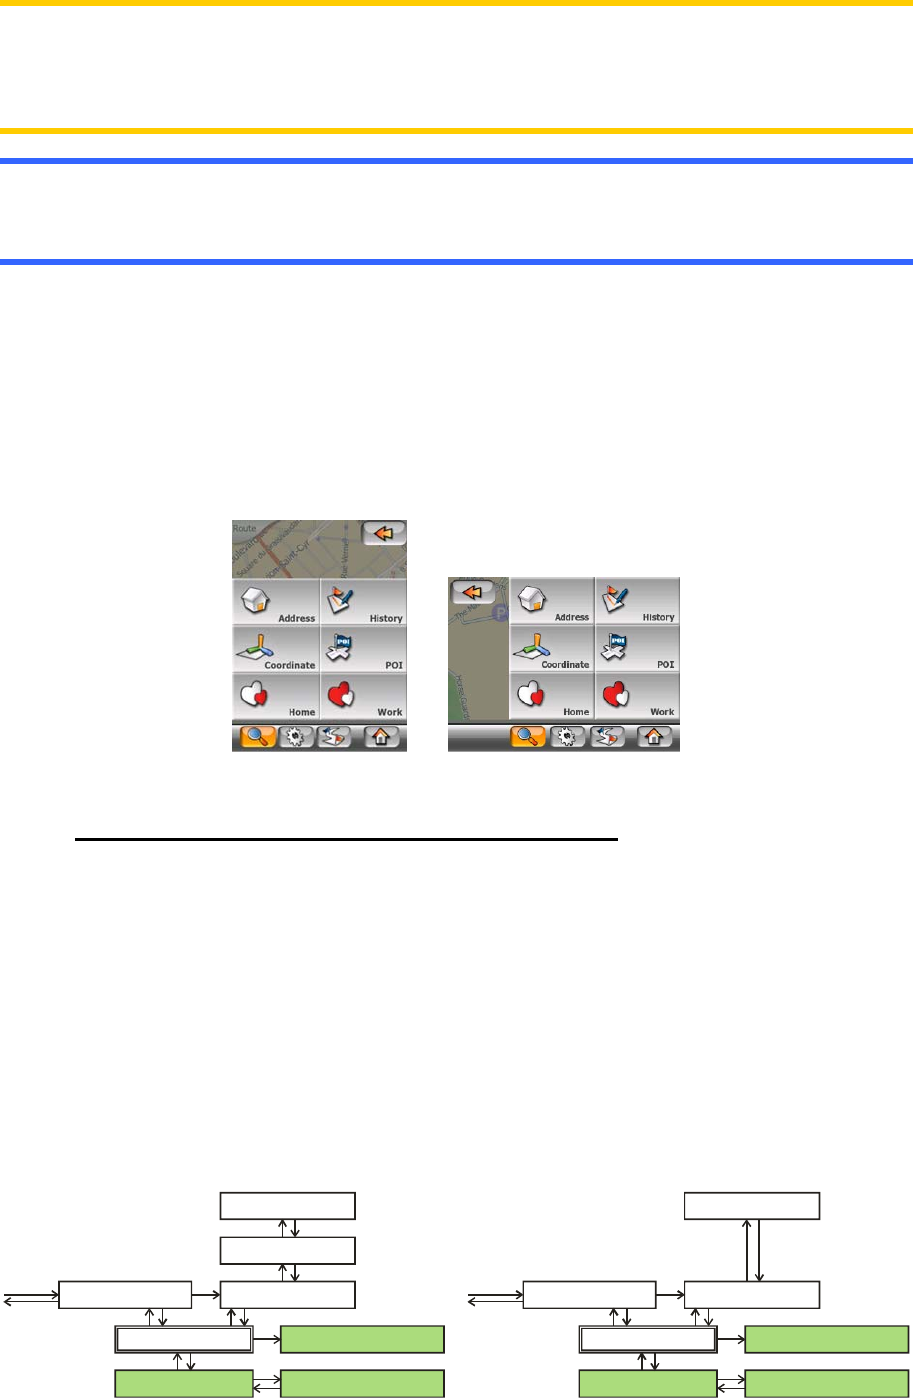
5.3 Using the Find menu
The Find menu is accessible through the Menu buttons of the map screens (4.3.7).
The Find menu gives you various possibilities for selecting a location.
5.3.1 Find an Address, Street, Intersection or City
Searching for a city, a street, an intersection, or an exact address can all be done in
the Find Address module. If you know at least a part of the address, this is the
quickest way to find the location.
The following figure shows the structure of the address-search module. There are
five levels (Country, State, City, Street and Address). The state level only appears for
Australia and the United States of America. This level is not used in all other
countries that Mio Map currently supports. The list of recent cities and states is the
entry point of the module. The green rectangles are the exits. You can complete your
search by selecting the centre of a settlement, the midpoint of a street, an
intersection of two roads, or an exact address.
Select State
Select Country Select Country
Select Recent Select RecentFind City Find City
Select Street Select StreetSelect City Centre Select City Centre
Select Address Select AddressSelect Crossing Select Crossing
Level 4 Level 4
Level 5 Level 5
Level 3 Level 3
Level 2
Level 1 Level 1
Australia
& USA
Europe
& Asia
65