DigiWalker User Manual P350 P550
Table Of Contents
- 1 Warnings and safety information
- 2 General information
- 3 Operating Mio Map (Controls)
- 3.1 Hardware buttons
- 3.2 Screen buttons and controls
- 4 Discovering the program through the screens
- 4.1 Main menu
- 4.2 The map
- 4.2.1 2D and 3D map views
- 4.2.2 Zoom levels
- 4.2.3 Daylight and night colour schemes
- 4.2.4 Streets and roads
- 4.2.5 Other objects
- 4.2.6 Current position and Lock-on-Road
- 4.2.7 Selected map point, also known as the Cursor
- 4.2.8 Visible POIs (Points of Interest)
- 4.2.9 Speed cameras
- 4.2.10 Contacts
- 4.2.11 Elements of the Active Route
- 4.3 Screens with map
- 4.3.1 Turn preview (No. 1)
- 4.3.2 Zoom in and out (No. 2 & 3)
- 4.3.3 Tilt up and down (No. 4 & 5)
- 4.3.4 Lock to GPS position and heading (No. 6)
- 4.3.5 Cursor (No. 7)
- 4.3.6 Map scale (No. 8)
- 4.3.7 Menu (No. 9)
- 4.3.8 Map orientation and Overview (No. 10)
- 4.3.9 GPS position quality (No. 11)
- 4.3.10 Battery status (No. 12)
- 4.3.11 Sound muting (No. 13)
- 4.3.12 Track Log recording/playback indicator (No. 14)
- 4.3.13 Cursor menu (No. 15)
- 4.3.14 Current street (No. 16)
- 4.3.15 Travel and Route data (No. 17)
- 4.3.16 Distance to next turn (No. 18)
- 4.3.17 Next street / Next settlement (No. 19)
- 4.3.18 Approaching next turn (No. 20)
- 4.3.19 Current speed limit (No. 21)
- 4.4 GPS Data screen
- 4.5 Route Information screen
- 4.6 Menu
- 4.7 Speed cameras
- 4.8 TMC
- 5 Find
- 5.1 Main menu Find buttons (Address, Favourites, POI, History)
- 5.2 Selection by tapping the map
- 5.3 Using the Find menu
- 5.3.1 Find an Address, Street, Intersection or City
- 5.3.2 Find in History
- 5.3.3 Find Coordinates
- 5.3.4 Find a POI
- 5.3.5 Find one of the Favourites (Home/Work)
- 6 Settings
- 6.1 General settings
- 6.2 Sound settings
- 6.3 Route parameter settings
- 6.4 Language & Units
- 6.5 Advanced settings
- 6.6 About screen
- 6.7 Manual GPS configuration
- 7 Troubleshooting guide
- 8 Glossary
- 9 Index

Once you have entered both numbers, press Done to make the selection.
Tip: The quickest way to tell the coordinates of a point is to select it by tapping on the
map or by using Find, and then come to this page and read the coordinates.
Tip: If you need to reformat coordinates to degrees and minutes, enter the
coordinates in the format you have, press Done to show it in the map, then come
back here to see the same location in dd.ddddddd format.
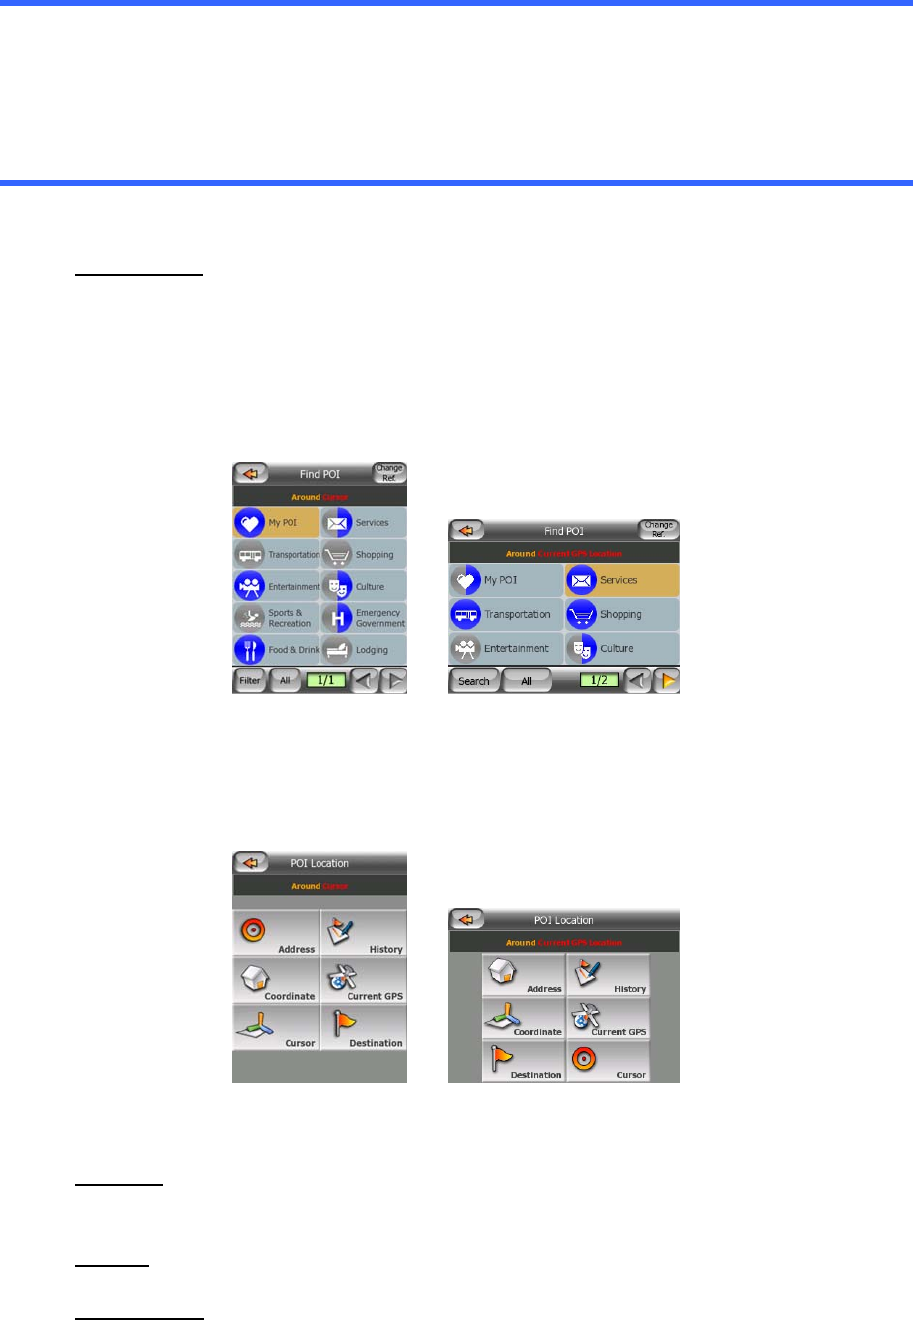
5.3.4 Find a POI
You can select your destination from the thousands of POIs included with Mio Map or
from the ones you have previously created. This screen helps you find the one you
are looking for. POI items are categorised to let you locate them more easily. On this
screen you can see the first page of the top level POI categories. There are three
levels altogether.
The search will be carried out around a certain reference point. Always look at the
current reference point shown in the green field above the POI category buttons and
confirm that it matches what you want. To change the reference, tap the Change ref.
button in the top right corner.
Once you tap the Change ref. button, you are presented with these choices:
• Address
: you can specify an address to be searched around, or a settlement
to search in. The centre of this settlement will be used as the reference point.
• History: the reference for the search can be selected from the History list.
• Coordinates
: you can specify a latitude/longitude pair to be the centre of the
search.
73


