
User's Manual
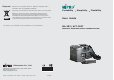


Personal Wireless P. A.Personal Wireless P. A.
MA-202
ALL
R
1
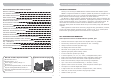
Transmitter Power Indicator:
Normal Battery:
Low Battery:
Drained Battery:
No Battery or Installed Incorrectly:
Different Frequency Band:
Transmitter Power Switch:
Volume Control:
Determines current battery power level.
Indicator illuminates and dims when turned on.
Indicator stays illuminated when turned on. Recharge immediately.
Indicator does not illuminate when turned on. Recharge
immediately.
Indicator does not illuminate when turned on.
Indicator flashes 4~5 times. Check to see if right
frequency band is used.
Power ON to speak or amplification. Make sure
transmitter is OFF position when not in use or during charging.
Volume level adjustment.
Personal Wireless P. A.
MA-202
ALL
R
1
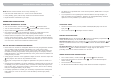
SIDE PANELS
6
7
Rechargeable Transmitter Microphone
32
33
31
SYSTEM SET-UP
SET-UP RECEIVER AND TRANSMITTER FREQUENCIES
1. Turn “ON” the Power Switch.
2. The Power Indicator red light is lit.
Personal Wireless P. A.
MA-202
ALL
R
1
Personal Wireless P. A.
MA-202
ALL
R
1
Personal Wireless P. A.
MA-202
ALL
R
1
Personal Wireless P. A.
MA-202
ALL
R
1
3. Press & hold
"SCAN" button for
1 second
4. Existing channel
blinks
5. Press & release
"SCAN" button
6. New interference-
free channel
appears
AUTOMATIC “TRANSMITTER” SYNC
1. POWER on transmitter (ensure fresh batteries are properly installed with the correct
polarity). Replace transmitter battery when LED glows red during powered-on. (glows
red = low battery)
2. Locate and bring an ACT transmitter *infrared (IR) port within 30cm (12-inch) of
receiver's ACT button.
3. Press and release “ACT” button to synchronize transmitter and receiver frequencies.
4. When the frequencies are synchronized successfully the Power Indicator light will turn
from red to green to indicate it is receiving RF signal from the transmitter.
Personal Wireless Public Address System
< 30cm (12 in.)
31
32
33