
User guide


9
INSTALLATION
Suitable Plumbing Systems
Gravity Fed:
The thermostatic mixer must be fed from a cold
water cistern (usually tted in the loft space) and
a hot water cylinder (usually tted in the airing
cupboard) providing nominally equal pressures.
Mains Pressurised Instantaneous Hot Water
System (Combination Boiler):
The thermostatic mixer can be installed with
systems of this type with balanced pressures.
(Recommended Minimum Maintained Pressure:
1.0 Bar).
Note! On combination boiler systems we
recommend that the thermostatic mixer is
operated in the maximum ow position in order to
achieve the minimum ow rate required to ignite
and run the boiler.
Unvented Mains Pressure System:
The thermostatic mixer can be installed with an
unvented, stored hot water system.
Pumped System:
The thermostatic mixer can be installed with an
inlet pump (twin impeller). The pump must be
installed in a suitable location and in accordance
with its instructions.
General
Installation must be carried out in accordance
with these instructions, and must be conducted by
designated, qualied and competent personnel.
The installation must comply with the “Water
Supply Regulations 1999 (Water Fittings)” or any
particular regulations and practices, specied by
the local water company or water undertakers.
Note! Make sure that all site requirements
correspond to the information given in section:
‘Specications’. For Type 2 Valves see also
supply conditions in section: ‘Type 2 Valves’.
1. The Mixer must not be installed in an area
where it may freeze.
2. For stud partitions alternative xings may be
required.
3. Isolating valves must be installed close to the
Mixer for ease of maintenance.
4. Pipework must be rigidly supported and avoid
any strain on the connections.
5. Pipework dead-legs should be kept to a
minimum.
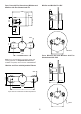
6. Decide on a suitable position for the Mixer.
The position of the Mixer and the Shower
Fittings must provide a minimum gap of 25 mm
between the spill-over level of the shower tray/
bath and the showerhead (refer to illustration).
This is to prevent back-siphonage. For further
information on the installation of your Shower
Fittings, refer to the Fittings Installation and
User Guide.
Note! Only use Shower Fittings recommended
by the manufacturer or supplier.
25 mm
Spill Over
Level