
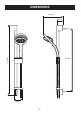
User guide


8
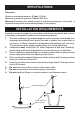
INSTALLATION
Note! For dry lined, stud partition, shower cubicle or laminated panel walls the installer
may wish to obtain alternative proprietary cavity xings. Use of these alternative
xings is beyond the scope of this guide.
Read the section: Installation Requirements before proceeding with the
installation.
The slide bar should be positioned to one side of the shower control at a convenient
height for all the family. It should be positioned so that the showerhead discharges
down the centre line of the bath, or across the opening of the shower cubicle. The
showerhead should be directed away from the shower control.
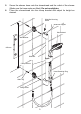
Slide Bar Securing Screw must be
positioned at the bottom
Slide Bar Securing Screw
must be positioned at the top
1. Decide on a suitable position for the
slide bar avoiding buried cables and
pipes.
2. Using the supplied template as a
guide, mark the position of the xing
holes for the wall brackets.
Note! Use a spirit level to make sure
that the xing holes are vertical.
Drill the two Ø8 mm xing holes for
the wall brackets at 600 mm centres,
and insert the wall plugs.
3. Insert the xing screws through the
holes in the wall brackets, screw
them to the wall but do not fully
tighten them at this stage. Use the
template to set the correct distances
between the brackets then fully
tighten the screws.
Note! Slots in the wall brackets
allow for minor adjustment, use one
horizontal and one vertical slot for
xing.
Note! Make sure that the holes for
the slide bar securing screws are
positioned correctly, refer to the
illustration.
4. Position the slide bar over the wall
brackets and secure with the slide
bar securing screws as indicated.
5. Fit the end plugs into the slide bar
supports and push rmly with thumb
or nger to until it clicks into place.
Template
555 mm
End Plug