
User Manual


How to use the Microphone
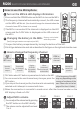
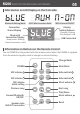
Press and hold the POWER button on the MICs to turn on the MICs.
The frequency channel will automatically connect, the LED screen
on the MICs will be on. (You should change the channel when the
channel
shows OFF or there is no sound)
The MICs is connected if the channel is displayed on the LED
screen and the ‘A-ON’ letter is displayed on the LED screen of
the MICs.
①
②
③
Turn on the MICs & LED display information
STEP 1 STEP 6 Back to STEP 1
Click 1 Click 6 Click 7
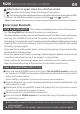
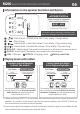
‘SEL’ blinks when SET button is pressed and is held on the MIC.
You can move to the next channel every time you press the
SET button.
If you stop at the channel you like, the channel is automatically
selected and it attempts to connect with base.
When the connection is successful a sound occurs after the channel number on the
MIC display is fixed on ‘A-ON’.
①
②
③
④
You can adjust the volume level by pressing
the SET button on the MICs briefly.
The volume can be adjusted from level
1 to 6.
①
②
SET
Press&hold
SET button
SET
Press SET
button briefly
STOP at
selected
channel
Attempt to
connect to
speaker
When
connected,
the channel
number is fixed
Display
A-ON on
the speaker
LED display
Connected
to changed
channel
Speaker
sound
output
How to change the frequency channel
Adjust MICs volume
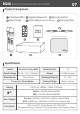
To open the battery compantment by turning the bottom of the MIC.
Put AA-type batteries into each side as described in the figure on the right and close the cover.
①
②
Changing the battery in the MICs
Battery not included
with this product
SET
SET
SET
(Two(2) AA-type batteries are required per MIC)
1
2
3
4
BLUETOOTH MICROPHONE & HIFI SPEAKER
M200
03
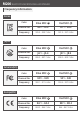
※The frequency of the MIC
may vary depending on the
country of residence of the
user. Please refer to the last
page of the User’s Guide※