
Operating instructions


GUIDE TO INSTALLATION AND OPERATION
ASI-Bridge CAM | 7
3.2 Monitoring and Setting the Default HDV Status
Note: The default HDV standard is important only when the ASI-Bridge CAM is being used with the Final
Cut Pro software package on a Macintosh computer. In all other applications, the ASI-Bridge CAM detects
the incoming transport stream format and configures itself automatically.
The STATUS LED displays the default HDV standard at power-up as follows:
The Status LED will:
1. Blink RED once
2. Blink GREEN 1 to 4 times signaling the video standard
3. Blink RED once when done
4. Go back to the Status mode
Interpret the LED indication according to the following table:
GREEN LED blinks Default HDV video standard
1 1080i50
2 1080i59.94
3 720p50, 720p25
4 720p59.94, 720p29.97, 720p23.98
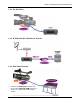
To change the default HDV video standard:
1. Power-up the unit. The unit will indicate the current standard as described above
2. Press and hold the power button for at least 4 seconds
3. When you release the power button, the HDV standard will be incremented by one, and the Status
LED will blink GREEN the code for the new standard
¾ The default video standard will cycle through positions 1 to 4 (see the table above) and then
back to 1, moving one step each time this process is repeated.
4. The LED will then blink RED once and return to normal status mode
Please wait until the status LED is back to normal status mode before powering-off the unit.
The default video standard is saved internally at the end of the LED blinking process.