
Quick start manual


Configuring an Aperio Door Controller Panel
Version 4.3.1 TX3 Configuration and Administrator Manual 167 (226)
LT-995 Copyright 2015
To label a panel
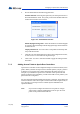
1. Select a panel. The Panel Configuration window appears.
Figure 110. Panel Configuration
2. Provide information for the following:
Panel label. Provide a name for the Panel.
Panel model. The application automatically retrieves the selected panel
model information. This field is read only.
Address. The drop down list displays the remaining available panel
addresses. From this list select the panel address. This field is disabled if a
connection is active. Ensure that this address matches the panel address.
Master Node. If you are connected to your TX3 system through TCP/IP,
this option lets you either configure the panel as a Master Node (select
This is a master from the list) or specify the Master Node for your panel
(select the Master Node from the list).
Test Connection. This option tests the connection between your
computer and a Master Node. You can only test the connection to a Master
Node panel. You must be connected to the TX3 system in order to use
Test Connection.
IP address. The IP address of your panel if it is a Master Node on a TCP/
IP network. This field only appears if you are connected to your TX3
system through TCP/IP.
Note: You cannot change a Master Node’s IP address by editing the IP
address field. To change a Master Node’s IP address, use the IP
Change Tool. See To change the IP address of a Master Node on
page 55 for more information.
3. Proceed with the rest of the configuration or click Send and Exit from
the Tool Bar to apply the settings and exit the session.
7.1.2 Setting the Aperio Door Controller Panel
The application lets you set and define log reporting, facility code usage, and
daylight savings time.