
User's Guide


9 • Miro Canvas • User Guide
b. To seal the reservoir, fully press the blue cap onto the reservoir.
c. Reagents loaded into reservoirs cannot be automatically detected as inlet reagents can.
Press Continue on the touchscreen to advance to the next reservoir.
iii. Once all reagents are loaded, follow the touchscreen
instructions to start the run.
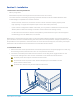
a. Examine the manifold on the underside of the lid to ensure it is clear of debris.
b. Press down rmly on both front corners to ensure the instrument lid is properly closed.
• Recover the Sample and Finish the Run
i. The Canvas touchscreen will indicate that the protocol has ended and it is time to recover the sample.
Follow the instructions on the screen.
ii. Fully open the lid immediately after the lid lock releases. To lift the lid, secure the instrument
base with one hand, and grasp the center of the lid with your other hand and lift straight up.
Do not tip the instrument, as this may move your sample away from the recovery inlet.
IMPORTANT: Leave the cartridge clamp engaged during sample recovery.
iii. To recover your sample, set a 200 μl pipette 20 μl higher than the volume of the sample you are
recovering, depress the plunger to the rst stop, insert the tip vertically into the recovery inlet, and slowly
release the plunger to draw up your sample. Transfer the sample to a clean, labeled tube for analysis
and storage.
iv. To remove the cartridge, release the cartridge clamp and lift the cartridge up. Cartridges are single
use only. Dispose of the cartridge after each run.
v. Close the lid and power off the Canvas. Closing the Canvas lid prevents dust from contaminating
the electrode board.
IMPORTANT: Never touch or wipe the electrode board. Contact Technical Support if you notice your
electrode board is dirty.