
User's Guide


5 • Miro Canvas • User Guide
Section 5 • Installation
1. INFRASTRUCTURE REQUIREMENTS
• 120V 3-prong outlet
• Networked computer with Google Chrome (browser version 75.x or later)
• Local area network connectivity supporting a speed of 100 Mb/s via RJ-45 shielded Ethernet cable
or 802.11a/b/g/n compatible Wi-Fi wireless network
• Please note that, at this time, we cannot connect to Wi-Fi networks requiring captive portal
login (opening of a page which requires input of user name and/or password).
• If your network conguration utilizes a MAC lter, you may need to whitelist the instrument MAC
address (found in Network Settings on the Miro Canvas touchscreen Settings menu).
• For the instrument to interact with the cloud platform, please ensure that your network supports
the following ports: TCP 8883, 8443, 443, and 53.
Maintaining a constant internet connection is critical to enable software updates, new protocol uploads to
your instrument, and aid in troubleshooting. Run data (instrument temperatures, voltages, pressures, etc.) will
be uploaded to a cloud platform, which Miroculus can access for technical support, if necessary. No sample
information will be entered into the instrument or transmitted via the internet.
2. INSTRUMENT SETUP
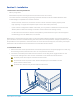
i. Remove the Miro Canvas (instrument and accessories) from the box and place upright on a clean, dry,
level working surface (minimum 30cm W x 45 cm D) free from vibrations.
ii. Connect the included power cable and Wi-Fi antenna. If not using Wi-Fi, toggle off Wi-Fi on the
touchscreen Settings menu and connect an Ethernet cord instead of the Wi-Fi antenna.
No other power cable may be used with the instrument.
Do not block access to power switch. Ensure adequate space is available to access
power switch on back of unit.
No other Wi-Fi antenna may be used with the instrument.