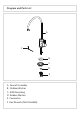
Diagram and Parts List A F B C D E A. Faucet Assembly B. Rubber Washer C. ABS Mounting D. Rubber Washer E. Connector F.
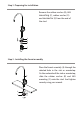
Faucet Dimension Installer Tip: Shut off main water supply before installing new faucet
Step 1: Preparing for installation Remove the rubber washer (B), ABS mounting (C), rubber washer (D) and connector (E) from the end of the stud. B C D E Step 2: Installing the faucet assembly A B C Place the faucet assembly (A) through the selected hole in the sink or countertop. On the underside of the sink or countertop, slide the rubber washer (B) and ABS mounting (C) onto the stud. And tighten securely using your wrench.
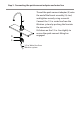
Step 3: Connecting the quick connect adaptor and water line A D E Thread the quick connect adaptor (E) onto the end of the faucet assembly (A) stud, and tighten securely using a wrench. Connect the 1/2 in. water line from the filtration system by pushing the line into the connector (E). Pull down on the 1/2 in. line slightly to ensure the quick connect fitting has engaged. 1/2 in.