INSTALLATION MANUAL FOR SHOWER SYSTEM
INSTALLATION INSTRUCTIONS Ceiling Mounted Installation 1
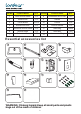
Item No. Product Name QTY Item No. Product Name QTY 1 Rain Shower Head 1 PC 8 Embedded Box Cover 1 PC 2 Shower Arm 1 PC 9 Handle 1 PC 3 Cover Board 3 PCS 10 Faucet 1PC 4 Elbow With Hook 1 PC 11 Diverter handle 1PC 5 Handheld Shower Head 1 PC 12 Nails Bag 1 BAG 6 Shower Hose 1 PC 13 Allen-Key 1 PC 7 Embedded Box 1 PC 14 Accessories Bag 1 BAG Essential accessories list 1 2 3 4 5 6 7 8 9 10 11 12 13 14 WARNING: Choking hazard.
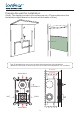
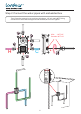
Prepare the wall for installation. (Note: The depth provided is for reference only. Please determine the installation depth based on the actual thickness of tiles.) 2.6 inch Tips :Embedded box can be cut to flush with tiles before trim installation (Distance from back of valve body to finish surface to be between 2.6-3.4 inches) 3.4 inch 2.
Step 1: Install the Embedded box Tips:Don’t remove the transparent protective cover when installing ·Mark position 4
x4 x4 ·Drill hole x4 ·Insert nylon plug ·Fix the embedded box 5
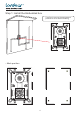
Step 2:Connect the water pipes with embedded box Tips:Clean the water pipe to avoid any blockage, 1/2 inch male NPT fitting connection to be made with pipe thread sealant,do not over tighten. USA : NPT1/2" Canada: NPT1/2" H C 2.
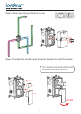
Step 3:Remove the protective cover x1 x1 Step 4:Install the handle and diverter handle to test the water Tips:Test the outlet of Rain shower head, handheld shower head and faucet OPEN 7
Step 5:Remove the handle and diverter,Install the transparent protective cover and finish the wall decoration Tips:Install the transparent cover before finishing the wall so as to protect the embedded box Step 6:Remove the transparent protective cover ·Cut away the part of the embedded box sticking out so that it is level with the wall.
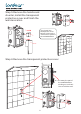
Step 7: Put the embedded box cover on,fix the handle and diverter handle Step 8:Install the elbow with hook x1 ·Loose the screw ·Take out the brass fitting ·See next page for step 8 continuously 9 x1
·Insert the brass fitting ·Turn the wrench gently and carefully ·Put the cover on, Fix the elbow with hook Step 9:Connect the shower hose and handheld shower head Tips:Please check whether the washer is inside the shower hose or not. If yes, connect directly;if no,take it from the accessories bag and put it in before connection to avoid leak.
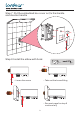
Step 10:Install the Faucet x1 ·Loose the screw x1 x1 ·Take out the brass fitting ·Insert the brass fitting ·Turn the wrench gently and carefully ·Cover board for faucet ·Put the cover on, Fix the faucet 11
Step 11:Install shower arm and rain shower head x1 x1 x1 ·Take out the brass fitting ·Loose screw ·Insert the shower arm ·Fix the brass fitting ·Put the cover on ·Fix the shower arm ·Install the rain shower head 12
Clean and maintain product 1.How to clean the shower head : A.Rub the nozzles with fingers or toothbrush to loosen deposits,then run hot water for a while . B.Put the shower head in a pot,fill with enough white vinegar or Detergent to cover the shower head.Then soak it for 30 minutes or longer. C.Use a high quality microfiber cloth and gently wipe over the surface, then rinse with warm water.Finally,use a dry chamois or paper towel to gently remove any residue.
Guarantee Repairs Claims 1. During the warranty period, LORDEAR is responsible for free repairs of any defective products and missing parts. 2. Payment needed for replacement if the Malfunction and damage caused by following situations even within the warranty period: 2.1 Improper use, unauthorized repair or reconstruction (including throwing or beating); 2.2 Failure to follow installation manual (including unprofessional installation by a plumber) ; 2.3 Removal after installation or other factors; 2.