
Installation Guide
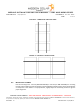


Table Of Contents
- 1.0 Disclaimer
- 2.0 Handling and Use
- 3.0 Limitation of Liability and Limited Remedies
- 4.0 General Instructions
- 5.0 Safety
- 6.0 Operating Conditions
- 7.0 Unpacking and Storage
- 8.0 Product Electrical Specifications
- 9.0 Mechanical Installation
- 10.0 Grounding Instructions
- 11.0 Electrical Installation
- 12.0 Maintenance

MODULE INSTALLATION AND USER MANUAL – PERC AND MONO SERIES
REVISION DATE:
06/19/2017
DOCUMENT #
GE- SA1- 0006
PAGE:
10 OF 14
MISSION SOLAR ENERGY - MSE CONTROLLED- PROPRIETARY & CONFIDENTIAL - RELEASED
Reproduction, dissemination, copying, modification, distribution and/or publication of this material is STRICTLY PROHIBITED. Disclosure of this document,
in any manner to a third party, requires prior written consent from MISSION SOLAR ENERGY LLC.
REVISION: R4 RELEASE DATE: 11/16/2016
FIGURE 5: MOUNTING CLAMPS
END CLAMP PURLIN
Once the module is aligned and centered, fully tighten the end-clamps in place to 16±2 Nm. All the end
clamps should be torqued to this value. Ensure that the channel nuts do not extend outside of the
purlin. Drop the mid-clamp into the purlin. Place the channel nut inside purlin and place the grounding
clip between the module and purlin with the grounding clip tabs in the middle of the purlin. Install the
final two end-clamps once the final module has been placed. Similar to the End-Clamp section, place
an end-clamp on each purlin, flush to the final module, with the lip of the end-clamps on top of the
module. Fully tighten the end-clamps once they are properly placed. If the channel nuts extend outside
of the purlin, spacing has been done improperly and needs to be fixed.
Note: Allowable clamp minimum dimensions are as follows