SME Server V5 with ServiceLink User Guide - 5.
SME Server V5 with ServiceLink: User Guide - 5.1 by Mitel Networks Corporation Published January 2002 Copyright © 2002 by Mitel Networks Corporation Permission is granted to copy, distribute and/or modify this document under the terms of the GNU Free Documentation License, Version 1.
Table of Contents 1. Welcome to your SME Server V5 with ServiceLink ................................................................................................................................................5 1.1. About This Guide.............................................................................................................................................................................................5 1.2. Software Licensing Terms and Conditions .........................................
11.7. Other E-mail Settings...................................................................................................................................................................................54 11.8. Review Configuration ..................................................................................................................................................................................55 12. Collaboration .............................................................................
Chapter 1. Welcome to your SME Server V5 with ServiceLink Congratulations on choosing the SME Server V5 with ServiceLink as your network and communications server! Companies all over the world are using the Internet to communicate more effectively and efficiently to a broader audience. The SME Server V5 with ServiceLink is founded upon state of the art technologies - such as the Linux operating system - which have been mainstays in the infrastructure of larger organizations for several years.
Chapter 1. Welcome to your SME Server V5 with ServiceLink 1.2. Software Licensing Terms and Conditions The SME Server V5 with ServiceLink is licensed for an individual server under the terms of the ServiceLink End User License Agreement found on the CD. Acceptance of this agreement is required during the software installation. The SME Server V5 with ServiceLink kit also includes software that is distributed under the terms of the GNU General Public License or other open source licenses.
Chapter 2. The role of the SME Server V5 Your SME Server V5 with ServiceLink manages your connection to the Internet by routing Internet data packets to and from your network (which allows all the computers on your network to share a single Internet connection) and by providing security for your network, minimizing the risk of intrusions.
Chapter 3. ServiceLink With SME Server V5 with ServiceLink, Mitel Networks Corporation has introduced a suite of integrated network services - ServiceLink - that extend and enhance the functionality of your server. ServiceLink maximizes the security, performance and reliability of your server through real-time interaction with the Mitel Network Operations Center (NOC).
Chapter 3. ServiceLink • DNS Services One of the components of a full Internet solution is a domain name. Most businesses using the SME Server V5 with ServiceLink will want to register a domain name representing their business, and will need a DNS host to make this domain name accessible to the world. For reasons of security and reliability, the server is not configured to publish DNS records by itself.
Chapter 4. Your Internet Service Provider (ISP) Your ISP is your connection to the Internet - it routes Internet data packets to and from your server. It also provides other essential services. This section of the user’s guide reviews what ISPs offer and what the implications are in choosing among the various options available to you.
Chapter 4. Your Internet Service Provider (ISP) 4.2.2. Routable versus non-routable IP addresses If an IP address is analogous to your phone number, then a routable IP address is the equivalent of a full telephone number complete with country code and area code such as +1-613-555-1234. Using the same analogy, a non-routable address is the equivalent of an office extension.
Chapter 4. Your Internet Service Provider (ISP) Note: In the tables below, please keep the following information in mind: 1. ISPs often supply the items marked * to your server by DHCP. 2. Some ISPs block outgoing HTTP connections, forcing you to use their proxy server. This interferes in a few minor ways with your server (e.g., the test for Internet connectivity will fail erroneously). However, using the ISP’s proxy server will normally work fine. 1.
Chapter 4. Your Internet Service Provider (ISP) 4.3.3. Ordering a dialup connection It is typical for you to purchase and install your own modem or ISDN adapter for your dialup connection. (Be sure to use a Linux-compatible modem - WinModems will not work.) Your modem connects to your ISP over a conventional phone line. If you require an additional phone line, it is typical for you to arrange that yourself.
Chapter 4. Your Internet Service Provider (ISP) 4.4. Arranging Services From Your ISP In each section on connectivity, above, we direct you to the appropriate list of services that should be ordered from your ISP. 4.4.1. Service List A • domain name set up and hosting • publication of DNS address records for your web server, FTP server and e-mail server • publication of DNS mail (MX) records • secondary mail server (optional) • Internet news server (optional) 4.4.2.
Chapter 4. Your Internet Service Provider (ISP) Some Important Notes on Service List D (Multidrop Mail) Service list D is applied to configurations where the publication of DNS records is not practical either because your IP address changes frequently or because it is non-routable. Because there is no published address receiving incoming network connections, this configuration does not allow you to host a web page or FTP site using your SME Server V5 with ServiceLink.
Chapter 4. Your Internet Service Provider (ISP) Secondary Mail Server A secondary mail server receives e-mail for your domain if your server is unavailable, and reattempts delivery later. Subnet Mask (or netmask) A subnet mask (or a netmask) has four numeric segments (each between 0 and 255) and looks like an IP address. It enables your computers to deduce what network they are on. Your ISP provides the netmask for the external network between the ISP and your server.
Chapter 5. Hardware Requirements of the SME Server V5 with ServiceLink Host Computer The hardware requirements of the SME Server V5 with ServiceLink are modest compared with other server software available today. However, because of its critical role in your office, selecting an appropriate host computer is important.
Chapter 5. Hardware Requirements of the SME Server V5 with ServiceLink Host Computer Sound card none required 5.2. Hardware Requirements for a Category 2 Server Table 5-3. Definition of a Category 2 Server # of Users Up to 40 Usage Light (moderate use of remote access, file sharing and other disk-intensive activity) Table 5-4.
Chapter 5. Hardware Requirements of the SME Server V5 with ServiceLink Host Computer Mouse none required Sound card none required 5.4. Hardware Requirements for a Category 4 Server Table 5-7. Definition of a Category 4 Server # of Users Up to 500 Usage Heavy Table 5-8.
Chapter 5.
Chapter 5.
Chapter 5. Hardware Requirements of the SME Server V5 with ServiceLink Host Computer • Q Logic QLA10160, 1080, 1240, 1280, 2100, 2200 12160 5.7. Supported Tape Drives If you intend to use the tape backup capabilities of the SME Server V5 with ServiceLink, you must have a tape drive that will work with a Linux system. We believe that most SCSI tape drives and many IDE tape drives will work correctly.
Chapter 6. Installing And Configuring Your SME Server V5 with ServiceLink Software 6.1. Licensing Terms and Conditions In installing the SME Server V5 with ServiceLink software, you are agreeing to the open source licensing terms and conditions associated with it. You can read these terms and conditions in the introduction to this guide under the title Software Licensing Terms and Conditions.
Chapter 6. Installing And Configuring Your SME Server V5 with ServiceLink Software 6.3. Upgrading From A Previous Version If you have previously installed a server and now wish to upgrade to version 5.1, you can do so while preserving your configuration data. To do so, select Upgrade from the appropriate screen in the installation process. While the upgrade should proceed smoothly, we do recommend that you back up your system prior to performing this upgrade just to be safe.
Chapter 6. Installing And Configuring Your SME Server V5 with ServiceLink Software • the system password • the type of ethernet adapters (network interface cards, or NICs) that will be used by your server to communicate with the internal network and the Internet (or external network). Typically, the server software will detect this information automatically. (Note that if you are connecting to the Internet with a dialup connection, you only need one ethernet adapter.
Chapter 6. Installing And Configuring Your SME Server V5 with ServiceLink Software Next you need to provide a name for your server. You should think carefully about this as changing it later may create additional work. (For instance, Windows client computers may be mapping drives to your server using its name. Those clients would need to remap the drive using the new name.
Chapter 6. Installing And Configuring Your SME Server V5 with ServiceLink Software 6.8.2. Configuring Local Network Parameters Your SME Server V5 with ServiceLink needs information about your local network in order to communicate with the other computers on your network. This includes the IP address and the subnet mask on your server’s internal interface. Because your server acts as a gateway and firewall, these will differ from the IP address and subnet mask on the external interface.
Chapter 6. Installing And Configuring Your SME Server V5 with ServiceLink Software network, and provides security and routing. If you configure your server to operate in server and gateway mode, your server will require either: 1. two ethernet adapters (one to communicate with the local network and the other to communicate with the external network/Internet) 2.
Chapter 6. Installing And Configuring Your SME Server V5 with ServiceLink Software The next step after selecting a connection type is to enter the specific parameters representing that connection. 6.11. Server and Gateway Mode - Dedicated How you configure your server’s external interface depends on whether you are using a dedicated connection or a dialup connection.
Chapter 6. Installing And Configuring Your SME Server V5 with ServiceLink Software Tip: If you are using two different network interface cards, you will see which driver is associated with eth0 and which is associated with eth1. This information can help you determine which card is eth0 and which is eth1. If you have two cards that use the identical driver you will see a screen such as the one above where the actual driver is not listed. 6.11.3.
Chapter 6. Installing And Configuring Your SME Server V5 with ServiceLink Software What is PPPoE? PPPoE is the Point-to-Point Protocol over Ethernet . Essentially, it is an implementation of the popular PPP protocol used for dialup connections - only configured to run over an Ethernet connection. Many ISPs that provide ADSL connections use PPPoE as the method of connecting their customers to the Internet over ADSL.
Chapter 6. Installing And Configuring Your SME Server V5 with ServiceLink Software This last item may be of special interest. As shown in the screen below, you can configure what type of policy you wish to have in place during typical work hours. If you are in a small office and wish to share your phone line between your computer and phone or fax, you may wish to minimize the time you are online. This is also true if your ISP charges a fee on a per-minute basis.
Chapter 6. Installing And Configuring Your SME Server V5 with ServiceLink Software 6.13.1. Configuring the DHCP Address Range Before the DHCP server is able to assign IP addresses to the computers on your network, you need to tell it what range of IP addresses it can safely distribute. As above, this section is pre-configured with defaults that are appropriate in most situations.
Chapter 6. Installing And Configuring Your SME Server V5 with ServiceLink Software any computers on your network cannot accept DHCP service. Additionally, the default end of "192.168.1.250" leaves addresses "192.168.1.251" through "192.168.1.254" available. 6.14. Further Miscellaneous Parameters There are a few, final connectivity-related parameters that must be entered into your SME Server V5 with ServiceLink. Master DNS server: The first option is for a master (or primary) DNS server.
Chapter 7. The Server Console When installation is complete and if you set server console mode to "auto", the opening screen of the SME Server V5 with ServiceLink server console will appear: If you set the server console mode to "login", you will be given a login prompt. After you enter the user name "admin" and your system password, you will see the server console screen above. Note: Any time that you login to your system as the "admin" user you will see the server console.
Chapter 7. The Server Console The password for the "root" user is whatever password is currently set for the administrator of the server. Note that this is the same password as that used by the "admin" user account. Be aware that this ability to switch between the server console and a login prompt is only available when you have physical access to the server. If you connect in remotely as the "admin" user and see the server console, you will not be able to switch to a login prompt in that window.
Chapter 8. Configuring the Computers on Your Network 8.1. What Order to do Things For efficiency, we recommend you configure your desktop computers in the following order: Step 1: First, configure one of your desktop computers to work with TCP/IP (using the information in this chapter). Step 2: With TCP/IP up and running on one of your computers, you can now access the server manager over the web and create your employees’ user accounts.
Chapter 8. Configuring the Computers on Your Network 8.2.1. Automatic DHCP Service Your server provides a DHCP server that assigns each of the computers on your network an IP address, subnet mask, gateway IP address and DNS IP address(es). For a more detailed explanation of DHCP, consult the section in the Chapter 5 called "Configuring Your DHCP Server". Note: In some rare cases, you may want to use a static IP address for a particular client machine.
Chapter 8. Configuring the Computers on Your Network DHCP service in the server console, you designated a range of IP addresses for DHCP assignment. You also allocated a block of IP addresses for manual assignment. If you accepted the defaults pre-configured into the server console, IP addresses 192.168.1.2 through 192.168.1.64 will have been set aside for manual entry. To avoid duplication, use only those IP addresses when manually assigning IP addresses to your computers.
Chapter 8. Configuring the Computers on Your Network Benefits of IMAP Drawbacks of IMAP You can access all of your new and stored e-mail from any machine connected to a network. Because all employee e-mail is stored on the server, backup of e-mail is easily accomplished. If you are not connected to a network, new and stored e-mail messages are not available to you. 8.4.
Chapter 8. Configuring the Computers on Your Network Netscape should now be ready to send and receive e-mail. 8.5. Configuring Your Web Browser Most browsers are configured using a dialog box called "preferences", "network preferences" or "options". Some browsers need to be configured to access the Internet either directly or via a proxy server. When required, most desktop applications, your web browser included, should be configured as though they were directly accessing the Internet.
Chapter 8. Configuring the Computers on Your Network • Enter the name you wish to give your company directory - any name will do. • The LDAP server is the name of your web server, in the form www.yourdomain.xxx. • • The Server Root information can be found on the "Directory" screen in your server manager (more information on this is available in the next chapter). The usual form, assuming your domain is yourdomain.xxx, is dc=yourdomain,dc=xxx.
Chapter 9. On-going Administration Using the server manager The server manager is a simple control panel that allows you to administer your network. Using the server manager, you perform such tasks as adding or deleting e-mail addresses, setting the system date and time, and creating a starter web page. The server manager is accessed through a web browser by visiting the URL http://www.yourdomain.xxx/server-manager or more simply http://www/server-manager.
Chapter 10. Security 10.1. Password This screen lets you change your system password at any time. To do so, type the new password in the first field. Verify the new password by entering it in the second field. (Your password can be any combination of printable characters, including upper- and lower-case letters, numbers, and punctuation marks.) If you make a mistake, click the "Back" button on your browser and try again.
Chapter 10. Security 10.2.1. ssh If you need to connect directly to your server and login from a remote system belonging to you, we strongly encourage you to use ssh instead of telnet. In addition to UNIX and Linux systems, ssh client software is now also available for Windows and Macintosh systems. (See the section below.) If you do not have any reason to allow remote access, we suggest you set this to No access.
Chapter 10. Security Entering 2 would only allow two users to connect at any given time. If a third user tried to connect, he or she would receive an error message and would not be able to connect until one of the other users disconnected. If, on the other hand, you entered 0 , no PPTP connections would be allowed. After you enter a number and press Save, the server should be ready to accept PPTP connections. To connect using PPTP, the protocol must be installed on each remote Windows client.
Chapter 10. Security 10.3. Local networks Your SME Server V5 with ServiceLink provides services to machines on the local network and it gives machines on that network special privileges and access. For example, only machines connected to the local network can access the mail server on your server to send mail. When you configured your server, you provided it with sufficient information to deduce its own local network.
Chapter 11. Configuration 11.1. Set date and time Accessing this section allows you to set the system date and time either manually or using a network time server. Pull-down menus for month and time zone ensure accurate entry. The server manager will reset the time automatically during daylight savings time. There are worldwide time zones with multiple selections for countries with multiple time zones. (including standard time zones, states/provinces and even cities).
Chapter 11. Configuration should appear in. You should also enter the Windows server name. In order that you may later connect multiple locations using IPSEC VPNs, we suggest that you use a different name for each server. If you wish you can change the workgroup name to correspond with an existing workgroup. Macintosh users need only enter a server name or accept the defaults. Also in this section, you can specify whether the server should be the domain master for your Windows workgroup.
Chapter 11. Configuration In this section of the server manager, you specify the default directory information for new accounts - the user’s department, company, street address, city and phone number. Each time you create an e-mail account, the fields will contain the information entered here as the default. If you wish, you can change the information for each user.
Chapter 11. Configuration and allowing you to make changes. Note that many modern network printers can be configured automatically. To do so, enter their hostname, IP address and Ethernet address in the Hostnames and addresses panel. Note also that the server printing system does not perform any filtering and passes the print requests directly from the client computers to the printer in the "raw" or "pass-through" machines.
Chapter 11. Configuration You would first change the location to "Remote" and then enter the IP address of your ISP’s server in the field marked "Global IP". 11.5.1. Creating New Hostnames Creating new hostnames simply involves selecting one of the links at the top of the Hostnames and addresses panel and filling out the appropriate fields.
Chapter 11. Configuration 11.5.2. Reserving IP Addresses Through DHCP Another task you can perform through this panel is to reserve an IP address for a given system based on its Ethernet address. For instance, you might have another intranet web server within your company that you want to always have the same IP address. One method of assigning that address is to manually configure the client machine to have a static IP address.
Chapter 11. Configuration will periodically fetch this mail and distribute it to individual POP mailboxes on the server. (Note that due to problems receiving mail for mailing lists, we strongly encourage people to NOT use multi-drop e-mail.) • If you are a ServiceLink subscriber, choose "Guaranteed e-mail" in order to activate the guaranteed e-mail services. If you want to forward e-mail to another mail server for processing, enter the mail server IP address in the box marked Delegate mail server.
Chapter 11. Configuration • Internet provider’s SMTP server: Normally the server will send outgoing messages directly to their intended destination. If, however, you have an unreliable connection or are using a residential Internet service, it may be advisable to route e-mail via your provider’s SMTP server. In that case, you should enter the SMTP server’s hostname or IP address here.
Chapter 12. Collaboration 12.1. User Accounts User accounts should be set up for each person in your organization. A user account includes separate, password-protected e-mail and file storage areas. If this is the first time you are setting up user accounts for your organization, you will need to establish what your naming convention will be. Let’s assume you’ve decided that the account name should consist of first initial and last name.
Chapter 12. Collaboration To make the change, a user would enter his or her account name (the characters before "@"), the old password and the new password (to ensure accuracy, the screen asks for the new password twice). Note that changing the password for a user in the server manager overrides any previous password entered by your user. Therefore, when a user forgets his password, simply reset it in the server manager.
Chapter 12. Collaboration Warning When you create a group, you are required to assign at least one user to that group. If you fail to do so, the group will not be created and you will receive an error message. After you add (or remove) a user account from a group, the user must log out and log back in for those changes to take effect. Until the user does so, he or she will still have their old group membership information.
Chapter 12. Collaboration 12.5. Information Bays The i-bay (information bay) feature of the SME Server V5 with ServiceLink is a simple, very flexible and powerful way for you to share information with others. It is a rich enough feature that we’ve devoted an entire upcoming chapter to discussing i-bays. 12.6. Virtual Domains When you are supporting multiple domains on a single server, each domain being served is referred to as a virtual domain.
Chapter 13. ServiceLink Until you sign up for ServiceLink and your server is registered, all of the panels in this section of the server manager will not be functional. In order to subscribe to ServiceLink, visit http://www.mitel.com/ (http://www.mitel.com/) and find a authorized reseller near you. The Mitel Networks Corporation authorized reseller will interact with the Mitel Networks NOC (Network Operations Center) to obtain a Service Account ID for your server.
Chapter 13. ServiceLink If a virus is found on a message, the message is quarantined in a special mail folder and notifications are sent out about the virus. For an inbound message, the recipient at your site, the original sender and your Mitel authorized reseller are notified. For an outbound message, only the sender (at your location) and your authorized reseller are notified. In the server manager the configuration screen shown below allows you to enable or disable e-mail virus scanning.
Chapter 13. ServiceLink With ServiceLink, changes you make in the Hostnames and addresses panel of the server manager will automatically be published to the global Internet. A checkbox is available for each hostname that asks " Publish globally?". If you check that box, the record will be transferred to the NOC and from there published out to the larger Internet.
Chapter 13. ServiceLink From a user perspective, the major difference will be that when you open up (on Windows) your "Network Neighborhood" or "My Network Places", you will now see the servers at the other locations on your VPN. Note that when you establish a VPN using ServiceLink, one SME Server is designated to act as the "primary" server. All user accounts are created on this primary server and users must login with those accounts to access network resources.
Chapter 14. Administration 14.1. Blades Blades are a feature in SME Server V5 with ServiceLink which allow you to easily install or remove software modules via the server manager. Using this feature will allow easy customization of your server. You can choose the options required for your particular needs without having to add unnecessary features. Warning Be aware that the installation of certain blades may void your support agreement.
Chapter 14. Administration When you choose Backup to desktop, a browser window will appear that will allow you to name the file and select the location on your desktop where the file will be saved. 14.2.2. Restore From Desktop If you ever need to restore the original configuration and files to your server, simply select Restore from desktop and a browser window will prompt you to select the backup file from your desktop. Restoration of the information is automatic.
Chapter 14. Administration 14.3. Reinstallation Disk Using this section of the server manager, you can create a reinstallation diskette which will aid in the recovery process in the unlikely event that you encounter a system failure and are required to reinstall the software. The reinstallation diskette will record system and network configuration data for your current system so that you will not need to re-enter that information when you reinstall.
Chapter 14. Administration 14.6. Reboot or Shutdown If you need to shut down or reboot your server, using this screen will ensure that the shutdown sequence occurs gracefully, preserving all configuration and information on your server. There is a similar function in the server console as well. Note that this screen initiates the shutdown or reboot immediately after you click the "Perform" button.
Chapter 15. Miscellaneous 15.1. Online manual This link will take you directly from the server manager to the online user guide available at http://www.e-smith.org/docs/manual/ (http://www.e-smith.org/docs/manual/). Note that you must be connected to the Internet to read the online user guide. 15.2. Create Starter Web Site If you already have a customized web site, you should not use this section, since it will overwrite your index.htm file.
Chapter 16. Information Bays (i-bays) Information bays, or i-bays, are a unique feature built into your SME Server V5 with ServiceLink. i-bays are a powerful, simple, flexible mechanism for creating distinct information-sharing sites. The network administrator can define several characteristics for each new i-bay they create: • write access: the administrator can control access to the i-bay by associating the i-bay with a group.
Chapter 16. Information Bays (i-bays) • html: When an i-bay is accessed using a web browser (via http), the user will enter the html directory and the web browser will automatically open the index file (usually index.html or index.htm) in that i-bay. In other words, it will display the web page associated with that i-bay. This means you can have different web sites running on your server, each associated with a specific i-bay. This can be very powerful and useful, as you will see in the upcoming examples.
Chapter 16. Information Bays (i-bays) You now need to fill out the form providing the information and making the choices described below. Note that the ftp access described below can be overridden by the FTP access limits setting on the Remote access panel of the server manager. If you choose to "Disable public FTP access" there, ftp access for individual i-bays will not be allowed, even though you will appear to be able to enable it from the i-bay configuration screen.
Chapter 16. Information Bays (i-bays) • After an i-bay is modified, all Macintosh users will be disconnected from the i-bay and will need to reconnect. All Macintosh users will receive an alert stating that they will be disconnected in 5 minutes. Outside of those concerns, you can modify the i-bay as often as you wish. If you wish to change the actual name of the i-bay, you will need to remove the i-bay and create it again.
Chapter 16. Information Bays (i-bays) The i-bay is accessed via Windows file sharing, AppleTalk or FTP. To access using file sharing, simply access the server over the network (via Network Neighborhood) and open the appropriate i-bay . You will see the files located in the files directory and can then open them or copy them to your system. Note: This is only true if the i-bay has been set to allow public access via web or anonymous ftp.
Chapter 16. Information Bays (i-bays) In keeping with TPV’s culture, the newsletter is very casual. The company has a high degree of trust in its employees, and, as a result, employees are given full access to the contents of the intranet so anyone on staff can revise it. A more typical company might want the intranet to be created by a particular staff member and "checked in" by the administrator (write access "administrator only"). The intranet is, of course, viewable only from the internal network.
Chapter 16. Information Bays (i-bays) Here’s how the process works: • Each week, Mr. Samson updates his online order sheet to include only produce that will be ripe and ready for the next delivery date. He saves it in ".html" format and e-mails it to The Pagan Vegan’s administrator. • Upon receiving the e-mail, TPV’s administrator saves the file directly into the html directory of the "samfarms" i-bay. • The chef accesses the samfarms i-bay, reviews what produce will be available, and plans menus.
Chapter 16. Information Bays (i-bays) TPV set the i-bay for Administrator-only write access, viewable over the entire Internet, with no password required. A customer accesses the site using the FTP client in their web browser to login as the i-bay user name by entering the URL ftp://menus@ftp.tofu-dog.com. This is what the customer sees: When the cursor is placed over a file name, the full name of the file appears. To download a particular file, the customer simply clicks on the file name.
Chapter 17. User File Storage on the SME Server V5 with ServiceLink When you create a user account on your server, this not only creates an e-mail account but also a file directory for that user. This directory is set aside for files that the user would like to store on the server hard drive. It can only be accessed by the user. To access the directory, the user would naviagate to the server via Windows file sharing or AppleTalk. 17.1.
Chapter 17. User File Storage on the SME Server V5 with ServiceLink Note that for users who are on a Windows network, the user must be logged onto the network with the name and password associated with the server user account. To do so, open the "Start" menu. • Select "Shut down". • Select "Close all programs and log in as a new user". • Enter the username (in our example, above, it would be "khedges") • Enter the current password for that user on the server.
Chapter 17. User File Storage on the SME Server V5 with ServiceLink The "Primary" volume is your default area set up by your server for sharing files and the company web site, while "Home directory" points to the specific user’s own space on the server, viewable only by that user. While other i-bays may appear, you may not be able to use them, as you must be a member of the group owning that i-bay to use it. The highlighted volumes are those you wish to connect to.
Chapter 17.
Chapter 18. Webmail If you wish, you can configure your SME Server V5 with ServiceLink so that users can access their e-mail via a web interface. Once webmail is enabled, users will be able to access their e-mail from the local network or anywhere in the world via the Internet using any standard web browser (provided it supports Javascript and tables, which almost all browsers do). For added security, the server supports the use of Secure Socket Layer (SSL) connections.
Chapter 18. Webmail 18.4. Viewing The Inbox Once logged in, you will see your inbox, as shown in screen below. Let’s take a quick tour of the Inbox window. In the top left corner is a pop-up menu that shows the list of your available mail folders. In your first webmail session, the only folder choice will be INBOX. As soon as you send an e-mail message, a folder called sent-mail will be created and available in the menu. You can also create additional mail folders at any time.
Chapter 18. Webmail At the top of the compose screen, your available options include the ability to spell-check the message in your language of choice, or to cancel, save a draft or send the message. If you choose to save a draft, your message will be saved in a folder called drafts . You may later retrieve this message by using the popup menu in the upper left corner to switch to the "drafts" folder. Below that are the familiar e-mail fields for you to fill out.
Chapter 18. Webmail 18.8. Deleting Messages You can delete a message while reading it, as mentioned previously, or you can delete a message - or a group of messages - from the Inbox view. To do so, check the box next to each message you wish to delete. After that, press the Delete text button directly above or below the list of messages on the left side. You will now see a trash icon next to the checkbox and a line through the messages.
Chapter 18. Webmail In either case, you will find yourself viewing a window that looks like the one below. If this is the first time you have entered the Contacts window, you will not see anything next to the "Select" button. Normally, though, you will see a pop-up menu with all of your contacts in it (as seen in the window above where "bob " appears).
Chapter 18. Webmail 18.10. Changing Webmail Preferences By clicking on the Preferences link on the navigation menu, you can modify preferences for your webmail session, as shown in the screen below. You have four preferences you can configure: • Signature - You may include any text that you wish to appear by default at the bottom of your e-mail messages. Once configured, it will always appear at the bottom of a Compose or Reply window when you enter that window.
Chapter 19. Additional Software In the process of developing the SME Server V5 with ServiceLink, we found it necessary to include some additional open source software. While Mitel Networks Corporation does not provide direct technical support for this additional software, its availability on the server may be of benefit to advanced users.
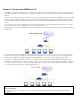
Appendix A. Introduction to the Ethernet Local Area Network (LAN) A local area network (LAN) is the system of wires and other hardware that connects the computers within your office and allows them to communicate with one another. An ethernet LAN is the most common type. Ethernet refers both to a kind of connection and to a protocol for how Internet data packets travel around your network. The hub, a common component of an ethernet, serves as a point of interface between computers on the network.
Appendix B. Dynamic DNS Services Tip: ServiceLink subscribers do not need to worry about a dynamic DNS service as DNS service is provided as part of the base ServiceLink subscription. If your IP address is assigned dynamically, you may find it helpful to use a dynamic DNS service. A dynamic DNS service provides you with an automated way to notify them whenever your IP address changes so that they can immediately publish new DNS records for your domain.
Appendix C. Proxy Servers The server comes with a proxy server called Squid which can proxy the web (HTTP), FTP and Gopher protocols. Proxy servers temporarily store information from the Internet on the hard drive of the server, allowing other users to access it directly from that hard drive. For example, when an employee visits a web page, the web proxy server will store that web page. Subsequent visitors to that web page will read it from your proxy server’s hard drive, rather than over the Internet.
Appendix D. Technical Support If you are a Mitel Networks Corporation subscriber and are having technical difficulty, please contact your local Mitel Networks Corporation authorized reseller for support. If you purchased your subscription directly from Mitel Networks Corporation, please call +1-613-271-7614 (in the United States and Canada, call 1-866-472-9999) and ask for technical support or e-mail us at support@e-smith.com. You can also visit our website http://www.e-smith.com/.