SME Server V5 with ServiceLink User Manual Mitel Networks Corporation
SME Server V5 with ServiceLink: User Manual by Mitel Networks Corporation Published August 2001 Copyright © 2001 by Mitel Networks Corporation Permission is granted to copy, distribute and/or modify this document under the terms of the GNU Free Documentation License, Version 1.
Table of Contents 1. Welcome to your SME Server V5 with ServiceLink .......................................................................................................................6 1.1. About This Guide....................................................................................................................................................................6 1.2. Software Licensing Terms and Conditions ...........................................................................................
8.3. IMAP versus POP3 e-mail....................................................................................................................................................55 8.4. Configuring Your E-mail Application...................................................................................................................................56 8.5. Configuring Your Web Browser..............................................................................................................................
16.1. i-bay Directories..................................................................................................................................................................99 16.2. Accessing the i-bays ...........................................................................................................................................................99 16.3. Creating an i-bay....................................................................................................................
Chapter 1. Welcome to your SME Server V5 with ServiceLink Congratulations on choosing the SME Server V5 with ServiceLink as your communications server! Companies all over the world are using the Internet to communicate more effectively and efficiently to a broader audience. The SME Server V5 with ServiceLink is founded upon state of the art technologies - such as the Linux operating system - which have been mainstays in the infrastructure of larger organizations for several years.
Chapter 1. Welcome to your SME Server V5 with ServiceLink • November 1999 - e-smith server and gateway user’s manual for version 3.1 published in print form by e-smith, inc. Primary author Kim Morrison using StarOffice 5.1. 1.1.3. Endorsements This is the official documentation for SME Server V5 with ServiceLink and is endorsed by Mitel Networks Corporation 1.1.4.
Chapter 1. Welcome to your SME Server V5 with ServiceLink 1.4.1. ServiceLink With the release of SME Server V5 with ServiceLink, Mitel Networks Corporation is also introducing ServiceLink, a suite of network-delivered services that extend the functionality of the server.
Chapter 2. The role of the SME Server V5 Your SME Server V5 with ServiceLink manages your connection to the Internet by routing Internet data packets to and from your network (which allows all the computers on your network to share a single Internet connection) and by providing security for your network, minimizing the risk of intrusions.
Chapter 2. The role of the SME Server V5 More About Ethernets Appendix A: Introduction to the Ethernet Local Area Network (LAN), briefly explains ethernets, ethernet components and typical ethernet configuration.
Chapter 3. ServiceLink With SME Server V5 with ServiceLink, Mitel Networks Corporation has introduced a suite of integrated network services ServiceLink - that extend and enhance the functionality of your server. ServiceLink maximizes the security, performance and reliability of your server through real-time interaction with the Mitel Networks NOC .
Chapter 3. ServiceLink • Guaranteed E-mail This service provides a backup e-mail service if a server becomes unreachable and cannot receive mail. The most common reason for this is a temporary failure of the Internet connection provided by your ISP. With ServiceLink, mail that cannot be delivered to your server will be stored at the NOC. Simultaneously, notifications are sent to your Mitel Authorized Partner, who can investigate the cause of the outage. This service uses what is called an MX secondary.
Chapter 3. ServiceLink the network; it uses that key to encrypt data intended for that server. A private key on the receiving server is then used to decrypt the data. One of the difficulties in setting up a VPN is securely exchanging the keys required to set up the VPN. ServiceLink simplifies and automates this process via a trusted central exchange – the Mitel Networks NOC. In addition, ServiceLink also secures and automates the renewal of encryption keys.
Chapter 4. Your Internet Service Provider (ISP) Your ISP is your connection to the Internet - it routes Internet data packets to and from your server. It also provides other essential services. This section of the user’s guide reviews what ISPs offer and what the implications are in choosing among the various options available to you.
Chapter 4. Your Internet Service Provider (ISP) 4.2.1. Static versus dynamic IP addressing A static IP address never changes. It is permanently assigned to your server by your ISP. Note: Static IP addressing is preferable to dynamic IP addressing because it makes it easier for users on the Internet to connect to your services. Dynamic IP address assignment means that your IP address is assigned to you only temporarily and may be changed by your ISP.
Chapter 4. Your Internet Service Provider (ISP) corporate service that you receive a routable, static IP address. In fact, usually you will be allocated a block of routable, static IP addresses for your corporation - you will need only one for your server. Information provided to you by your ISP: • static IP address (or block of addresses from which you choose one) • IP address of router ("gateway IP address") • subnet mask Order services from: Service List A 4.3.2.
Chapter 4. Your Internet Service Provider (ISP) Note: In the tables below, please keep the following information in mind: 1. ISPs often supply the items marked * to your server by DHCP. 2. Some ISPs block outgoing HTTP connections, forcing you to use their proxy server. This interferes in a few minor ways with your server (e.g., the test for Internet connectivity will fail erroneously). However, using the ISP’s proxy server will normally work fine. 1.
Chapter 4. Your Internet Service Provider (ISP) • DNS service account name • DNS service password Order services from: Service List B 3. You receive a routable, dynamically assigned IP address and you elect not to use a dynamic DNS service OR your IP address is non-routable. Information provided to you by your ISP: • IP address of cablemodem or ADSL router ("gateway IP address")* • subnet mask* Order services from: Service List D 4.3.3.
Chapter 4. Your Internet Service Provider (ISP) • your ISP is able to accept the "ETRN command". (This command is used by the server to retrieve the mail held by the ISP’s secondary mail server.) Information provided to you by your ISP: • static IP address • dialup access number • dialup account name • dialup account password Order services from: Service List C 2.
Chapter 4. Your Internet Service Provider (ISP) 4.4.2. Service List B Services to order from ISP: • secondary mail server (optional) • Internet news server (optional) Services From Dynamic DNS Service • domain name (depending on the service purchased, your dynamic DNS service may restrict what your domain name can be) • publication of DNS address records for your web server, FTP server and e-mail server • publication of DNS mail (MX) records 4.4.3.
Chapter 4. Your Internet Service Provider (ISP) Some Important Notes on Service List D (Multidrop Mail) Service list D is applied to configurations where the publication of DNS records is not practical either because your IP address changes frequently or because it is non-routable. Because there is no published address receiving incoming network connections, this configuration does not allow you to host a web page or FTP site using your SME Server V5 with ServiceLink.
Chapter 4. Your Internet Service Provider (ISP) DNS: Publication of DNS Mail (MX) Records The publication of DNS mail (MX) records is the method used to inform Domain Name Services worldwide that all e-mail to your domain ("yourdomain.xxx") should be delivered to your e-mail server ("mail.yourdomain.xxx").
Chapter 5. Hardware Requirements of the SME Server V5 with ServiceLink Host Computer The hardware requirements of the SME Server V5 with ServiceLink are modest compared with other server software available today. However, because of its critical role in your office, selecting an appropriate host computer is important.
Chapter 5. Hardware Requirements of the SME Server V5 with ServiceLink Host Computer Table 5-2. Hardware Requirements for a Category 1 Server Architecture PCI-based Pentium-class processor Processor speed 90 MHz (or better) Minimum RAM 32 MB (64 MB recommended) Hard drive IDE or SCSI - at least 1 GB SCSI adapter SCSI adapter must appear on the supported list (only necessary for SCSI systems) Ethernet adapters The ethernet adapters installed on your server must appear on the supported list.
Chapter 5. Hardware Requirements of the SME Server V5 with ServiceLink Host Computer CD-ROM drive ATAPI or SCSI Floppy drive any Monitor any Graphics card any Mouse none required Sound card none required 5.3. Hardware Requirements for a Category 3 Server Table 5-5. Definition of a Category 3 Server # of Users Up to 40 Usage Heavy (heavy use of remote access, file sharing and other disk-intensive activity) Table 5-6.
Chapter 5. Hardware Requirements of the SME Server V5 with ServiceLink Host Computer 5.4. Hardware Requirements for a Category 4 Server Table 5-7. Definition of a Category 4 Server # of Users Up to 500 Usage Heavy Table 5-8.
Chapter 5. Hardware Requirements of the SME Server V5 with ServiceLink Host Computer If you need more information about how to install an Ethernet adapter, please visit our HOWTO document on "Installing an Ethernet Adapter in 11 Steps" found online at http://www.e-smith.org/docs/howto/nicinstall-howto.html Be aware that your Mitel Networks Corporation service representative may not be able to support you if choose to use an adapter that is not on our supported hardware list.
Chapter 5.
Chapter 5. Hardware Requirements of the SME Server V5 with ServiceLink Host Computer • Winbond 89C940 5.6. Supported SCSI Adapters If the computer you plan to use for your server has a SCSI hard disk, your SCSI adapter must be supported by Red Hat Linux 7.1. PLEASE NOTE: Only PCI SCSI adapters are supported by the SME Server V5 with ServiceLink. Furthermore, they must contain a SCSI BIOS so that the PC can boot from the SCSI disk.
Chapter 5. Hardware Requirements of the SME Server V5 with ServiceLink Host Computer • Initio Corp INI-940, INI-950, INI-9100/9100W, 360P • Intel 80960RP • Mylex (BusLogic) FlashPoint Series, MultMaster 01/10 • Symbios 53c1510, 53c8xx • Q Logic QLA10160, 1080, 1240, 1280, 2100, 2200 12160 5.7. Supported Tape Drives If you intend to use the tape backup capabilities of the SME Server V5 with ServiceLink, you must have a tape drive that will work with a Linux system.
Chapter 5.
Chapter 6. Installing And Configuring Your SME Server V5 with ServiceLink Software 6.1. Licensing Terms and Conditions In installing the SME Server V5 with ServiceLink software, you are agreeing to the open source licensing terms and conditions associated with it. You can read these terms and conditions in the introduction to this manual under the title Software Licensing Terms and Conditions.
Chapter 6. Installing And Configuring Your SME Server V5 with ServiceLink Software Level 5 (disk striping with parity) because of the poor performance and reliability of software implementations of RAID5. If you are seeking RAID5 support, Mitel Networks Corporation recommends you consider one of the many hardware implementations which will provide both protection and performance. 6.2.2.
Chapter 6. Installing And Configuring Your SME Server V5 with ServiceLink Software 6.4. Installing the Software Note: If you are configuring your system with RAID1 support, notice that your step 4 below will be slightly different. If you skipped the previous section on RAID, it would be advisable to read it before proceeding. Step 1: Insert the CD-ROM. If your computer is an older model that is unable to boot from CD-ROM, you will also need to insert the boot floppy.
Chapter 6. Installing And Configuring Your SME Server V5 with ServiceLink Software • operation mode - you must select whether your server will operate in server and gateway mode or server-only mode. • configuration for the external network/Internet - you must configure your server so that it can communicate with your ISP either by a dedicated connection or using a dialup connection (only for server and gateway mode).
Chapter 6. Installing And Configuring Your SME Server V5 with ServiceLink Software 6.7. Configuring Your System Name and Domain Name As shown below, your next step is to enter the primary domain name that will be associated with your SME Server V5 with ServiceLink. (You can later configure other virtual domains that work with the server.) Next you need to provide a name for your server. You should think carefully about this as changing it later may create additional work.
Chapter 6. Installing And Configuring Your SME Server V5 with ServiceLink Software A computer needs a special software program, called an "ethernet driver", to use an ethernet adapter. Which ethernet driver is required depends on which ethernet adapter is installed on your computer.
Chapter 6. Installing And Configuring Your SME Server V5 with ServiceLink Software If you have no reason to prefer one set of IP addresses over another for your local network, your server will prompt you with default parameters that are probably appropriate in your situation. Tip: If you are installing servers at multiple sites within your organization, you may find it useful for later troubleshooting to use different network addresses for each site.
Chapter 6. Installing And Configuring Your SME Server V5 with ServiceLink Software 6.9.1. Option 1: Server and gateway mode In server and gateway mode, your server provides services (such as e-mail, web services, file and print sharing) to your network and also acts as a gateway between your internal network and the outside world. The fact that it serves as a "gateway" means it has separate interfaces with each network, and provides security and routing.
Chapter 6. Installing And Configuring Your SME Server V5 with ServiceLink Software 6.9.3. Option 3: Server-only mode Server-only mode is appropriate if you do not wish to use the gateway capabilities of your server. In this configuration, your server connects only to the local network and does not connect directly to the outside world (although it may connect indirectly through your firewall or another server).
Chapter 6. Installing And Configuring Your SME Server V5 with ServiceLink Software The next step after selecting a connection type is to enter the specific parameters representing that connection. 6.11. Server and Gateway Mode - Dedicated How you configure your server’s external interface depends on whether you are using a dedicated connection or a dialup connection.
Chapter 6. Installing And Configuring Your SME Server V5 with ServiceLink Software 6.11.2. Assigning Your Ethernet Adapters to Network Connection To communicate successfully, your server needs to know which ethernet adapter connects it to the internal network and which adapter connects it to the external network/Internet.
Chapter 6. Installing And Configuring Your SME Server V5 with ServiceLink Software Your server must know three additional things to communicate on the Internet: • its own unique IP address so that Internet data packets can reach it. • a subnet mask (also called a netmask) which looks like an IP address and allows other computers to infer your network address from your IP address. • the IP address of the external gateway for your server.
Chapter 6. Installing And Configuring Your SME Server V5 with ServiceLink Software If you have a static IP address and your ISP does not offer DHCP or PPPoE, then your ISP will give you the static IP address, subnet mask (or netmask), and the gateway IP address of the device that your server should connect to in order to communicate with the Internet. Assuming you have this information on hand, you can go ahead and select Option 4. Successive screens will prompt you to enter each parameter. 6.11.4.
Chapter 6. Installing And Configuring Your SME Server V5 with ServiceLink Software • modem initialization screen - most users can simply leave this blank, but with some particular modems, additional information may need to be entered here • the dialup access phone number • username • password • connection policy This last item may be of special interest. As shown in the screen below, you can configure what type of policy you wish to have in place during typical work hours.
Chapter 6. Installing And Configuring Your SME Server V5 with ServiceLink Software There are two separate timeout values configured by each choice. One value is the length of time since the last HTTP (web) packet went through the server. The other is a more general timeout for any other types of packets.
Chapter 6. Installing And Configuring Your SME Server V5 with ServiceLink Software If you have fewer than 180 machines on your local network and no reason to prefer one range of IP addresses over another, you can simply accept the defaults for these screens. If the defaults are not appropriate to your situation, you may need a bit of background to understand how to configure this range. For example, if you entered the server address of 192.168.1.1 and subnet mask of 255.255.255.
Chapter 6. Installing And Configuring Your SME Server V5 with ServiceLink Software assigned the IP address of "192.168.1.1" then the lowest possible number in the DHCP range should be "2". We recommend that you leave a small pool of IP addresses that can be manually assigned: Some of the computers (or devices such as network printers) on your network may not be able to accept DHCP service.
Chapter 6. Installing And Configuring Your SME Server V5 with ServiceLink Software Contact e-mail address: Finally, you will have the option of providing a contact e-mail address and name. If you would like to be notified of security updates or new versions of software, we strongly encourage you to provide at least your e-mail address. As the screen indicates, we will only send you notices of updates and no other information. Your contact information will not be shared.
Chapter 7. The Server Console When installation is complete and if you set server console mode to "auto", the opening screen of the SME Server V5 with ServiceLink server console will appear: If you set the server console mode to "login", you will be given a login prompt. After you enter the user name "admin" and your system password, you will see the server console screen above. Note: Any time that you login to your system as the "admin" user you will see the server console.
Chapter 7. The Server Console 7.1. Using the Text-based Browser For Option 6, Access server manager with text-mode browser, the server uses a text-based browser called lynx to allow you to access the web-based server manager from the server console. Navigation is primarily with the arrow keys - up and down to move through the page, right arrow to follow a link, left arrow to go back. Lynx has a wide range of other commands which you can learn about through the online help available at http://www.lynx.
Chapter 8. Configuring the Computers on Your Network 8.1. What Order to do Things For efficiency, we recommend you configure your desktop computers in the following order: Step 1: First, configure one of your desktop computers to work with TCP/IP (using the information in this chapter). Step 2: With TCP/IP up and running on one of your computers, you can now access the server manager over the web and create your employees’ user accounts.
Chapter 8. Configuring the Computers on Your Network Item Description What to enter enable DHCP service See section below In Windows, enable "Obtain an IP address service automatically". In Apple, select "DHCP server". Note: We strongly recommend that you configure all clients machines using DHCP rather than manually using static IP addresses.
Chapter 8. Configuring the Computers on Your Network Only One DHCP Server It is imperative that no other DHCP server is on your network. If a former DHCP server configured your computers, you should remove that DHCP server from your network. Leave DHCP enabled, and reboot each computer. New IP addresses, netmasks, gateway IP addresses and DNS addresses will be assigned automatically by the server DHCP server. 8.2.2.
Chapter 8. Configuring the Computers on Your Network After configuring the TCP/IP parameters, you may need to reboot your desktop computer to implement the configuration changes. (For example, most Windows systems need to be rebooted after the TCP/IP configuration has been changed.) Once the settings take effect, your computer will be connected to the server and to the Internet. 8.2.3.
Chapter 8. Configuring the Computers on Your Network Benefits of POP3 Drawbacks of POP3 Even when you are not connected to your network, you have access to the e-mail stored on your desktop. POP3 was not originally intended to support users accessing and managing their e-mail from remote systems. Because your e-mail is stored on your desktop, setting up remote access of your e-mail when you are at a different computer can be complex.
Chapter 8. Configuring the Computers on Your Network dedicated to the incoming e-mail server. Disable POP3 protocol: To disable the POP3 protocol for outgoing mail, click the POP3 checkbox "off". The images below show you the sequence in Netscape. First you choose Preferences from the Edit menu and click on Mail Servers as shown in: If you have not configured a mail server yet, you will need to press the Add... button and enter information about your server.
Chapter 8. Configuring the Computers on Your Network explores this issue). If you decided that you do want to use proxy servers 1, you will need to enter the IP address or domain name of the proxy server (i.e. your server) into the configuration screens of your web browser. The port number you will need to enter to connect to the e-smith proxy server is 3128. This information is the same for HTTP, Gopher and FTP proxying. The image below shows how a proxy server would be configured in Netscape Navigator.
Chapter 8. Configuring the Computers on Your Network You will need to enter the following information: • Enter the name you wish to give your company directory - any name will do. • The LDAP server is the name of your web server, in the form www.yourdomain.xxx. • The Server Root information can be found on the "Directory" screen in your server manager (more information on this is available in the next chapter). The usual form, assuming your domain is yourdomain.xxx, is dc=yourdomain,dc=xxx.
Chapter 9. On-going Administration Using the server manager The server manager is a simple control panel that allows you to administer your network. Using the server manager, you perform such tasks as adding or deleting e-mail addresses, setting the system date and time, and creating a starter web page. The server manager is accessed through a web browser by visiting the URL http://www.yourdomain.xxx/server-manager or more simply http://www/server-manager.
Chapter 9. On-going Administration Using the server manager In the next four chapters, we’ll explain each of the administrative functions in the order in which they appear in the frame running down the left side of the screen. The links are grouped together under four headings: Security, Configuration, Collaboration and Miscellaneous. Note: As even one further layer of security, you can also connect to the server manager using the secure HTTPS protocol .
Chapter 10. Security 10.1. Password This screen lets you change your system password at any time. To do so, type the new password in the first field. Verify the new password by entering it in the second field. (Your password can be any combination of printable characters, including upper- and lower-case letters, numbers, and punctuation marks.) If you make a mistake, click the "Back" button on your browser and try again.
Chapter 10. Security Each of these remote access methods is described below. 10.2.1. ssh If you need to connect directly to your server and login from a remote system belonging to you, we strongly encourage you to use ssh instead of telnet. In addition to UNIX and Linux systems, ssh client software is now also available for Windows and Macintosh systems. (See the section below.) If you do not have any reason to allow remote access, we suggest you set this to No access.
Chapter 10. Security ssh (secure shell) ssh (secure shell) provides a secure, encrypted way to login to a remote machine across a network or to copy files from a local machine to a server. Many people do not realize that many programs such as telnet and ftp transmit your password in plain, unencrypted text across your network or the Internet. ssh and its companion program scp provide a secure way to login or copy files.
Chapter 10. Security 10.2.2. PPTP The Point-to-Point Tunnelling Protocol (PPTP) is used to create client-to-server Virtual Private Networks (VPNs) and was developed by the PPTP Forum, an industry group which included Microsoft and several other companies. A VPN is a private network of computers that uses the public Internet to connect some nodes. PPTP allows users to connect to their corporate networks across the Internet.
Chapter 10. Security 10.2.3. FTP Another way to upload or download files to and from your server is to enable a protocol called FTP, or "file transfer protocol". This screen enables you to set your policy for FTP. Note that allowing liberal FTP access to your server does reduce your security. You have two options that you can set here. FTP user account access: Private FTP access allows only people on your internal network to write files to your server.
Chapter 10. Security If your company only has one network that is being serviced by the server, you do not need to add any information here. Some advanced users may wish to extend privileges to more than one network of computers. If you would like your server to identify one or more additional networks for those privileges, you will be asked to enter those network IDs and the subnet mask for each network here.
Chapter 11. Configuration 11.1. Set date and time Accessing this section allows you to set the system date and time either manually or using a network time server. Pull-down menus for month and time zone ensure accurate entry. The server manager will reset the time automatically during daylight savings time. There are worldwide time zones with multiple selections for countries with multiple time zones. (including standard time zones, states/provinces and even cities).
Chapter 11. Configuration Warning After you start using a network time server, you should NOT set the time or date manually. If you do so, the network time synchronization will no longer function. This screen in the server manager allows you to configure your server to connect regularly to a time server and synchronize the clock on the server with the time provided by the time server.
Chapter 11. Configuration Warning If you have a Windows NT server or Windows 2000 server on your network that is functioning as a network server, you should most likely answer "no" because that other server will act as the domain master. If you do configure your system to be the domain master, a special Windows share called NETLOGON is created with a DOS batch file called netlogon.bat. This batch file is executed by Windows clients that have been configured to "Logon to domain". The netlogon.
Chapter 11. Configuration In this section of the server manager, you specify the default directory information for new accounts - the user’s department, company, street address, city and phone number. Each time you create an e-mail account, the fields will contain the information entered here as the default. If you wish, you can change the information for each user.
Chapter 11. Configuration The next two fields can be left blank if your printer is on a local port. If it’s a network printer, you will likely already have assigned it an IP address. Enter that information where requested. The next field asks for your network printer name. Use the default setting, "Raw", if you have no specific reason to do otherwise. ("Raw" is the name used by most network printers for their main print queues.
Chapter 11. Configuration 11.5. Hostnames and addresses When you installed your SME Server V5 with ServiceLink, you were asked to provide a name for your system. That name and several other "standard" names are automatically configured in your system’s host table during the installation process. This host table is consulted as part of the name resolution process.
Chapter 11. Configuration You would first change the location to "Remote" and then enter the IP address of your ISP’s server in the field marked "Global IP". 11.5.1. Creating New Hostnames Creating new hostnames simply involves selecting one of the links at the top of the Hostnames and addresses panel and filling out the appropriate fields.
Chapter 11. Configuration Remote hosts: As mentioned in the example earlier, you might want to point a hostname such as "www" to a remote system. While "www" is created by default, you can create other names such as "home", "research", or any other appropriate name. In the form, you simply enter the hostname, choose the domain, and enter the remote IP address. Local hosts: This screen is a bit more complicated because you have more options.
Chapter 11. Configuration Your choice of e-mail retrieval mode will depend on the arrangements you made with your Internet service provider: • If you have a dedicated connection, set E-mail retrieval mode to "Standard". • If you arranged "ETRN" support with your ISP, choose that setting and then scroll down to the field that asks for the IP address or hostname of your ISP’s secondary mail server.
Chapter 11. Configuration every 15 minutes during standard office hours and every hour outside normal office hours on weekdays or on weekends. The fields allow you to customize those settings. Finally, if you have "multidrop" mail service you need to select the sort method used by the server to decide which user each message should be delivered to.
Chapter 11. Configuration • Internet provider’s SMTP server: Normally the server will send outgoing messages directly to their intended destination. If, however, you have an unreliable connection or are using a residential Internet service, it may be advisable to route e-mail via your provider’s SMTP server. In that case, you should enter the SMTP server’s hostname or IP address here.
Chapter 11.
Chapter 12. Collaboration 12.1. User Accounts User accounts should be set up for each person in your organization. A user account includes separate, password-protected e-mail and file storage areas. If this is the first time you are setting up user accounts for your organization, you will need to establish what your naming convention will be. Let’s assume you’ve decided that the account name should consist of first initial and last name.
Chapter 12. Collaboration 12.1.1. Disabling User Accounts There may be times when you do not wish to delete a user account but instead merely want to disable it. For instance, when an employee leaves the company, you may want to immediately remove their access to the server, but still keep their files or e-mail address active until the information can be examined. To disable any user account on your server, just click on the Lock Account link on the User Accounts web panel.
Chapter 12. Collaboration Warning When you create a group, you are required to assign at least one user to that group. If you fail to do so, the group will not be created and you will receive an error message. After you add (or remove) a user account from a group, the user must log out and log back in for those changes to take effect. Until the user does so, he or she will still have their old group membership information.
Chapter 12. Collaboration As noted on the screen below, there are some restrictions on the text content of the names. Pseudonyms can be linked to existing user or group accounts. In the example shown, a pseudonym for webmaster is being set to point to ffrog. 12.4. Information Bays The i-bay (information bay) feature of the SME Server V5 with ServiceLink is a simple, very flexible and powerful way for you to share information with others.
Chapter 12. Collaboration 12.5. Virtual Domains When you are supporting multiple domains on a single server, each domain being served is referred to as a virtual domain. (The strict definition of virtual domain is when a single IP address is shared between multiple domains.) When you create a virtual domain using this section of the server manager, your SME Server V5 with ServiceLink will be able to receive e-mail for that domain and will be able to host a web site for that domain.
Chapter 13. ServiceLink Until you sign up for ServiceLink and your server is registered, all of the panels in this section of the server manager will not be functional. In order to subscribe to ServiceLink, visit http://www.e-smith.com/servicelink/ and find a partner near you. The Mitel Networks Corporation partner will interact with the Mitel Networks NOC (Network Operations Center) to obtain a Service Account ID for your server.
Chapter 13. ServiceLink As the image shows, if there is an issue with any of your services, it will appear in red italics and you can follow a link to determine the problem. Note also that the expiration of your ServiceLink subscription appears. 13.2. Virus Protection As soon as you are subscribed to ServiceLink and the Virus Protection service is enabled, all of your inbound and outbound mail messages will be scanned for viruses.
Chapter 13. ServiceLink To view the quarantined messages, we recommend you login to webmail as the "admin" user. You will be then able to view the messages without any code being executed. (Do not open the attachments as doing so can infect your system.) Note: Administrators with Linux experience can also use ssh to the server and login as the "root" user to use the command-line mail programs mutt or pine to view the messages.
Chapter 13. ServiceLink The top part of the panel allows you to configure a service domain that is available to you after ServiceLink activation. This domain takes the form of yourdomain.e-smith.net and allows you to immediately start receiving e-mail and connecting to your server using that domain. If you wish to change the service domain name, you can do so using this panel by entering your new name and clicking the Update button.
Chapter 13. ServiceLink From a user perspective, the major difference will be that when you open up (on Windows) your "Network Neighborhood" or "My Network Places", you will now see the servers at the other locations on your VPN. Note that when you establish a VPN using ServiceLink, one SME Server is designated to act as the "primary" server. All user accounts are created on this primary server and users must login with those accounts to access network resources.
Chapter 14. Administration 14.1. Blades Blades are a new feature in SME Server V5 with ServiceLink which allow you to easily install or remove software modules via the server manager. Using this feature will allow easy customization of your server. You can choose the options required for your particular needs without having to add unnecessary features. If you have not registered for ServiceLink, you will see a list of default blades that are available to be installed.
Chapter 14. Administration the web panel shown below. You have four actions you can perform, each of which is described in the following sections. 14.2.1. Backup To Desktop The first type of backup allows you to save a snapshot of your server configuration onto your desktop computer. This will save all user accounts, user directories, i-bay contents and web content, as well as the configuration parameters entered using the server console and the server manager.
Chapter 14. Administration 14.2.3. Verify Desktop Backup File This option allows you to verify that the backup to disk was completed successfully. In rare cases we have found that users ran out of disk space on their client PC while doing the backup to desktop. This options allows you to verify whether or not the backup did in fact complete successfully. 14.2.4.
Chapter 14. Administration Warning Note that this restore procedure only restores user data and configuration information. It does not restore system files. If you experienced a serious system crash, you should first re-install the SME Server V5 with ServiceLink software and then perform a restore from tape. 1 14.3.
Chapter 14. Administration Note that this reinstallation disk serves a different purpose than the "emergency boot disk" you created as part of the original software installation process. The emergency boot disk allows you to boot your server if you are unable to boot from the hard disk for some reason. For instance, this could occur due to a hardware error or through a mis-configuration of the LILO boot loader during an advanced customization procedure.
Chapter 14. Administration 14.5. View Log Files This panel allows you to view the system log files on you server. As shown in the image below, you select the log file that you want to view and press the "View Log File" button. Without any filter options, you will see the entire log file. You will probably find the log file of most interest to be messages where most of the system services write log messages.
Chapter 15. Miscellaneous 15.1. Online manual This link will take you directly from the server manager to the online manual available at http://www.e-smith.org/docs/manual/. Note that you must be connected to the Internet to read the online manual. 15.2. Create Starter Web Site If you already have a customized web site, you should not use this section, since it will overwrite your index.htm file.
Chapter 15. Miscellaneous 15.3. Support and Licensing This section allows you to review the support and licensing terms attached to your SME Server V5 with ServiceLink. It also provides contact information for Mitel Networks Corporation and our Authorized Partners. 15.4.
Chapter 16. Information Bays (i-bays) Information bays, or i-bays, are a unique feature built into your SME Server V5 with ServiceLink. i-bays are a powerful, simple, flexible mechanism for creating distinct information-sharing sites. The network administrator can define several characteristics for each new i-bay they create: • write access: the administrator can control access to the i-bay by associating the i-bay with a group.
Chapter 16. Information Bays (i-bays) 16.1. i-bay Directories Each i-bay has three directories - html, files and cgi-bin. (The cgi-bin directory is set aside to hold cgi scripts used for that i-bay’s web page. CGI scripts are tools used in advanced web-site creation and do not need to be discussed here.) • the files directory: This directory holds files that can be accessed either locally only or publicly.
Chapter 16. Information Bays (i-bays) • accessing an i-bay via Windows file sharing and AppleTalk: To access the i-bay using Windows file sharing or AppleTalk, simply navigate to the server over your network browser (in Windows, this would be via "Network Neighborhood") and select the i-bay you want to enter from those appearing. You can only access an i-bay in this way if you are on the local network.
Chapter 16. Information Bays (i-bays) • Brief description: This text will appear in various administrative screens and can be a useful reminder of the i-bay content. • Group: Ownership of the i-bay content is assigned to an existing group. The group ownership plays a role in the next setting for user access. • User access: You need to decide who will be able to add and modify content in the i-bay and who will be able to read the content.
Chapter 16. Information Bays (i-bays) TPV has chosen a naming convention for i-bays that customers can easily remember - first initial, last name. Because it contains important customer information, only the site administrator can save files into this i-bay. To prevent others from accessing the customer’s i-bay, a password is required to enter the site. (TPV created individual passwords and securely provided them to their customers.) Miles Gabriel has contacted The Pagan Vegan to cater an art exposition.
Chapter 16. Information Bays (i-bays) example, at midnight tonight he can access his i-bay to show his spouse the design used for his invitations! 16.5. An i-bay Used as a Shared Network Drive Having a shared network drive can be very helpful as a way of storing and sharing documents company-wide. TPV uses an i-bay for a company-wide network drive to hold documents to which all employees should have access. All employees can read and write files to this directory.
Chapter 16. Information Bays (i-bays) As you can see in this example, The Pagan Vegan has several files in this directory for company use. Providing a centralized location for company documents (such as expense report templates) ensures that everyone always has access to these documents and uses the most up-to-date version. 16.6. An i-bay Used as an Intranet: The Pagan Vegan "Vegemite" The Pagan Vegan has created an i-bay for its company newsletter / intranet.
Chapter 16. Information Bays (i-bays) want the intranet to be created by a particular staff member and "checked in" by the administrator (write access "administrator only"). The intranet is, of course, viewable only from the internal network. No password is required. To access the intranet, TPV employees use their web browsers to access the URL www.tofu-dog.com/intranet. This particular newsletter was created using a desktop office application called StarOffice (similar to Microsoft Office).
Chapter 16. Information Bays (i-bays) Here’s how the process works: • Each week, Mr. Samson updates his online order sheet to include only produce that will be ripe and ready for the next delivery date. He saves it in ".html" format and e-mails it to The Pagan Vegan’s administrator. • Upon receiving the e-mail, TPV’s administrator saves the file directly into the html directory of the "samfarms" i-bay. • The chef accesses the samfarms i-bay, reviews what produce will be available, and plans menus.
Chapter 16. Information Bays (i-bays) • On the day of delivery, Samson’s shipping staff accesses the i-bay over the Internet, prints out TPV’s order from the samfarms i-bay, and fills it. 16.8. An i-bay Used as Your Customer Download Site When customers hire The Pagan Vegan to plan events, they need to review a great deal of information - menu options, catalogues from various vendors for event stationary, table-setting rentals, etc. Often customers want several days to review it all.
Chapter 16. Information Bays (i-bays) TPV set the i-bay for Administrator-only write access, viewable over the entire Internet, with no password required. A customer accesses the site using the FTP client in their web browser to login as the i-bay user name by entering the URL ftp://menus@ftp.tofu-dog.com. This is what the customer sees: When the cursor is placed over a file name, the full name of the file appears. To download a particular file, the customer simply clicks on the file name.
Chapter 17. User File Storage on the SME Server V5 with ServiceLink When you create a user account on your server, this not only creates an e-mail account but also a file directory for that user. This directory is set aside for files that the user would like to store on the server hard drive. It can only be accessed by the user. To access the directory, the user would naviagate to the server via Windows file sharing or AppleTalk. 17.1.
Chapter 17. User File Storage on the SME Server V5 with ServiceLink Note that for users who are on a Windows network, the user must be logged onto the network with the name and password associated with the server user account. To do so, open the "Start" menu. • Select "Shut down". • Select "Close all programs and log in as a new user". • Enter the username (in our example, above, it would be "khedges") • Enter the current password for that user on the server.
Chapter 17. User File Storage on the SME Server V5 with ServiceLink Note: AppleTalk will work without TCP/IP, but will be slower than AppleTalk over TCP/IP. The next step is to choose a server to connect to via AppleTalk. Click on the Chooser icon in your Apple Menu to bring up a list of file servers to connect to. Double clicking on the server will bring up a list of all the volumes available for you to connect to, whether or not you have sufficient priveleges to use them.
Chapter 17. User File Storage on the SME Server V5 with ServiceLink Use your server user name and password to connect. This screen will pop up only once, as the information typed in will be used for every subsequent login. This includes clicking on the Chooser, your server, and then other volumes to mount them as well. Your desktop should now have icons for each successful volume, such as the icons below: MacOS 8.5 or above MacOS 7.5 to 8.
Chapter 18. Webmail If you wish, you can configure your SME Server V5 with ServiceLink so that users can access their e-mail via a web interface. Once webmail is enabled, users will be able to access their e-mail from the local network or anywhere in the world via the Internet using any standard web browser (provided it supports Javascript and tables, which almost all browsers do). For added security, the server supports the use of Secure Socket Layer (SSL) connections.
Chapter 18. Webmail 18.2. Starting Webmail To use webmail, a user first needs a valid user account and password on your server. Next, the user opens up a web browser and points it to your server using an address resembling the following URL: https://www.tofu-dog.com/webmail/ The https in the URL indicates this connection uses SSL encryption and provides a secure communication session. Note: The exact address used in the URL will depend on how you have configured your server. In the example above, www.
Chapter 18. Webmail Let’s take a quick tour of the Inbox window. In the top left corner is a pop-up menu that shows the list of your available mail folders. In your first webmail session, the only folder choice will be INBOX. As soon as you send an e-mail message, a folder called sent-mail will be created and available in the menu. You can also create additional mail folders at any time.
Chapter 18. Webmail 18.6. Composing Messages To compose a new message, click on Compose in the menu on the left. You should see a screen similar to that below. At the top of the compose screen, your available options include the ability to spell-check the message in your language of choice, or to cancel, save a draft or send the message. If you choose to save a draft, your message will be saved in a folder called drafts .
Chapter 18. Webmail • Reply only to the sender. • Reply to all of the original recipients. • Forward the message to someone else. • Bounce the message to another person (similar to "Forward" but without providing you the opportunity to comment). 1 • Save As - save the message to a text file. By clicking on the Reply button, you will be able to enter a reply window such as that shown below. Notice that the original message text is "quoted" with a " " character in front of it.
Chapter 18. Webmail To do so, check the box next to each message you wish to delete. After that, press the Delete text button directly above or below the list of messages on the left side. You will now see a trash icon next to the checkbox and a line through the messages. As an example, in the image above, our user (ffrog) wants to delete the second and third messages. He can click on the checkbox next to each message and then click Delete. This will produce a screen such as that below.
Chapter 18. Webmail In either case, you will find yourself viewing a window that looks like the one below. If this is the first time you have entered the Contacts window, you will not see anything next to the "Select" button. Normally, though, you will see a pop-up menu with all of your contacts in it (as seen in the window above where "bob bbass@e-smith.com " appears).
Chapter 18. Webmail compare the text against the directory. The default is to search for entries where the name is the text you enter, which requires an exact match. You may find it more useful to search for entries where the name contains the search text. A search with "contains" will find names where the search text appears somewhere in the name. After entering your text and choosing your search options, press the Start Search button to query the directory.
Chapter 18. Webmail You have four preferences you can configure: • Signature - You may include any text that you wish to appear by default at the bottom of your e-mail messages. Once configured, it will always appear at the bottom of a Compose or Reply window when you enter that window. You can, however, delete it for a specific message simply by editing the text in the Compose or Reply text window.
Chapter 19. Additional Software In the process of developing the SME Server V5 with ServiceLink, we found it necessary to include some additional open source software. While Mitel Networks Corporation does not provide direct technical support for this additional software, its availability on the server may be of benefit to advanced users.
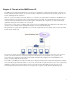
Appendix A. Introduction to the Ethernet Local Area Network (LAN) A local area network (LAN) is the system of wires and other hardware that connects the computers within your office and allows them to communicate with one another. An ethernet LAN is the most common type. Ethernet refers both to a kind of connection and to a protocol for how Internet data packets travel around your network. The hub, a common component of an ethernet, serves as a point of interface between computers on the network.
Appendix B. Dynamic DNS Services If your IP address is assigned dynamically, you may find it helpful to use a dynamic DNS service. A dynamic DNS service provides you with an automated way to notify them whenever your IP address changes so that they can immediately publish new DNS records for your domain. Without dynamic DNS, you would have to contact your ISP to have them change your DNS records, and your web site and other services would be unavailable for several days until the change was processed.
Appendix C. Proxy Servers The server comes with a proxy server called Squid which can proxy the web (HTTP), FTP and Gopher protocols. Proxy servers temporarily store information from the Internet on the hard drive of the server, allowing other users to access it directly from that hard drive. For example, when an employee visits a web page, the web proxy server will store that web page. Subsequent visitors to that web page will read it from your proxy server’s hard drive, rather than over the Internet.
Appendix D. Technical Support If you are a Mitel Networks Corporation subscriber and are having technical difficulty, please contact your local Mitel Networks Corporation Authorized Partner for support. If you purchased your subscription directly from Mitel Networks Corporation, please call +1-613-592-2122 (in the United States and Canada, call +1-866-472-9999) and ask for technical support or e-mail us at support@e-smith.com. You can also visit our website http://www.e-smith.com/.
Appendix E. ServiceLink End User License Agreement The following are the terms and conditions for use of the March Networks ServiceLink services including associated software products (collectively referred to as the "ServiceLink Services"), from Mitel Networks. Please read them carefully. BY CHECKING THE "I ACCEPT" BOX, YOU ARE STATING THAT YOU AGREE TO BE BOUND BY ALL TERMS AND CONDITIONS OF THIS AGREEMENT.
Appendix E. ServiceLink End User License Agreement Authorized Integrator without your prior consent (except as required by subpoena, search warrant or other legal process or as a result of the assignment or transfer of this Agreement by Mitel Networks). 8. LIMITATION OF LIABILITY - Mitel Networks and/or its respective suppliers may make improvements and/or changes in the ServiceLink Services at any time without obligation to notify any person or entity of such changes.
Appendix E. ServiceLink End User License Agreement Services shall remain with Mitel Networks, or its suppliers and licensors. You will not infringe, and will take appropriate steps for the protection of such rights. You will not remove, obscure or alter any notice of patent, copyright, mask work, trademark, trade secret or other proprietary rights relating to or appearing anywhere on any of the ServiceLink Software, documentation or associated with the ServiceLink Services. 13.
Appendix E. ServiceLink End User License Agreement that is downloaded to enable the subscription and use of the ServiceLink Service; and any and all copies, modifications, upgrades, enhancements and new releases thereof made or acquired by you. "Subscription Period" begins on the initial date that you connect to the ServiceLink Service and ends on the last date of service as elected by you in the ServiceLink registration form completed with your Authorized Integrator, including any renewals thereof.
Appendix F. GNU General Public License TERMS AND CONDITIONS FOR COPYING, DISTRIBUTION AND MODIFICATION 0. This License applies to any program or other work which contains a notice placed by the copyright holder saying it may be distributed under the terms of this General Public License.
Appendix F.
Appendix F. GNU General Public License through that system in reliance on consistent application of that system; it is up to the author/donor to decide if he or she is willing to distribute software through any other system and a licensee cannot impose that choice. This section is intended to make thoroughly clear what is believed to be a consequence of the rest of this License. 8.