TELink 700 FLASH INSTALLATION AND OPERATION MANUAL Attention: A telco line surge protector should be used in series with the line connected to this unit. Please leave this manual with the unit after installation Important warranty information enclosed Mitel On Hold 720 Brooker Creek Blvd., Ste. 215 Oldsmar, FL 34677 888.664.3366 Fax: 727.785.7659 http://mitelonhold.com info@onholdbusiness.
FCC Notice WARNING: This equipment has been tested and found to comply with the limits for a Class A digital device pursuant to Part 15 of FCC Rules. These limits are designed to provide reasonable protection against harmful interference when this equipment is operated in a commercial environment. This equipment generates, uses, and can radiate radio frequency energy and, if not installed and used in accordance with the instruction manual, may cause harmful interference to radio communications.
TABLE OF CONTENTS FCC NOTICE ....................................................................................................... 2 LIMITED WARRANTY ......................................................................................... 2 1. SYSTEM DESCRIPTION ............................................................................... 4 2. INSTALLATION .............................................................................................. 5 VOICE LINE AND/OR NIGHT ANSWER INSTALL PROCEDURE ..
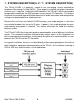
1. SYSTEM DESCRIPTION{tc \l1 "1. SYSTEM DESCRIPTION} The TELink FLASH is a powerful, simple to use messaging system intended for telephone Messaging On Hold (MOH). Once properly installed, no further interaction from the user is required. Unlike other MOH products, the TELink FLASH is designed to be operated remotely by the MOH provider using a central PC Controller.
2. INSTALLATION{tc \l1 "2. INSTALLATION} If other installation instructions were included, those instructions should be followed first. There are three installation procedures available, depending on the phone line used. Keep in mind that whichever installation procedure is used, the TELink must always be connected directly to the telephone company input, ahead of any other devices using that line. If you have any questions or require assistance installing the TELink, please contact Mitel.
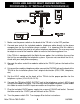
VOICE LINE AND/OR NIGHT ANSWER INSTALL PROCEDURE{tc \l2 "INSTALLATION PROCEDURE A} 1. Make sure the power switch on the back of the TELink is in the OFF position. 2. Connect one end of the included modular telephone cable directly to the phone company box for the installation phone number. It is important that this cable is attached to a direct line, prior to any other telephone equipment. The user may need to adapt one end of the modular cable to mate to the incoming phone line.
DEDICATED LINE INSTALL PROCEDURE{tc \l2 "INSTALLATION PROCEDURE B} 1. Make sure the power switch on the back of the TELink is in the OFF position. 2. Connect one end of the included modular telephone cable directly to the phone company box for the installation phone number. The user may need to adapt one end of the modular cable to mate to the incoming phone line. 3. Connect the other end of the modular cable to the TELCO jack on the back of the TELink. 4.
Mitel TELink 700 FLASH 8 06/2009
FAX SHARE INSTALL PROCEDURE{tc \l2 "INSTALLATION PROCEDURE C} 1. Make sure the power switch on the back of the TELink is in the OFF position. 2. Connect one end of the included modular telephone cable directly to the phone company box for the installation phone number. The TELink must be connected before the fax machine. The user may need to adapt one end of the modular cable to mate to the incoming phone line. 3. Connect the other end of the modular cable to the TELCO jack on the back of the TELink. 4.
9. Turn the power switch ON. Turn to page 9 for further instructions.
FINAL INSTALLATION{tc \l2 "FINAL INSTALLATION} After installation is complete, a download may be required. Check the STATUS light on the front panel (note: on some units this light is labeled ACTIVE): IF IT IS ON (STEADY): An audio file is present in memory and is currently playing. Download is not required. IF IT IS FLASHING SLOWLY: No audio file is present. Contact Mitel. They must call the unit and download audio.
3. OPTIONAL FEATURES{tc \l1 "3. OPTIONAL FEATURES} Your TELink may have optional features which provide additional convenience and functionality. The serial number label on the bottom of the unit indicates which features the unit has. Note that the unit may be equipped with optional features that have not been activated by Mitel. CALL ON SCHEDULE (CS) allows the TELink to be programmed to call the PC Controller at a future date and time to automatically download a new audio program.
Manual - Night Answer can be turned ON or OFF on demand by pressing the NIGHT button on the front panel. If a Night Answer schedule is present, this will preempt it. If you manually turn Night Answer ON or OFF, it will remain in that state until you cancel Manual mode (press the NIGHT button again). Then, Night Answer operation will return to Scheduled (if a schedule is present). IMPORTANT: If Night Answer is turned ON manually, you must remember to turn it OFF when you want calls to ring through normally.
4. TROUBLESHOOTING{tc \l1 "4. TROUBLESHOOTING} Problem / Symptom Possible Solution(s) • Adjust the volume by pressing the UP/DOWN volume switches on the front panel. If the volume level does not change, contact Mitel. Audio output level is too low or too high. TELink does not answer when called by the PC Controller. The telephone line to which the TELink is attached does not work. STATUS (or ACTIVE) light alternates between 1 second flash flash, and 1 second no flash.