
User's Manual

Part 1: Hardware Installation
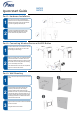
Quick Start Guide
AW525
AW505
Part 2: Connecting Wireless Device with WPS Button
Part 3: Wall Mounting
1
Connect one end of the provided Ethernet
cable to one of the LAN ports of the AW525 or
AW505, and the other end to an Internet shar-
ing router or gateway’s Ethernet port.
2
Connect the provided power adapter to the
AW525 or AW505
and plug it into a power
source and ensure the power LED is on.
1
Press the WPS button on the AW525 or the 5G
WPS button on the AW 505. The Wi-Fi LED
should begin to flash orange.
2
Within 2 minutes, press your preferred wireless
device’s WPS button. The WPS LED on the
AW525 or AW505 should light up green and the
Wi-Fi LED should now be green too, indicating
you’ve successfully connected.
The WPS LED will turn off and can be pressed
again to connect another device.
1
Use a hammer to tap the screw anchors into the
holes.
2
Insert and slowly screw the screws into the
anchors (or the holes if you are not using
anchors). Make sure the screws are snugly
fastened to the wall. They need to hold the weight
of the Device with the connection cables. Do not
screw the screws all the way into the wall. Leave
a small gap of about 0.5 cm between the heads
of the screws and the wall.
3
Align the holes on the back of the Device with the
screws on the wall.
Hang the Device on the screws.
AW525 AW505
M4-L30