QUAD FULL HIGH DEFINITION MONITOR MODEL 56P-QF60LCU USER'S MANUAL Be sure to follow the directions below. Warning: This product requires special installation to prevent falling or toppling. Please ask installation specialists for installation. Don't attempt to install the product by yourself. This user's manual is important to you. Please read it before using your product.
CAUTION RISK OF ELECTRIC SHOCK DO NOT OPEN CAUTION: TO REDUCE THE RISK OF ELECTRIC SHOCK, DO NOT REMOVE COVER (OR BACK) NO USER-SERVICEABLE PARTS INSIDE REFER SERVICING TO QUALIFIED SERVICE PERSONNEL. The lightning flash with arrowhead symbol, within an equilateral triangle, is intended to alert the user to the presence of uninsulated “dangerous voltage” within the product’s enclosure that may be of sufficient magnitude to constitute a risk of electric shock.
Important safeguards Please read all these instructions regarding your monitor and retain them for future reference. Follow all warnings and instructions marked on the monitor. 1. Read instructions All the safety and operating instructions should be read before the appliance is operated. 2. Retain instructions The safety and operating instructions should be retained for future reference. 3. Warnings All warnings on the appliance and in the operating instructions should be adhered to. 4.
WARNING: Unplug immediately if there is something wrong with your product. CAUTION: Battery replacement of the optional remote control • Do not operate if smoke, strange noise or odor comes out of your product. It might cause fire or electric shock. In this case, unplug immediately and contact your dealer. • Never remove the cabinet. • • This product contains high voltage circuitry. An inadvertent contact may result in an electric shock.
COMPLIANCE NOTICE OF FCC This equipment has been tested and found to comply with the limits for a Class A digital device, pursuant to Part 15 of the FCC Rules. These limits are designed to provide reasonable protection against harmful interference when the equipment is operated in a commercial environment. This equipment generates, uses, and can radiate radio frequency energy and, if not installed and used in accordance with the instruction manual, may cause harmful interference to radio communications.
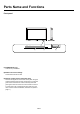
Parts Name and Functions Front panel EXIT MENU (2) (1) (1) POWER button ( ) Switches the power on/off. (2) Buttons for menu settings These buttons cannot be used. (3) Remote control sensor and power lamp Receives the signal from the remote control (when using the optional wireless remote control). During start-up, it will blink green. Glows red when the LCD is in stand-by mode and glows green when the monitor is in active. When the LCD is in power save mode, it will glow both green and red.
Rear panel INPUT1 POWER (1) (2) INPUT2 DVI-D INPUT3 INPUT4 (3) (1) Main Power Switch LAN (4) (5) (4) RS-232C connector On/Off Switch to turn main power on/off. Connect the RS-232C cable with the RS-232C connector of the computer for control the monitor. (2) AC IN connector Connects with the power cord. RS-232C (5) LAN connector Connect the LAN cable with the LAN connector of the computer for control the monitor.
Installation To avoid monitor from falling Warning: Take measures to prevent the monitor from falling over in case of an earthquake or other disaster to lessen the probability of injury and damage resulting from fall. As shown in the figure, secure the monitor to a solid wall or pillar using rope (commercially available) strong enough to bear the weight of the monitor. (Approx. 51 kg) Be sure to follow the directions below. This product requires special installation to prevent falling or toppling.
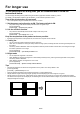
For longer use To use the product for a long time, you are recommended to follow the instructions below. You can change the settings of the product using the accessory application software “QF60LC_Control.” For details of the application software, see the QF60LC_Control software operation manual. Turn off the product when it is not used. • Turn off the product using the POWER button when it is not used. 1. Set the power saving function to ON. The factory default is ON.
This product is designed to be resistant to adverse environmental conditions. However, note the following for longer use. • • • • • • The display quality of the panel (such as brightness, uniformity, and afterimage) degrades, depending largely on the usage and installation condition. Pay attention to the following points and use the product correctly. The guaranteed operating temperature and relative humidity ranges are 5°C to 35°C and 20% to 80%. Be careful not to subject the product to static discharge.
Note the following when using the product continuously for a long time. • • The backlight used in the LCD monitor has a lifetime. The brightness of the backlight decreases with the duration of use. When the same image is kept displayed for a long time, its afterimage may be left on the screen after the displayed image is changed. The afterimage gradually disappears as different images are displayed.
Connections Before making connections: • • First turn off the power of all the attached equipment and make connections. Refer to the user manual included with each separate piece of equipment. DVI-D cable DVI-D Computer 56P-QF60LCU (Rear panel) INPUT1 INPUT2 DVI-D INPUT3 INPUT4 Recommended video signal timing for this product is as follows. Resolution Frequency Horizontal 67.
Basic operation Power ON procedures 1. Turn the Main Power Switch on the rear of the product to ON to turn on the main power. The power lamp blinks green and then illuminates red. (You cannot turn on the power while the lamp is blinking green.) ON OFF Main Power Switch (Rear panel) 2. Press the power ( ) button to turn on the power. The power lamp illuminates green. 3. Turn on the power of the other equipment.
Troubleshooting Consult the following table for troubleshooting a problem. Symptom Cause and remedy Reference page The monitor displays nothing. (The power lamp doesn't Check that the power cord is connected securely. P.9 illuminate.) Using other device, check that the wall outlet is receiving power. Check that the main power switch isn't off. P.7, P.10 The monitor displays nothing. (The power lamp is blinking An error may have occurred. Contact your MITSUBISHI red.) dealer. Blinking red 0.5 sec.
Specifications Model 56P-QF60LCU Surface treatment Glossy Diagonal 56.2” (142.75 cm) Viewable size 1244.16 × 699.84 mm Resolution 3840 × 2160 Pixel pitch 0.108(H) × 0.324(V) Color 16,770,000 View angle (Typ.) *1 88° (Horizontal), 88° (Vertical) Brightness (Typ.) 500 cd/m2 Contrast ratio (Typ.) 1200 : 1 (1000 : 1 using at surface up) Response speed (Typ.) GTG 6.5 ms *2 PC input Input resolution 1920 × 1080 Horizontal frequency 67.
Pin Assignment 1) INPUT 1 - 4 PIN No. 1 2 3 4 5 6 7 8 9 10 11 12 Name TX 2TX 2+ Shield (TX2/TX4) NC NC DDC-Serial Clock DDC-Serial Data NC TX 1TX 1+ Shield (TX1/TX3) NC PIN No.
MITSUBISHI ELECTRIC CORPORATION 1 Zusho Baba, Nagaokakyo-City, Kyoto Japan 871D502A30 Printed in Japan