
Instruction manual


51
ENGLISH
••••••••••••••••••••••••••••••••••••••••••••••••••••••••••••••••••••••••••••••••••••••••••••••••••••••••••••••••••••••••••••
Operations
INFORMATION
For the relationship of the warning display and CALL
OUT signal output, see pages 87,88. Although the
warning will be displayed regardless if the output item
for the CALL OUT signal is set to “Fixed”, the condition
to output CALL OUT signals can be added when the
output is set to “Selectable”. For example, the buzzer
can be set to sound when reaching a value set in “HDD
MAIN REMAIN” or “HDD SUB REMAIN” of the <CALL
OUT SETTINGS> screen if “BUZZER” in the <REAR
TERMINAL SETTINGS> screen is set to “WARNING”.
• HDD MAIN FULL/HDD SUB FULL
When the HDD is full, the CALL OUT terminal outputs a CALL
OUT signal.
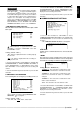
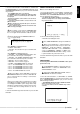
<CALL OUT SETTINGS>
HDD MAIN REMAIN OFF
>>
HDD MAIN FULL OFF
HDD SUB REMAIN OFF
HDD SUB FULL OFF
“HDD SUB FULL” is appeared when the “HDD
SETTING” is selected on “PARTITION” of the <INI-
TIALIZATION> screen.
Setting ( default : “OFF” )
“ON” : Signal is outputted when the recording capacity
becomes full.
“OFF” : No signal is outputted when the recording ca-
pacity becomes full.
1. Press the SET UP button
}
<SETTINGS>
}
<INITIAL SET
UP/INFORMATION>
}
<REAR TERMINAL SETTINGS>
}
Select “HDD MAIN FULL” or “HDD SUB FULL” in the <CALL
OUT SETTINGS> screen. Display the desired setting and
confirm.
2. Turn the SHUTTLE ring counterclockwise or press the SET
UP button.
♦ EMERGENCY REC DURATION
The recording time for emergency recording can be set.
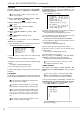
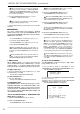
<REAR TERMINAL SETTINGS>
MODE OUT 1 OFF
MODE OUT 2 OFF
MODE OUT 3 OFF
MODE OUT 4 OFF
MODE OUT 5 OFF
KEY SOUND ON
BUZZER OFF
REMAIN HDD MAIN-10
%
CALL OUT SETTINGS
>>
EMERGENCY REC DURATION 10M
For details concerning setting EMERGENCY RE-
CORDINGS,
see page 64.
Setting ( default : “10M” )
“1M”, “2M”, “5M”, “10M”, “20M”, “30M”, “60M”
1. Press the SET UP button
}
<SETTINGS>
}
<INITIAL SET
UP/INFORMATION>
}
Select “EMERGENCY REC
DURATION” in the <REAR TERMINAL SETTINGS> screen.
Display the desired setting and confirm.
2. Turn the SHUTTLE ring counterclockwise or press the SET
UP button.
■ COMMUNICATION PORT SETTINGS
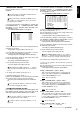
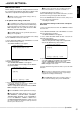
<INITIAL SET UP/INFORMATION>
HDD SETTINGS
AUDIO RECORDING OFF
REAR TERMINAL SETTINGS
>>
COMMUNICATION PORT SETTINGS
INFORMATION/SERVICE
PASSWORD
LANGUAGE SELECTION
1. Press the SET UP button
}
<SETTINGS>
}
Select
“COMMUNICATION PORT SETTINGS” in the <INITIAL SET
UP/INFORMATION> screen and turn the SHUTTLE ring
clockwise.
• The <COMMUNICATION PORT SETTINGS> screen appears.
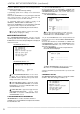
<COMMUNICATION PORT SETTINGS>
>>
RS-232C
ETHERNET
♦ RS-232C
Settings for the communication device connected to this
unit is set.
• MODE
This unit can be remote controlled from a PC connected
to the RS-232C terminal. Comments can also be inputted
from a PC for recording of comments along with the video.
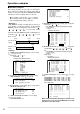
<RS-232C>
>>
MODE REMOTE A
SETTINGS
Setting ( default : “REMOTE A” )
“REMOTE A” : This unit can be controlled from a PC
and every status information is returned from the unit.
“REMOTE B” : This unit can be controlled from a PC
and from the unit when the status for command is
changed.
“REMOTE C” : This unit can be controlled from a PC
with no status information.
“OFF” : This unit cannot be controlled from a PC.
1. Press the SET UP button
}
<SETTINGS>
}
<INITIAL SET
UP/INFORMATION>
}
<COMMUNICATION PORT
SETTINGS>
}
Select “MODE” in the <RS-232C> screen.
Display the desired setting and confirm.
2. Turn the SHUTTLE ring counterclockwise or press the SET
UP button.